A practical guide on using the Decision Center archive repository tool
By performance architect Nicolas Peulvast
What does the archive repository tool do?
The goal of the archive tool is to reduce the size of the in-use schema by removing the records that are inactive. A smaller schema can improve the overall performance of Decision Center.
Active database records are in use by the current rule projects. Inactive records are no longer in use, but are made use of when you run a query. A schema is a set of objects associated with a user.
Before you begin
The first thing to do is to backup the current database before you start.
Step 1: Create a new schema in your database
Run the SQL commands to create the new schema in your database.
Example in Oracle
create user C##ODMLIGHT identified by C##ODMLIGHTPWD default tablespace MYTS quota unlimited on MYTS ;
grant connect, resource, create view to C##ODMLIGHT ;
Where C##ODMLIGHT is the name of the user. Note that in Oracle, users and schemas are essentially the same thing. A user is the account you use to connect to a database, and a schema is the set of objects (tables, views, etc.) that belong to that account.
At the end of all the steps, you’ll use this new schema in the main Decision Center repository.
Step 2: Change your datasource target schema to point to the new schema
- Configure your application server datasource to use the new schema.
- Restart your application server.
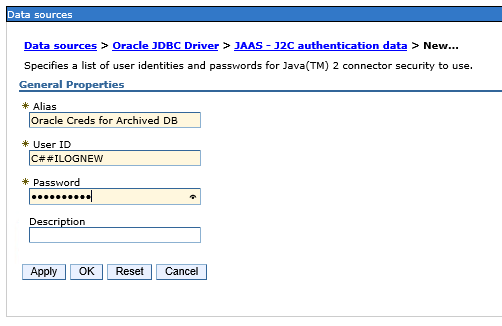
Example in Websphere
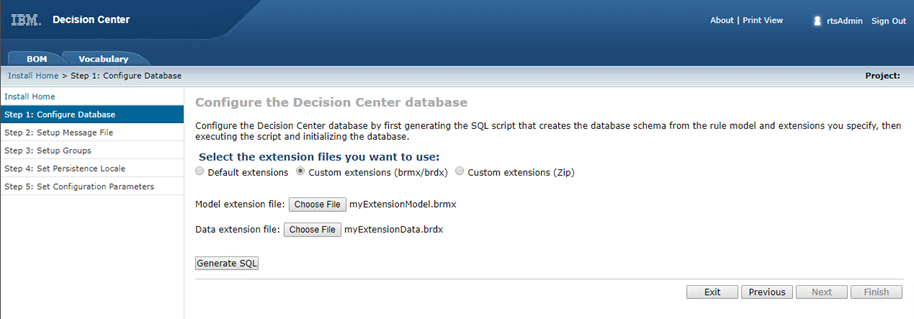
Step 3: Create your database tables using the Decision Center wizard
Make sure you use your own Model and Data extension files.
If you have extension files, you can consult the most up-to-date version in the database by running the following commands:
select CONTENT from ODMFULL.RTSRESOURCE where NAME = 'teamserver.extensionModel' ;
select CONTENT from ODMFULL.RTSRESOURCE where NAME = 'teamserver.extensionData' ;
Where ODMFULL is the name of the old schema.
Step 4: Generate an SQL script to grant the required privileges to copy data from the old schema
- Open a command window from the following folder:
<ODM_InstallDir>/teamserver/bin - Run the following ANT task to authorize the new user to access the old schema.
ant gen-archive-repository-role -Dserver.url=http://localhost:9080/teamserver -DdatasourceName=jdbc/ilogDataSource -DoldDatabaseSchemaName=ODMFULL -Dusername=rtsAdmin -Dpassword=rtsAdmin -DoutputFile=gen-archive-repository-role.sql >> gen-archive-repository-role.log
Step 5: Grant user access to the database
- From a SQL command line or using a SQL Client tool, run the SQL file to grant access for the new user.
cd C:\oracle12c\product\12.1.0\dbhome_1\BIN
sqlplus sysadmin/sysadminpwd@MYDB @gen-archive-repository-role > gen-archive-repository-role.log
Ignore any errors related to a non-existing table. - Restart your application server to load the new authorization in the datasource connection.
Step 6: Generate an SQL script to copy the active records of the old schema
Run the following ANT task to generate a script that populates the new schema tables with the active records in the old schema. To log more information, set the following environment variables to “on”. The example uses Oracle:
set echo on;
set timing on;
Example using a date
ant gen-archive-repository-script -Dserver.url=http://localhost:9080/teamserver -DdatasourceName=jdbc/ilogDataSource -DoldDatabaseSchemaName=ODMFULL -Dusername=rtsAdmin -Dpassword=rtsAdmin -DarchiveDate=2017-01-01 -DoutputFile=gen-archive-repository-script.sql >> gen-archive-repository-script.log
Example using surfaceMode
By default, active records are referenced by a baseline, for example a deployment baseline. This is called surfaceMode.
ant gen-archive-repository-script -Dserver.url=http://localhost:9080/teamserver -DdatasourceName=jdbc/ilogDataSource -DoldDatabaseSchemaName=ODMFULL -Dusername=rtsAdmin -Dpassword=rtsAdmin -DoutputFile=gen-archive-repository-script.sql >> gen-archive-repository-script.log
The old schema data is renamed to indicate that the data is archived.
Step 7: Run the SQL script to populate the new schema table with the active records
From a SQL command line or using a SQL Client tool, run the generated SQL file to copy the data to the new schema.
cd C:\oracle12c\product\12.1.0\dbhome_1\BIN
sqlplus C##ODMLIGHT/C##ODMLIGHTPWD@MYDB @gen-archive-repository-script > gen-archive-repository-script.sql.log
The script ordinarily executes without errors.
The database is now stored in your new schema and the old schema still contains all of the inactive data.
You can now gather some statistics about the new light schema by running a command on the database.
Example in Oracle
EXECUTE DBMS_STATS.GATHER_SCHEMA_STATS('C##ODMLIGHT') ;
Step 8: Migrate all of your custom data in the old schema to the new schema
- Complete the migration of any custom data in the old schema to the new schema.
- Backup the old schema.
- Remove the old schema to free up some space.
Leave a Reply