Decision service lifecycle on IBM Cloud Private
By ODM technical leads: Rachel Orti and Laurent Grateau
Introduction
When you work on an ODM project, it is more than likely that you’ll need a number of different ODM instances to support the promotion of a decision service all the way into production. The need for a well-defined workflow is important if you plan to split up the work into small manageable activities and you want to secure these environments from users who have no need to access them.
ODM on IBM Cloud Private does not have customized environments out-of-the-box. However, you can use the ibm-odm-prod Helm chart to create the different environments that you need. ODM instances can be configured to grant user access to the ODM components, and if you enable Decision Governance you can define what each user can do, and where they can do it.
In most companies the ODM application lifecycle starts with rule development in Rule Designer and Decision Center. The application is then moved to one or more test and validation environments, and ends with deployment of the decision service to a production environment. For many decision services, this requires one instance of Decision Center and at least two (test and production) instances of Decision Server. Decision Server that is configured for testing can start small, whereas an instance that is configured for performance testing is probably much bigger (scaled); in many cases a duplication of the production instance.
To demonstrate the need for different environments, consider a car rental business that uses ODM to automate its decision making. The car rental company wants to use ODM to make rental decisions based on established policies and pricing. Several people who work at the car rental company collaborate to design rules, create, and test a decision service. The company has its development processes well-defined, which involves multiple environments (development, test, QA, UAT (User Acceptance testing), and OAT (Operational Acceptance Testing) before going to production.
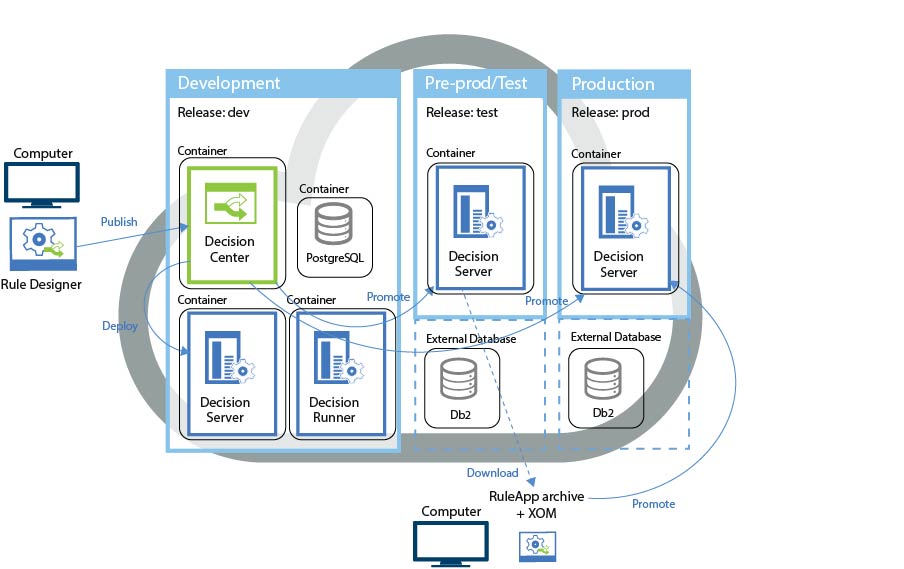
The following diagram shows the minimal number of ODM instances in order to separate activities. A decision service is first published from Rule Designer to an ODM development instance, then promoted to an ODM test instance before it is promoted to an ODM production instance.
Developers of the ODM application can install a “development instance” for their own use and tests, but generally an IT department decides to set up the entire infrastructure for the lifecycle at the start of the project, as they have to take care of other team requirements and they are not focused only on the ODM project and the business users working on it. Each team has its own schedule and constraints, so the planning of the different teams is separated to avoid delays.
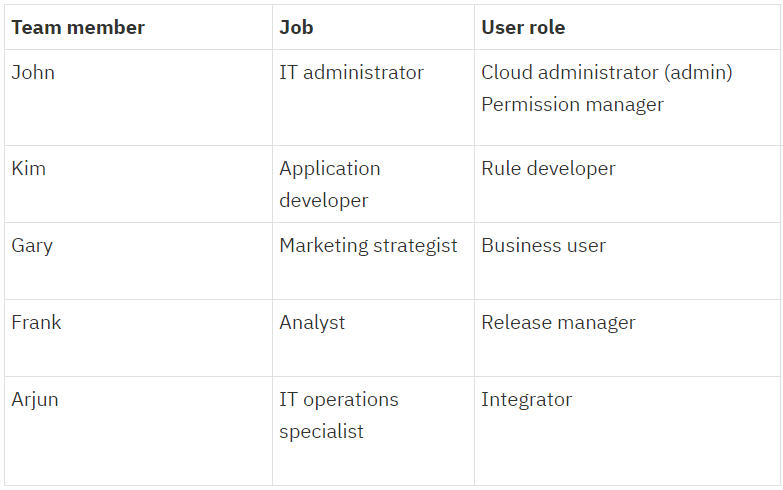
John is the IT administrator at the car rental company and he is responsible for administering user accounts for projects using ODM. He might not use the ODM components himself, but he must assign appropriate user groups for everyone working on the project.
For the car rental company, the essential users and assignments for the ODM application is described in the following table.
Part 1: Work assigned to the IT team
The following steps describe how to set up the 3 ODM instances for the company’s delivery team. The steps are done as soon as the delivery team is ready to start working on the project.
- IT team step 1: Configure and install an ODM development and authoring instance
- IT team step 2: Configure and install an ODM pre-prod/test instance
- IT team step 3: Configure and install an ODM production instance
For the car rental company, the IT team decides to set up Ingress for all of the ODM instances to give the delivery team a clear sense of staging in the exposed endpoints. Ingress provides a way to route requests to services based on the request host or path. IBM Cloud Private includes a Nginx ingress controller to forward outside traffic into a single entry point that acts as a reverse proxy for the in-cluster services. Ingress gives services externally reachable URLs, load balancing, name-based virtual hosting, and more.
The following diagram shows an example of how Ingress can be used to direct traffic to 3 different ODM instances. In this simplified use case, one TLS/SSL certificate is used for both the development/authoring and pre-prod/testing instances. This certificate contains a domain identity (CN) of *.carrental.com (a wildcard prefixed to a base domain), which permits access to all of the hosts that end with the base domain. The production instance can either use the same certificate as the other instances, in which case deployment can occur between all of the instances or for security reasons it can specify its own TLS certificate. In this example, the production instance uses a different certificate and specifies a domain identity (CN) of prodcarrental.com. The production certificate is often supplied by a trusted/root certificate authority.

IT team step 1: Configure and install an ODM development and authoring instance
- John creates a security certificate to be used by Ingress and enable Transport Layer Security (TLS).
- He uses openssl to generate a self-signed certificate (.crt file) and a private key (.key file) that accept the domain name
*.carrental.com. The expiration is set to 1000 days:
openssl req -x509 -nodes -days 1000 -newkey rsa:2048 -keyout carrental.key -out carrental.crt -subj "/CN=*.carrental.com/OU=it/O=carrental/L=Paris/C=FR"
As Java does not support the format of the .crt and .key files, John must convert them to the JKS format. - He runs the openssl and keytool commands to convert the files to the P12 format and then the JKS format. He enters the password “changeme” for the P12 and JKS files.
openssl pkcs12 -export -in carrental.crt -inkey carrental.key -out carrental.p12
keytool -importkeystore -srckeystore carrental.p12 -srcstoretype PKCS12 -destkeystore carrental.jks -deststoretype JKS
John stores the carrental.jks file for Kim (and other developers) who install Rule Designer and want to interact with this environment. - He creates a Kubernetes secret for the Ingress front end.
kubectl create secret tls carrental-ingress-tls --key carrental.key --cert carrental.crt - He creates another secret for the ODM development instance from the JKS files by using the kubectl command line.
kubectl create secret generic mysecurity-java-secret --from-literal=keystore_password=changeme --from-file=keystore.jks=carrental.jks --from-literal=truststore_password=changeme --from-file=truststore.jks=carrental.jks
- He uses openssl to generate a self-signed certificate (.crt file) and a private key (.key file) that accept the domain name
- John creates a user access security file (
webSecurityDev.xml) for the development instance. John is assigned the super user, Kim and Frank are given deployment and monitoring rights, Kim is given execution rights, Frank also needs administration rights in Decision Center, and Gary is a regular business user. An LDAP registry is also defined to enable quick access for other users in the company.<server> <!-- Define the basic registry --> <basicRegistry id="basic" realm="customRealm"> <!-- Define users --> <!-- ODM super user --> <user name="john" password="john"/> <!-- Users of ODM --> <user name="frank" password="frank"/> <user name="kim" password="kim"/> <!-- Users of Decision Center only --> <user name="gary" password="gary"/> <!-- Assign users to groups --> <group name="rtsAdministrators"> <member name="john"/> <member name="frank"/> </group> <group name="resAdministrators"> <member name="john"/> </group> <group name="resDeployers"> <member name="kim" /> <member name="frank"/> </group> <group name="resExecutors"> <member name="kim" /> </group> </basicRegistry> <!-- Define the LDAP registry --> <ldapRegistry id="ldap" realm="OpenLdapRealm" host="host_name" port="389" ldapType="Custom" ignoreCase="true" recursiveSearch="true" baseDN="dc=example,dc=org" bindDN="cn=admin,dc=example,dc=org" bindPassword="admin"> <customFilters userFilter="(uid=%v)" groupFilter="(cn=%v)" userIdMap="*:uid" groupIdMap="*:cn" groupMemberIdMap="groupOfNames:member"> </customFilters> </ldapRegistry> </server> - John creates another secret from this file (
mydev-auth-secret).
kubectl create secret generic mydev-auth-secret --from-file=webSecurity.xml=webSecurityDev.xml - John then installs an ODM instance (release name “dev”) with these secrets by using the customization.securitySecretRef (
mysecurity-java-secret) and customization.authSecretRef (mydev-auth-secret) parameters. Defaults for the other parameters are probably good enough for internal development.
The default parameters install all of the ODM components, each component is deployed in a given pod in a separate docker container. - John logs in to the Decision Center to configure the users and groups.

- As the permission manager, he enables security and manually creates the groups and users from the basic registry. He assigns Frank, Gary, and Kim to the correct user groups and ensures they have the correct rights when they access the release and activities in the decision service.

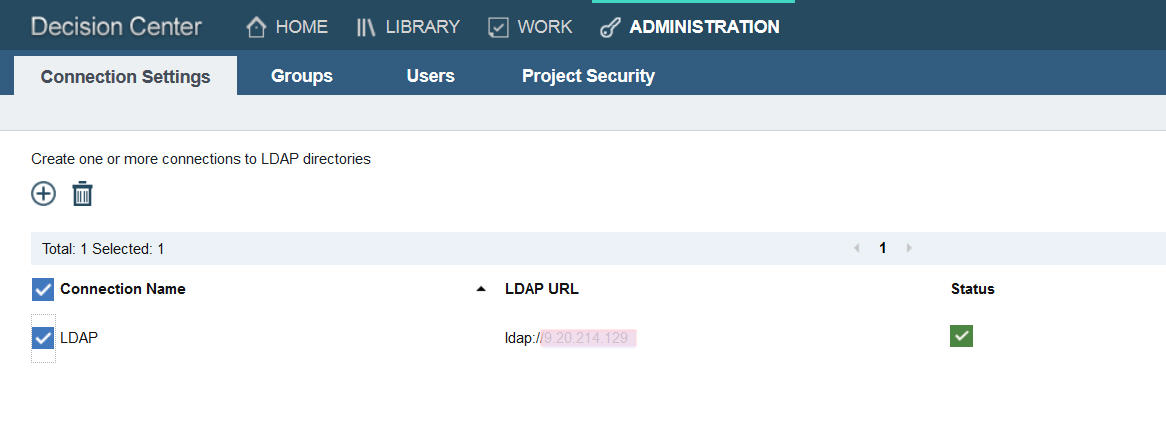
For more information on all of the things you can do with project security, see Rob Peeren’s demo on YouTube. - He also makes a connection to the LDAP registry to make sure they can add other users quickly if needs be.
- As the permission manager, he enables security and manually creates the groups and users from the basic registry. He assigns Frank, Gary, and Kim to the correct user groups and ensures they have the correct rights when they access the release and activities in the decision service.
- John finally puts in place Ingress for the development instance.
- He creates a file named
ingress-httpsbackend-odmdev.yaml, and defines an Ingress resource to map the paths to the exposed services. The host in the Ingress descriptor must match the custom domain name specified in the SSL certificate.apiVersion: extensions/v1beta1 kind: Ingress metadata: annotations: ingress.kubernetes.io/secure-backends: "true" name: odm-securedbackend-devenv spec: tls: - hosts: - dev.carrental.com # This assumes tls-secret exists and the SSL # certificate contains a CN for *.carrental.com secretName: carrental-ingress-tls rules: - host: dev.carrental.com http: paths: - path: /DecisionRunner backend: # This assumes dev-odm-decisionrunner exists and routes to healthy endpoints serviceName: dev-odm-decisionrunner servicePort: 9443 - path: /res backend: # This assumes dev-odm-decisionserverconsole exists and routes to healthy endpoints serviceName: dev-odm-decisionserverconsole servicePort: 9443 - path: /DecisionService backend: # This assumes dev-odm-decisionserverruntime exists and routes to healthy endpoints serviceName: dev-odm-decisionserverruntime servicePort: 9443 - path: /decisioncenter backend: # This assumes dev-odm-decisioncenter exists and routes to healthy endpoints serviceName: dev-odm-decisioncenter servicePort: 9453 - path: /teamserver backend: # This assumes dev-odm-decisioncenter exists and routes to healthy endpoints serviceName: dev-odm-decisioncenter servicePort: 9453 - path: /decisioncenter-api backend: # This assumes dev-odm-decisioncenter exists and routes to healthy endpoints serviceName: dev-odm-decisioncenter servicePort: 9453 - He then creates the Ingress from this file:
kubectl create -f ingress-httpsbackend-odmdev.yaml - He declares the domain name dev.carrental.com (referenced in the Ingress descriptor) in the DNS (Domain Name Servers) infrastructure.
When this is done, the Ingress is in place and the ODM components are accessible at the following URLs:
For the Decision Server console: https://dev.carrental.com/res
For the Decision Center Business Console: https://dev.carrental.com/decisioncenter
For the Decision Center Enterprise Console: https://dev.carrental.com/teamserver
For the Decision Center REST API: https://dev.carrental.com/decisioncenter-api
For the Decision Server Runtime: https://dev.carrental.com/DecisionService
For the Decision Runner: https://dev.carrental.com/DecisionRunner
The Ingress controller receives the incoming requests. If there is an existing Ingress with a rule matching an incoming request, this request is routed to the associated backend. If a request arrives at a path that has no rules, it gets routed to a default backend that serves a 404 page.
- He creates a file named
- John asks Frank to open the Decision Center Enterprise console and add the “dev” Decision Server and Decision Runner servers to the list of managed servers. Frank needs to select the groups that enable him (rtsAdministrators) and Kim (rtsUsers) to deploy to the servers. He names the servers to identify them as pointing to the “dev” servers, and enters frank/frank for the Username/Password. The user must be in the basic registry with a Decision Server role that has decision service deployment rights (minimum resDeployers).
Note: By default only users with the rtsAdministrator and rtsConfigManager roles can use a deployment configuration to deploy a decision service. Frank must add the rtsUsers group on the deployment configurations if he wants users of the rtsUsers group to see the deployment configurations.
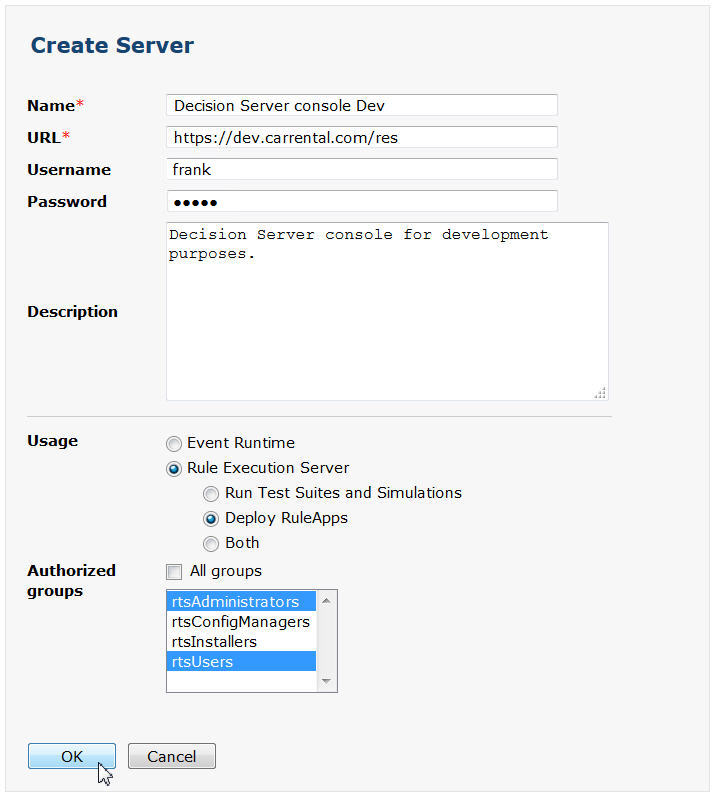
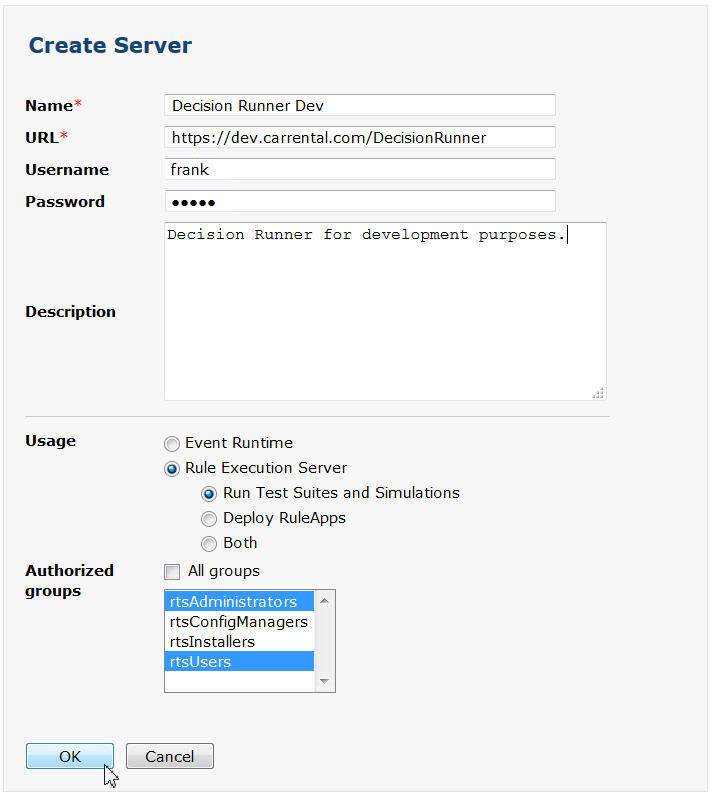
Note: Decision Server and Decision Runner servers are created by default with the internal names and ports. To make things clearer, you might want to remove these servers.
IT team step 2: Configure and install an ODM pre-prod/test instance
In this example, the car rental company uses a single pre-prod/test instance. One execution instance is really an absolute minimum, so the following steps can be repeated for each new test/QA/execution environment you need.
- John uses the same security secret (
mysecurity-java-secret) used in the development instance for the test instance. - John creates the security file (
webSecurityTest.xml) for the ODM test instance.
For the test instance, John is given administrator rights, Frank and Kim are given rights to monitor and deploy, and Arjun is given deployment and execution rights.<server> <!-- Define the basic registry --> <basicRegistry id="basic" realm="customRealm"> <!-- Define users --> <!-- ODM super user --> <user name="john" password="john"/> <!-- Users of ODM --> <user name="frank" password="frank"/> <user name="kim" password="kim"/> <user name="arjun" password="arjun"/> <!-- Assign users to groups --> <group name="resAdministrators"> <member name="john"/> </group> <group name="resDeployers"> <member name="frank"/> <member name="kim"/> <member name="arjun" /> </group> <group name="resExecutors"> <member name="arjun" /> </group> </basicRegistry> </server> - John creates a secret (
mytest-auth-secret) from this file. - John installs a new ODM instance (release name “test”) with these secrets by using the customization.securitySecretRef (
mysecurity-java-secret) and customization.authSecretRef (mytest-auth-secret) parameters. In this test instance, John does not enable Decision Center or Decision Runner, because the team plans to use only the development instance for these activities.
He changes the other parameters to best reflect what the production instance needs. The pre-prod/test instance needs to be as close to the production instance as possible, so an external database is set up prior to the configuration of the ODM instance and enabled in the Helm release using theexternalDatabaseparameters. - John copies the
ingress-httpsbackend-odmdev.yamlfile toingress-httpsbackend-odmtest.yaml, replaces “dev” with “test” in the file and removes the paths for DecisionRunner/decisioncenter/decisioncenter-api/teamserver.apiVersion: extensions/v1beta1 kind: Ingress metadata: annotations: ingress.kubernetes.io/secure-backends: "true" name: odm-securedbackend-testenv spec: tls: - hosts: - test.carrental.com # This assumes tls-secret exists and the SSL # certificate contains a CN for *.carrental.com secretName: carrental-ingress-tls rules: - host: test.carrental.com http: paths: - path: /res backend: # This assumes test-odm-decisionserverconsole exists and routes to healthy endpoints serviceName: test-odm-decisionserverconsole servicePort: 9443 - path: /DecisionService backend: # This assumes test-odm-decisionserverruntime exists and routes to healthy endpoints serviceName: test-odm-decisionserverruntime servicePort: 9443 - John then creates the Ingress from this file.
kubectl create -f ingress-httpsbackend-odmtest.yaml - John declares the domain name test.carrental.com (referenced in the Ingress descriptor) in the DNS infrastructure.
When this is done, the Ingress is in place and the ODM components are accessible at the following URLs:
For the Decision Server console: https://test.carrental.com/res
For the Decision Server Runtime: https://test.carrental.com/DecisionService - John asks Frank again to open the Decision Center Enterprise console on the “dev” instance and add Decision Server to the list of managed servers. John needs to select the group that enables only him (rtsAdministrators) to deploy to the server. He names the server to clearly identify it as the “test” server, and enters frank/frank for the Username/Password.

IT team step 3: Configure and install the ODM production instance
In some companies, the development and pre-prod/test instances (where changes are made) are physically separated from the production instance (which end users use). The staged deployment process allows delivery teams to rollout their changes, test them, and roll them back in case of problems. Separating development and production physically is a good way to ensure that a problem in one does not interfere with the other.
- John installs the ODM for production Helm chart on a different IBM Cloud Private master node to that used by the development and pre-prod/test instances.
- John converts the dedicated certificate files (prodcarrental.crt and prodcarrental.key) to the P12 format, and then to the JKS format.
openssl pkcs12 -export -in prodcarrental.crt -inkey prodcarrental.key -out prodcarrental.p12
keytool -importkeystore -srckeystore prodcarrental.p12 -srcstoretype PKCS12 -destkeystore prodcarrental.jks -deststoretype JKS
Note: To submit a Certificate Signing Request, John needs a.csrfile. For more information, see generation and activation. - He creates a Kubernetes secret for the Ingress front end from the certificate.
kubectl create secret tls prodcarrental-ingress-tls --key prodcarrental.key --cert prodcarrental.crt - He creates another secret for the ODM production instance from the JKS files by using the kubectl command line.
kubectl create secret generic prod-security-java-secret --from-literal=keystore_password=changeme --from-file=keystore.jks=prodcarrental.jks --from-literal=truststore_password=changeme --from-file=truststore.jks=prodcarrental.jks - John creates the security file to give Frank access (
webSecurityProd.xml) to the ODM production instance.<server> <!-- Define the basic registry --> <basicRegistry id="basic" realm="customRealm"> <!-- Define users --> <!-- ODM super user --> <user name="john" password="john"/> <!-- Users of ODM --> <user name="frank" password="frank"/> <!-- Assign users to groups --> <group name="resAdministrators"> <member name="john"/> </group> <group name="resDeployers"> <member name="frank"/> </group> </basicRegistry> </server> - John creates another secret (
prod-auth-secret) from this file. - John installs the ODM production instance with these secrets by using the customization.securitySecretRef (
prod-security-java-secret) and customization.authSecretRef (prod-auth-secret) parameters. He changes the defaults for the other parameters to best reflect what the production instance needs.
An external database is used and Decision Server Runtime and Decision Server Console are the only ODM components to be installed. - John copies the
ingress-httpsbackend-odmtest.yamlfile toingress-httpsbackend-odmprod.yaml, replaces “test” with “prod” in the new file.apiVersion: extensions/v1beta1 kind: Ingress metadata: annotations: ingress.kubernetes.io/secure-backends: "true" name: odm-securedbackend-prodenv spec: tls: - hosts: - prodcarrental.com # This assumes tls-secret exists and the SSL # certificate contains a CN for prodcarrental.com secretName: prodcarrental-ingress-tls rules: - host: prodcarrental.com http: paths: - path: /res backend: # This assumes prod-odm-decisionserverconsole exists and routes to healthy endpoints serviceName: prod-odm-decisionserverconsole servicePort: 9443 - path: /DecisionService backend: # This assumes prod-odm-decisionserverruntime exists and routes to healthy endpoints serviceName: prod-odm-decisionserverruntime servicePort: 9443 - John then creates the Ingress from this file.
kubectl create -f ingress-httpsbackend-odmprod.yaml
Part 2: Work assigned to the delivery team
The following steps describe what activities are done in each instance before the decision service is promoted to the next stage in each release cycle. The steps are repeated for each new release.
- Delivery team step 1: Develop decision services collaboratively
- Delivery team step 2: Validate the decision service in the ODM pre-prod/test instance
- Delivery team step 3: Promote the decision service to production
Delivery team step 1: Develop decision services collaboratively
Kim is a rule developer. Kim uses Rule Designer to author and edit rules, deploy the decision service to a development instance, and publish the decision service to Decision Center.
- Kim installs Rule Designer from the Eclipse Marketplace on her laptop. She is competent in Java and understands the company object model. Kim works with the car rental company Software architects to develop the first version of the decision service, which means that she defines the vocabulary and writes the business rules that model the car rental business logic. She uses Rule Designer to connect to the ODM development instance.

- She develops the decision service in Rule Designer.

- Kim then publishes it to Decision Center with the Decision Governance Framework enabled.
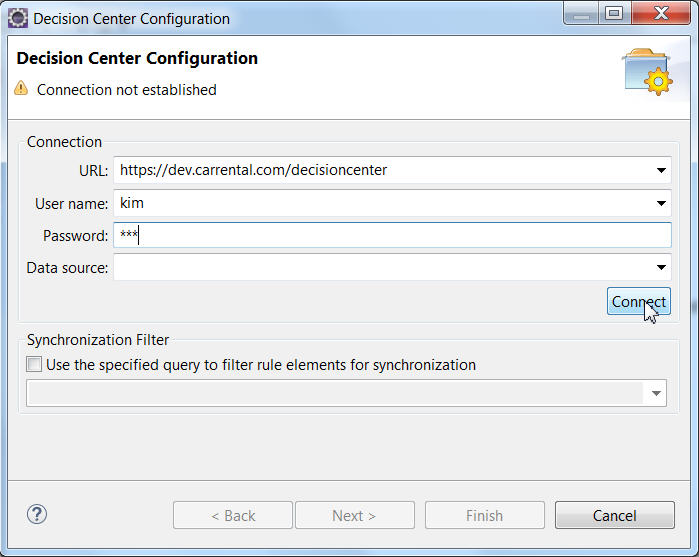
Note: For Rule Designer to connect to Decision Center, Kim needs to specify the security certificate or JKS file created by John in Part 1. For more information, see Importing a security certificate in Rule Designer. She can take the files John created with the Java keytool or run the commands herself on the JDK that is used for Rule Designer. She can then use the Ingress host address of https://dev.carrental.com/decisioncenter.

- Kim logs in to Decision Center to check everything is deployed. When the initial version of a decision service is published from Rule Designer, both a main branch and an Initial Release branch are created.
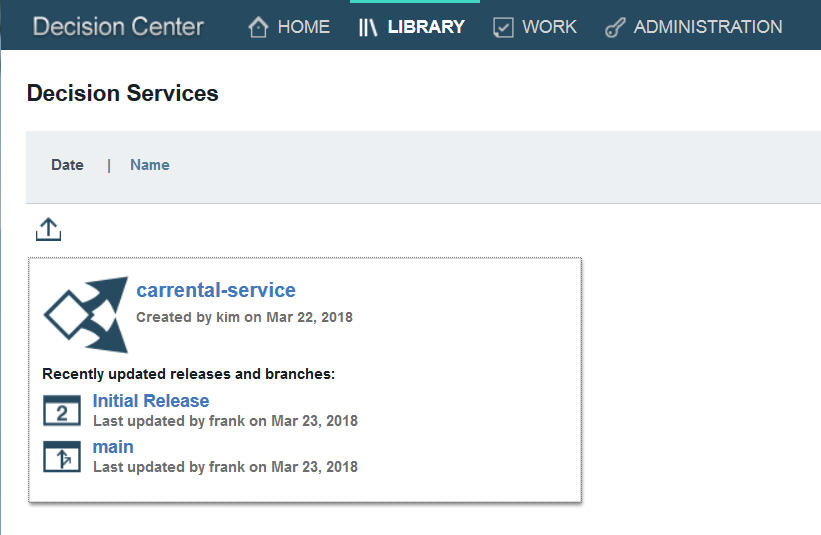
The main branch is available to work in a decision service without the governance framework. The Initial Release branch is published as the closed initial release of the decision service. - Kim views the artifacts to make sure everything is as it should be.

- As the release manager, Frank has an important role in the team. Frank creates a new release based on the Initial Release.

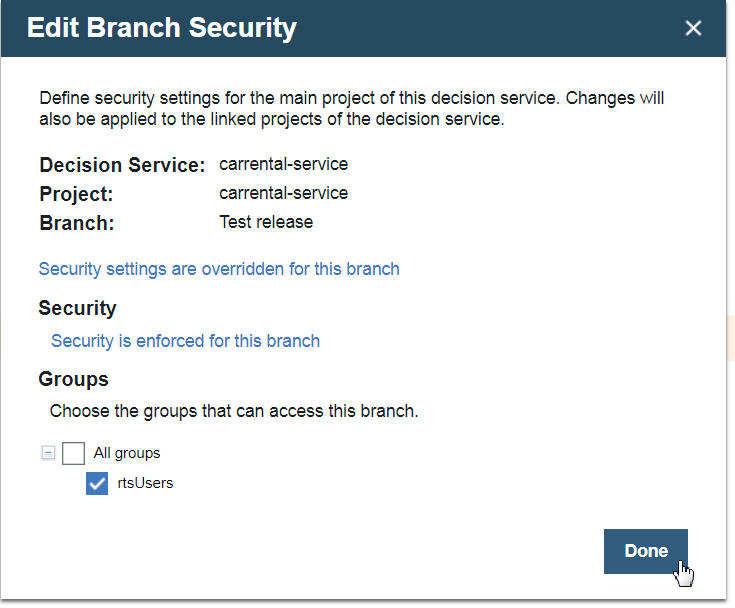
- Frank sets up change and validation activities in the Business console. As the release manager, Frank selects the groups so that Kim and Gary can access the carrental-service in the decision governance framework. When security is enforced he can restrict access to some projects in the branch for specific groups of users. The following dialog gives access to the
rtsUsersgroup in the branch named “Test release”.
In a change activity, participants create, modify, or delete rules and get these changes approved. When all the change activities that are related to the release are done, the release is validated, and then completed. Validation activities are used to track and manage a validation of the content of the release. Activities can be manual tests that are entered in a test plan, automatic tests through test suites, or simulations. For a Walkthrough on governance by Rob Peeren, open this link to YouTube. - Gary is the business user on the team and he works with Frank in Decision Center to revise the decision service. Since he works in the Marketing and Analytics department, he wants to review the pricing policies as expressed in the rules. Gary views and edits the rules in the Business console. Gary’s work is tracked as a change activity that records the modifications that he makes to the rules.
The following diagram shows that business users in this instance can deploy their updates to Rule Execution Server and make as many tests as they want at this stage.

- When Kim or any other user deploys the decision service to Decision Server in the ODM development instance the RuleApp version is incremented in the console.
- Kim can use the Decision Server console in this instance to do some initial tests by executing the decision service over REST.
Delivery team step 2: Validate the decision service in the ODM pre-prod/test instance
Frank, as the release manager, initiates the next step in the workflow by deploying the most recent decision service release to the test instance. Kim works closely with Arjun, the integrator, to test and validate that the decision service is running as expected.
- Frank creates a change activity to add a new deployment configuration.
- Frank deploys the decision service to the test instance (https://test.carrental.com/res) for validation.
- Arjun and Kim work together at the start of the project to understand how Arjun can monitor and evaluate the decision making of the service when it is called from a client application. To run the tests, he adds some code to a car rental web application so that it calls the new pricing decision service. The car rental web application runs on the company application server, and it calls the decision service that runs in the Decision Server test instance.

- When the decision service is close to complete (its first release), Frank asks the tooling and QA teams to validate the execution. Frank wants to evaluate the performance of the decision service in the test instance before he puts it into production. He asks for some benchmarks that use standard development validation procedures.
Delivery team step 3: Promote the decision service to production
Frank, as the release manager, takes the final step in the workflow when the decision service is complete and Frank is satisfied with the benchmark results in the test instance.
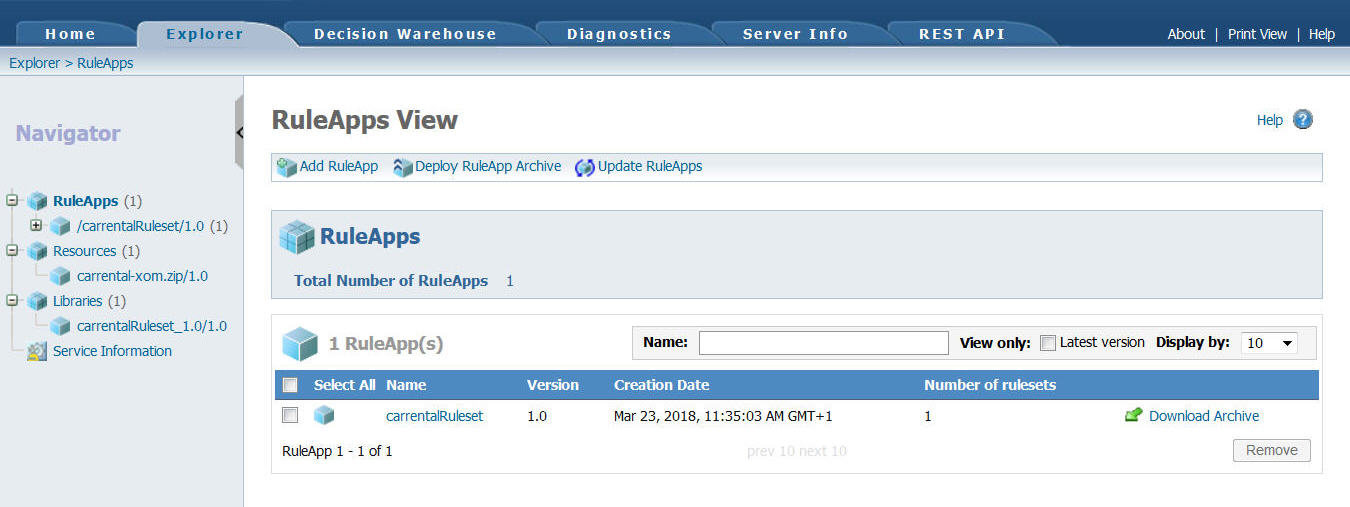
- Frank downloads the version of the decision service that was tested in the pre-prod/test instance from the Decision Server console in the ODM “test” instance. He then deploys the RuleApp archive (and its XOM) to Decision Server hosted on the production instance.
Frank is in the only user group (rtsAdministrators) that has access rights to deploy a decision service into production. - Customers of the car rental company use the car rental web application, and the car rental application runs the updated pricing decision service.
The following diagram shows that the release manager (Frank) promotes the decision service from the ODM test instance to the ODM production instance that customers access through the web application.

- Gary tells his marketing department colleagues that a promotional pricing campaign is possible next week because he can quickly revise the pricing rules and create a new release of the decision service by using ODM on IBM Cloud Private.
Leave a Reply