Hiring tutorial: Create the coach view for the position request data
Hiring tutorial > Create the user interface >
In this lesson, you create the coach view that displays the position request data, such as the hiring manager, the department, and the starting date.
About this task
This lesson uses the following concepts:
| Concept | Description |
|---|---|
| coach view | A reusable piece of user interface that users use to interact with a business object or service. Coach views can contain other coach views to build a user interface. |
| control | A coach view that is provided in the responsive coaches toolkit. Controls include basic user interface artifacts, such as buttons and text fields. |
This lesson describes how to create the Requisition CV coach view. The Requisition CV coach view consists of a panel that provides the title for the form. Inside the panel, there are controls stacked vertically.
Procedure
- Make sure that the My Hiring Sample process application is open in Process Designer.
- In the library, click the plus sign next to User Interface and select Coach View.

- Type Requisition CV as the name and click Finish. You can now edit the coach view that you created.
- Bind the coach view to the Requisition business object by creating a Requisition variable and assigning the Requisition business object as its type:
- Select the Variables tab.
- Click the plus sign next to Business Data.
- Type Requisition as the name.
- For the variable type, click Select and then select the Requisition business object.

- Click the Layout tab and then, from the palette, add a panel to the layout canvas and change the label to Request data.
- In the Configuration properties, under Appearance, set Color style to Primary. Your diagram matches the following image:
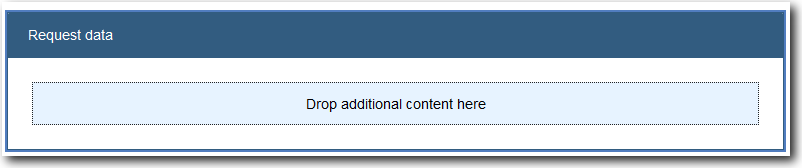
- Drop the following controls onto the Drop additional content here area of the requisition data panel.
- Single select
- Single select
- Text
- Integer
- Edit the properties of the first single select control:
- In the General properties, change the label of the control to Employment type.
- Click Select for the binding. From the list, expand the Requisition variable and then select empType.

- In the Configuration properties, under Items, set the item lookup mode to Items from Service.
- For List items service, click New to create a new service that will populate the selection list.
- In the dialog that prompts you to create a service flow, enter the name PopulateEmploymentTypeList and click Finish. The service flow editor opens.

- Click the Script Task. In the Properties, under Script, enter this code:
tw.local.results = new tw.object.listOf.String();
tw.local.results[0] = “Full-time”;
tw.local.results[1] = “Part-time”;
tw.local.results[2] = “Contract”;
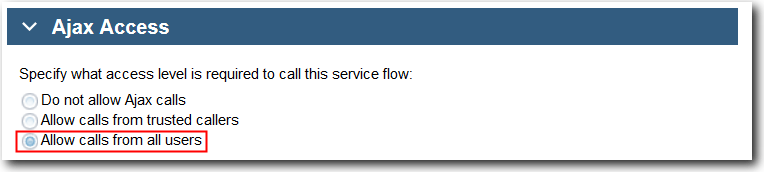
tw.local.results.listAddSelected(0); - Switch to the Overview tab. Under Ajax Access, select Allow calls from all users.
- Switch to the Requisition CV coach view’s layout. Click the Employment Type control and expand the Items list.

- In the Visibility properties, set the visibility to Required.
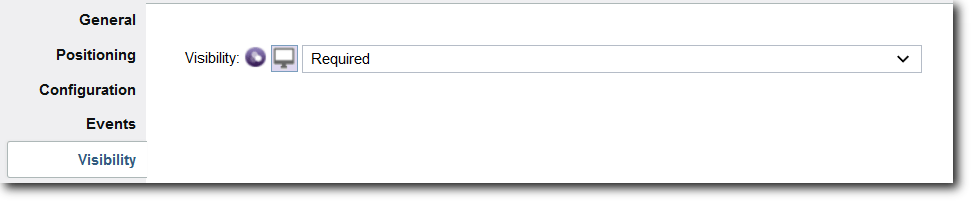
Notice that the Employment Type control now has an asterisk.
- Edit the properties of the second single select control.
Property Value General > Label Department General > Binding Requisition.departmentConfiguration > Items > Item lookup mode > Items From Service populateDepartmentListService Flow > Service Task > Script tw.local.results = new tw.object.listOf.String();
tw.local.results[0] = “Finance”;
tw.local.results[1] = “Marketing”;
tw.local.results[2] = “Product Development”;
tw.local.results[3] = “Human Resources”;
tw.local.results[4] = “Sales”;
tw.local.results[5] = “Customer Service”;
tw.local.results[6] = “Business Partner Service”;
tw.local.results[7] = “Business Strategies”;
tw.local.results[8] = “Software Engineering”;
tw.local.results.listAddSelected(0);Service Flow > Overview > Ajax Access Allow calls from all users. Visibility > Visibility Required - Edit the properties of the text control:
Property Value Hiring manager Requisition.requester Enter name - Edit the properties of the integer control:
Property Value Number of employees Requisition.empNum - Save your work.
Your diagram matches the following image:

Summary
You created the Requisition CV coach view.
In the next lesson, you create the coach view for position data.