Prerequisites for the example system
Create a DS8900 system. The system in our example is typical, but simple, so that we can focus on Data Space configuration for the system. The example system has these attributes:
|
Note: Detailed instructions for creating such a system are provided in “Adding a System”.
|
▪Device type: DS8900 All
▪Adapters: Eight (8) adapters of type 32 Gb 4-port SW FCP/FICON. Include a port with Protocol
FCP and a port with Protocol FICON.
▪Capacity:
a. Do “Add Pool Pair” twice. Add one pair with storage type CKD, with the
default settings. Then, add a second pair with storage type FB (fixed block), with the default settings.
b. Do “Add Drive Set” twice. Add one drive set with High Capacity Tier 1drive
technology, with default settings. Then, add a second set with High Capacity Tier 2 drive technology, with default settings.
Concepts for Data Space creation:
▪A workload can reference only one Data Space.
▪Multiple workloads can reference the same Data Space.
▪Multiple Data Spaces can be assigned to a pool/pool pair, as needed.
Follow these steps to add a sample Data Space to a system. The steps include discussion of your options and reasons for making specific choices.
1. Open the project, which should have the features listed in
“Prerequisites for the example system”.
The Systems list is displayed.
The Systems list is displayed.
2. Click the name of the system to which you want to add a Data Space.
The System tab for that system is displayed by default.
The System tab for that system is displayed by default.
3. Click the Capacity tab.
The Physical Layout sub-tab is displayed by default.
The Physical Layout sub-tab is displayed by default.
4. Click the Logical Layout sub-tab.
(A typical Logical Layout sub-tab with a completed Data Spaces configuration is shown in the “Data Space Pairs” topic.)
(A typical Logical Layout sub-tab with a completed Data Spaces configuration is shown in the “Data Space Pairs” topic.)
5. Click Add Pool Pair. A dialog box is displayed where you make the
following settings:
|
Note: In these steps, all settings for the sample system are the defaults, unless stated otherwise.
|
– Even and Odd Pool Names. Storage
Modeller provides a unique, generic name, which you can modify.
|
Note:
Pairs of pools are not required. You can complete creation of the pool pair in this dialog box. Then, delete one member of the pair, if your
design does not require it. You delete a pool through the action menu of the target pool.
|
– Set the Extent Size:
• MiB/GiB for Fixed Block volumes.
• Cylinders for CKD volumes.
– Enter values for Data Space Defaults:
• Thin Provisioning (%)
• Number of Volumes
– Click Submit.
You return to the Pool Pairs view. Your new pool pair view is expanded to show the Data Spaces sub-tab, which currently has no Data Spaces defined.
You return to the Pool Pairs view. Your new pool pair view is expanded to show the Data Spaces sub-tab, which currently has no Data Spaces defined.
6. Click Add Data Space Pair. The
Add Data Space Pair dialog box is displayed.
A convenient, full view of the
Add Data Space Pair dialog box is presented in the
“Add (or Edit) Data Space Pair dialog box”
topic.
Choose whether you want the pair of pools to have identical configuration:
– Select the Balanced Pools check box to make your settings apply to both
pools in the pool pair.
OR
OR
– Deselect the Balanced Pools check box to make your settings apply to only
one of the pools in the pool pair. Then, follow this process if you need a distinctly configured, second pool:
A. In the Pool drop-down menu, select the pool you want to configure first.
B. Enter the configuration values for the pool that you selected. The values are described in the remaining steps of this procedure.
C. Click Submit.
D. Configure the second member of the pool pair by opening the
Add Data Space Pair dialog box again, then select and configure the second pool.
NOTE: You are not required to have pairs of pools. Having a single pool is valid.
NOTE: You are not required to have pairs of pools. Having a single pool is valid.
7. Complete the fields in the Add Data Space Pair dialog box.
This example assumes that the Balanced pools option is selected.
This example assumes that the Balanced pools option is selected.
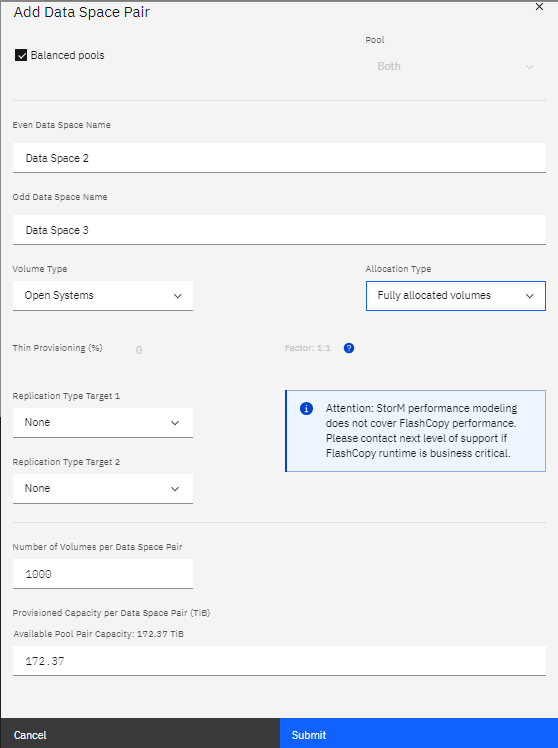
Figure 113 Add Data Space Pair
▪Name the even and odd data space, or accept the unique default names that Storage Modeller provides.
▪Volume Type: Open Systems or IBM i.
▪Allocation Type: Choose the allocation features that you require:
– Fully allocated volumes or
Thin provisioned volumes
(“Fully Allocated” means that no data-reduction is applied to a volume.)
(“Fully Allocated” means that no data-reduction is applied to a volume.)
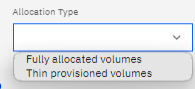
Figure 114 Allocation Type
|
Note: Your settings here can affect the Effective Capacity of the pool and thus the amount that you can enter in the
Provisioned Capacity
field
|
▪Thin Provisioning (%)
▪Replication (None, Metro Mirror, Global Mirror)
▪Number of Volumes per Data Space Pair:
When you choose the Balanced Pools option, the volumes are split equally between the two member pools.
When you choose the Balanced Pools option, the volumes are split equally between the two member pools.
▪Provisioned Capacity per Data Space Pair:
|
Option for Fixed Block (FB) volumes:
Available Pool Pair Capacity (an integer value)
|
Options for CKD volumes:
Available Pool Pair Capacity (in cylinders):
▪Specify capacity for each volume.
OR
▪Specify capacity for entire Data Space Pair.
|
8. Click Submit to save your configuration choices for the Data Space.
▪The Logical Layout view returns to the screen, with the Data Spaces sub-tab showing the your newly created Data Space Pair and its configuration
settings.
▪Remember that you have the option to create only a single pool through the Balanced pools option. See Step 6 on page 139.
You always have the option to edit a Data Space configuration by clicking Edit in the action menu in the row of a specific Data Space in this view.
Associate the Data Space with a workload
9. Go to the top-level view of your project. In our case, this view is the
Example: Adding a Data Space
project.
10. Click the Performance tab. The Workloads sub-tab is displayed by default,
including a list of available workloads.
|
Note: Currently, only a single workload can be assigned to a Data Space. The option to assign multiple workloads to a Data Space is pending
implementation.
|
11. Select a Data Space to be targeted by the workload, through one of the following methods:
|
Note: The Data Space selection field is visible in the sample workspace that is shown in the
“Changes to the Workloads form”
topic.
|
– New workload: Click Add Workload.
The Workloads form is displayed. (Follow the standard procedures in the
“Adding a workload”
topic.) Select the target Data Space in the
Data Space field.
– Existing workload: Select Edit in
the actions menu of an existing workload. The Workloads form is displayed. Select the target Data Space in the
Data Space field.
|
Note: You can do either of the preceding options. What you cannot do is associate multiple Data Spaces with a single workload.
|
12. Save your workload, and Solve it.
The performance of the pool in your system is assessed, based on the capacity usage that you have defined in the target Data Space.
For DS8000 devices, you also can instead choose the
Advanced Solve (degraded mode) option at this point. See
“Basic example, part 3 of 4: (optional) invoke Degraded Mode”.
13. (Optional) Assess the performance of a pool pair as described in
“How to assess performance for a pool pair in a DS8000 device”.
How to assess performance for a pool pair in a DS8000 device
Currently Storage Modeller requires that a workload be associated with only one pool. In other words, a “workload” for a pool pair actually must be two workloads, one for each of the two
pools.
The following steps describe the workaround for assessing pool pair performance.
1. Open the project that has the DS8000 device with a pool pair.
2. Access the Performance tab for the project. The Workloads sub-tab is displayed by default.
3. Create a workload that points to the first pool in your pool pair. (Follow the standard procedures in the
“Adding a workload”
topic.)
4. Access the action menu of the new workload and select Duplicate, as
shown here:
The Duplicate Workload dialog box is displayed.
5. Select the name of the second pool in the Pool field, and click
Submit.
6. Edit the I/O rate of the two workloads. Do the following steps for each workload:
a. Divide the original Total I/O Rate (ops/s) value by 2. (Calculate one half
of the original value.)
b. Click Edit in the action menu for the workload.
c. Enter the halved value in the Total I/O Rate (ops/s) field.
d. Save the updated workload.
e. Be sure that you repeat these substeps for each workload.
7. Solve the workloads and review the results for both pools, which are displayed automatically after you solve.