You can use developer tools to create and start a Liberty
profile server. If you have not yet installed the Liberty profile,
the developer tools can install it for you the first time you create
a server.
Before you begin
Make sure you have installed the developer tools as described
in Installing the Liberty profile developer tools and (optionally) the Liberty profile.
You can create
a server as described in this topic, or as described in Creating a Liberty profile server manually.
When you create a new server using the tools, you specify the installation of the Liberty profile that you want to use. You are offered three options:- Select an existing installation.
- Install from a previously downloaded archive file.
- For the no-charge developer edition, Download and install.
If you want to use the tools to install a Liberty edition (other
than the no-charge developer edition) from an archive file, make sure
you have downloaded the archive file.
Procedure
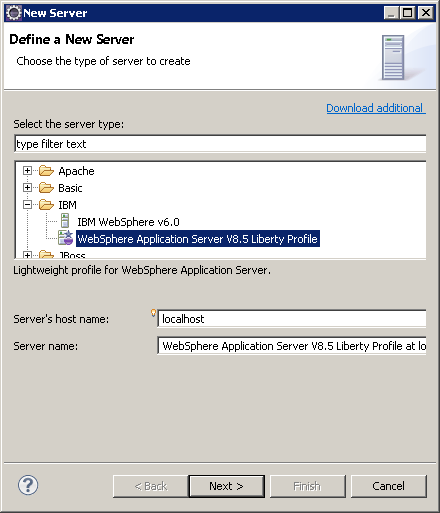
- In the workbench, open the Servers view by clicking the Servers tab.
- Right-click the Servers view and
select .
- Under the server type list, expand IBM and
select the WebSphere Application Server V8.5 Liberty Profile server
type.
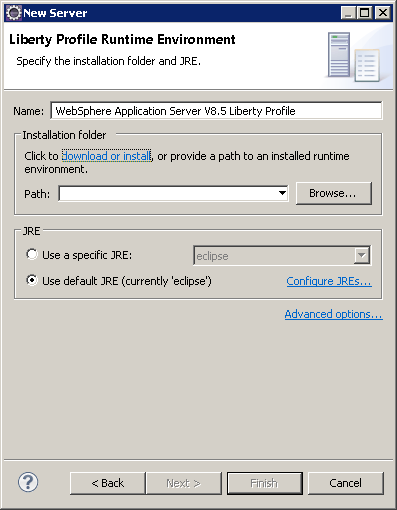
- Click Next. The Liberty
Profile Runtime Environment page is displayed.
- Select an installation, install from an archive file, or
(for the no-charge developer edition) download and install, the Liberty
profile.
If you have previously installed the Liberty
profile, complete the following steps:
- In the Path field under the Installation
folder section, type or browse for the directory where
you installed the Liberty profile runtime environment, then click OK.
- In the Liberty Profile Runtime Environment page,
click Next. The application-serving
environment is selected.
If you want to install the Liberty profile from an archive
file that you have previously downloaded, complete the following steps:
- In the Installation folder section
of the Liberty Profile Runtime Environment page,
click download or install.
- In the Install Runtime Environment page,
select Install a new runtime environment from an archive.
Type or browse for the archive where you downloaded the Liberty profile
runtime environment, then click Next.
- In the Install Add-ons page,
click the Add or Remove button
to make your selection of add-on archive files that you want to install
on the Liberty profile runtime environment. You can install an add-on
archive file from your local file system, download, or use a combination
of both when installing multiple add-on archive files. If the workbench
is connected to the internet, the Install Add-ons page
is populated with add-on archive files available for download from
the WAS dev community download site.
If
you want to install add-on archive files from your local file system,
click Add Archive button. In the Add-on
archive field, type or browse for the add-on archive file
on the local file system, and then click OK.
If you have additional add-on archive files to install from your local
file system, repeat this step until you are done.
After
you complete your selection in the Install Add-ons page,
click Next.
- In the License Acceptance page,
if you accept the license terms, select I accept the terms
of all the license agreements then click Next.
- In the Installation Folder page
and in the Target installation folder field,
type or browse for the directory to which you want the workbench to
extract the archive, then click Finish. The Liberty profile and any specified add-on archive files
are downloaded and installed to your chosen folder.
- The Liberty Profile window
displays the status of the Liberty profile installation, click OK.
- In the Liberty Profile
Runtime Environment page, click Next.
If you want to download and install the no-charge developer
edition of the Liberty profile, complete the following steps:
- In the Installation folder section
of the Liberty Profile Runtime Environment page,
click download or install.
- In the Install
Runtime Environment page, select Download and
install a new runtime environment from:, choose a download
site, then click Next.
- In the Install Add-ons page,
click the Add or Remove button
to make your selection of add-on archive files that you want to install
on the Liberty profile runtime environment. You can install an add-on
archive file from your local file system, download, or use a combination
of both when installing multiple add-on archive files. If the workbench
is connected to the internet, the Install Add-ons page
is populated with add-on archive files available for download from
the WAS dev community download site.
If
you want to install add-on archive files from your local file system,
click Add Archive button. In the Add-on
archive field, type or browse for the add-on archive file
on the local file system, and then click OK.
If you have additional add-on archive files to install from your local
file system, repeat this step until you are done.
After
you complete your selection in the Install Add-ons page,
click Next.
- In the License Acceptance page,
if you accept the license terms, select I accept the terms
of all the license agreements then click Next.
- In the Installation Folder page
and in the Target installation folder field,
type or browse for the directory to which you want the workbench to
extract the archive, then click Finish. The Liberty profile and any specified add-on archive files
are downloaded and installed to your chosen folder.
- The Liberty Profile window
displays the status of the Liberty profile installation, click OK.
- In the Liberty Profile
Runtime Environment page, click Next.
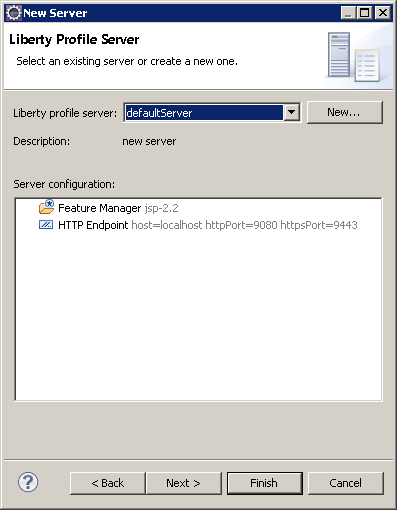
- If the Liberty Profile Server page
displays, in the Liberty profile server field,
use the drop-down list to select an existing server. Or click New to
create a new server.
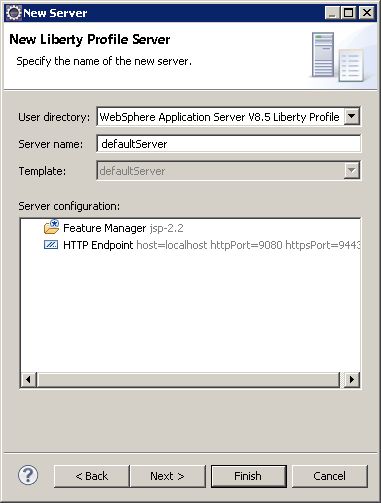
- If you are creating a new server, in the Server
name field of the New Liberty Profile Server page,
enter a server name of your choice or use the default server name, defaultServer.
Then click the Next button if available, otherwise
click Finish.
- In the Liberty Profile Runtime Environment page,
click Next.
- (Optional) Add the projects of your application to the
server. On the Add and Remove page, under the Available list,
select the projects that you want to add to the server and click Add.
The project appears in the Configured list.
- In the New Server page, click Finish.
Results
Here is a screen capture of how the Servers
view should look with the server and its server configuration:
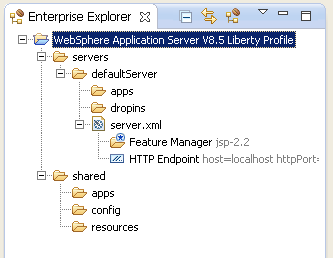
Here is the
screen capture of how the Enterprise Explorer view should look with
the project, the server folder, and the server configuration files:
What to do next
- Edit the server configuration. For more
details see Editing the Liberty profile configuration by using developer tools topic.
- Start
or stop the server, add or remove applications on the server,
and many other tasks. You can perform these tasks
by using the server context menu (right-click on the server to open
the pop-up menu) or by selecting the tray buttons in the Servers view.
Tip: In the Servers view, you must select the server entry to
perform these tasks. Do not select the server configuration, such
as the Server Configuration [server.xml] entry for
performing these tasks.


 Task topic