Administering a queue manager using IBM MQ Explorer and the runmqsc command line
This guide shows you how to administer an IBM® MQ as a Service queue manager using the IBM MQ Explorer application and the runmqsc command line interface.
IBM MQ Explorer
IBM MQ Explorer is an Eclipse-based tool for administering IBM MQ that you install on a machine of your choice and that connects remotely to one or more queue managers using a client connection. There are native installers for Windows and Linux® 64-bit environments and it can be run on macOS via a Docker container as described in the prerequisites below.
runmqsc
Part of the IBM MQ clients bundle, runqmsc is a command-line interface (CLI) tool that enables you to automate the configuration of IBM MQ queue managers by executing a series of pre-defined steps at the command-line or in a script file. It is supported on a range of operating systems including Windows and Linux (but is not currently supported on macOS).
There are many actions you can perform by using IBM MQ Explorer or runmqsc from an IBM MQ client. You can:
- Connect to a queue manager
- Create a new queue
- Put a message onto a queue
- Delete a queue
In addition to this, on IBM MQ Explorer, you can browse a queue to view messages In the runmqsc command line, you can also get messages from a queue.
Before you begin
You should meet the following conditions:
- You need an existing queue manager (for instructions, follow the Creating a queue manager guide).
- Ensure you have permission to access queue managers within your IBM MQ service instance (for instructions, follow the Configuring administrator access for a queue manager guide).
- Depending on your method of administration, you require either:
- An existing installation of IBM MQ Explorer.
- An existing installation of IBM MQ Client on your own machine.
Installing a client
- Download the client from the location given in IBM MQ downloads .
- Clicking the HTTP link next to the latest available version of the CD Clients takes you to Fix Central. From there you can search for and select the appropriate Redist (redistributable) client bundle for your operating system platform. This will include the sample applications and runmqsc.
- Once downloaded, unpack the bundle into a location of your choosing.
- Make a note of the full path to the
bindirectory, the location of which will dependon where you chose to unpack the bundle. This path is referred to as<PATH_TO_BIN_DIR>for the rest of this task. - Make a note of the full path to the directory containing the sample applications. This path is
referred to as
<PATH_TO_SAMPLE_BIN_DIR>for the rest of this task.- For Windows, this is the
bindirectory unpacked in the previous step, the location of which depends on where you chose to unpack the bundle. - For Windows, this is the
samp/bindirectory unpacked in the previous step, the location of which depends on where you chose to unpack the bundle.
- For Windows, this is the
Gather required connection details
- Navigate to your IBM MQ as a Service UI by following the instructions in Getting started with IBM MQ as a Service.
- From the list of your queue managers, click on the queue manager you want to administer.
- Make note of the Queue manager name, Hostname, and Port values for use in the next steps.
- If you already know your MQ Username and API Key, you can skip to Connect to your queue manager. Otherwise, click the Administration tab.
- Make a note of your MQ Username for future use.
- Note that you can edit your MQ Username at any time by following the Editing or removing the username for an existing user or application guide.
-
If you do not already have an existing API key:
- Click Create API Key.
- Click Show to display the API key to copy and save it for later, or click
Download to store the API key in a file.
- Note that the API key generated in these steps is used to authenticate as the user who created it. Therefore, it should not be shared with any other users and should be stored securely.
- An API key created through the IBM MQ service can be reset from the queue manager Administration tab.
- Click Close.
Connect to your queue manager
To connect by using IBM MQ Explorer:
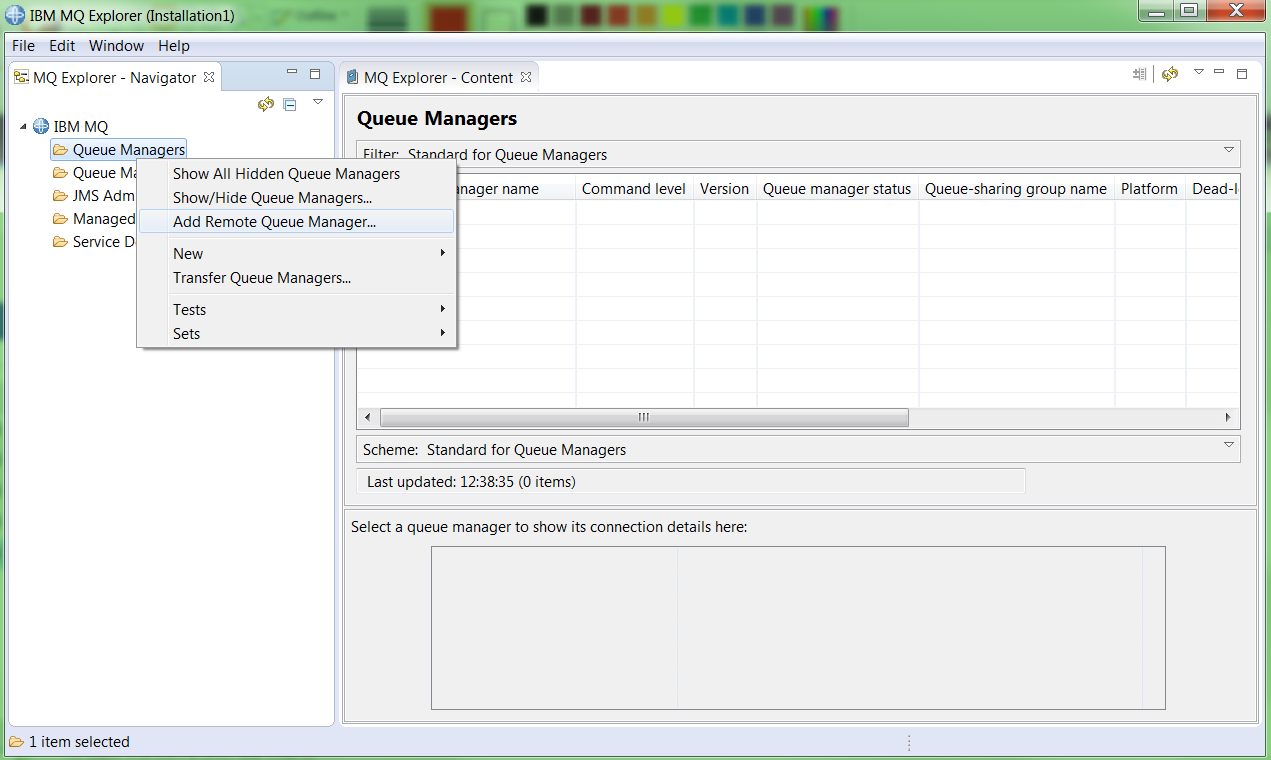
- Start IBM MQ Explorer.
- In the MQ Explorer - Navigator panel, expand IBM MQ.
- Right click Queue Managers.
- Click Add Remote Queue Manager....
- Enter the queue manager name you want to administer.
- Click Next.
- Enter the Hostname you noted in step 2.
- Overwrite the Port number with the one you noted in step 2.
- Overwrite the server connection channel name with CLOUD.ADMIN.SVRCONN.

- Click Next.
- Click Next.
- Tick the checkbox for Enable user identification.
- Untick the checkbox for User identification compatibility mode.
- Type your MQ username as the user id.
- Click Finish.
- Paste your platform API key into the Password text box.
- Click OK.
Your queue manager connection now appears under the Queue Managers folder in the MQ Explorer - Navigator panel.
To connect by using runmqsc:
- Open a command shell to use in the next steps.
- Export the MQSERVER variable:
- Linux:
export MQSERVER="CLOUD.ADMIN.SVRCONN/TCP/<Hostname>(<Port>)" - Windows (Command prompt):
set MQSERVER=CLOUD.ADMIN.SVRCONN/TCP/<Hostname>(<Port>) - Windows (PowerShell):
$env:MQSERVER="CLOUD.ADMIN.SVRCONN/TCP/<Hostname>(<Port>)"
- Linux:
- Run
<PATH_TO_BIN_DIR>/runmqsc -c -u <your MQ username> -w60 <QUEUE_MANAGER_NAME> - Enter your platform API key when prompted for a password.
Create a new test queue called 'DEV.TEST.1'
Using IBM MQ Explorer:
In the view:
- Expand the entry for your queue manager.
- Right click Queues.
- Select
- Type 'DEV.TEST.1' in the Name text box.
- Click Finish.
- Click OK.
Your new queue appears in the list of queues.
Using runmqsc
- Run
DEFINE QLOCAL(DEV.TEST.1) - Run
DISPLAY QLOCAL(DEV.TEST.1)- Details of queue 'DEV.TEST.1' are displayed.
- Run
end- The runmqsc session is closed.
- Retain the prompt to use in the next steps.
Put a message onto the test queue
- Right click on queue 'DEV.TEST.1'.
- Click Put Test Message....
- Type in a test message in the Message data text box.
- Click Put message.
- Click Close.
- Click Refresh in the Queues panel.
You can see that the 'Current queue depth' for 'DEV.TEST.1' is now 1.
Using runmqsc:
We use the sample program amqsputc to assist in putting messages on the test
queue. In the same shell used in the previous steps:
- Export the 'MQSAMP_USER_ID' variable:
- Linux:
export MQSAMP_USER_ID="<your MQ username>" - Windows (Command prompt):
set MQSAMP_USER_ID=<your MQ username> - Windows (PowerShell):
$env:MQSAMP_USER_ID="<your MQ username>"
- Linux:
- Run
<PATH_TO_SAMPLE_BIN_DIR>/amqsputc DEV.TEST.1 <your QMGR name> - Enter your platform API key when prompted for a password.
- Type in a test message.
- Hit
Entertwice to exit the amqsputc sample.
Browse a message on the test queue
- Right click on queue 'DEV.TEST.1'.
- Click Browse Messages....
- Confirm you can see your test message and then click Close.
Get a message using the amqsgetc sample program
In the same shell used in the previous steps:
- Run
<PATH_TO_SAMPLE_BIN_DIR>/amqsgetc DEV.TEST.1 <your QMGR name> - Enter your platform API key when prompted for a password.
Your test message is displayed.
After a short period, the amqsputc sample program should end after finding no more messages.
Delete the test queue
- Configuring access for connecting an application to a queue manager
- Right click on queue 'DEV.TEST.1'.
- Click Delete.
- Click Delete.
- Check the Clear all messages from the queue box.
- Click Delete.
- Click OK.
You can see that queue 'DEV.TEST.1' has been removed from the list of queues.
Using runmqscIn the same shell used in the previous steps:
- Run
<PATH_TO_BIN_DIR>/runmqsc -c -u <your MQ username> -w60 <QUEUE_MANAGER_NAME> - Enter your platform API key when prompted for a password.
- Run
DELETE QLOCAL(DEV.TEST.1)- You receive a message stating that the queue has been deleted.
- Run
DISPLAY QLOCAL(DEV.TEST.1)to prove the queue has been deleted.- You receive a message stating that the queue was not found.
- Run
end- The runmqsc session is closed.
Conclusion
You have successfully:
- Connected to a queue manager using either IBM MQ Explorer or runmqsc and have created a new test queue
- Put a test message onto the test queue.
- Either browsed the test queue to view the test message or used amqsgetc to view the test message.
- Cleared and deleted the test queue to clean up.