Getting started with IBM MQ as a Service
IBM® MQ as a Service enables you to quickly and easily deploy queue managers in the cloud and connect your applications to them, for reliable data transfer between different parts of your enterprise application landscape.
This documentation describes two approaches to get started with IBM MQ as a Service:
 Getting started using the Guided Tour - this describes how to start
the embedded tutorial, which guides you through the process of creating and using your first
IBM MQ as a Service queue manager (available on IBM Cloud®).
Getting started using the Guided Tour - this describes how to start
the embedded tutorial, which guides you through the process of creating and using your first
IBM MQ as a Service queue manager (available on IBM Cloud®). - Manually creating and using an IBM® MQ as a Service queue manager - this provides documented steps describing how to create and use your first IBM MQ as a Service queue manager.
Before you begin
- You need an IBM Cloud® or an Amazon Web Services (AWS) account.
- Permissions to create an IBM MQ as a Service service instance in the account.
Launching an IBM MQ as a Service service Instance on IBM Cloud
To create an IBM MQ as a Service service instance:
- Go to the IBM Cloud Catalog
- Select MQ
- Select your desired region.
- Type in a service name.
- Select a plan, for example Lite.
- Click Create.
You are now presented with a view of your service instance from where you will be able to view and manage your queue managers. This is also the page from which you can launch the Guided Tour.

Launching an IBM MQ as a Service instance on AWS
- Go to the AWS Marketplace.
- Search for IBM MQ SaaS Reserved Instance.
- Click View purchase options to view public and private offers that are available
- Select the required quote, enter the required number of capacity units, then click Subscribe.
- Click Set up your account to register the subscription with IBM. When prompted, select the required region and provide a name for the service instance, then click Submit and provision.
- Once the service has been provisioned, go to the IBM SaaS Console at https://aws.console.saas.ibm.com. For help using the IBM SaaS Console, see https://www.ibm.com/docs/en/saas-console?topic=console-getting-started-saas
- Select the required account to open the list of its subscriptions.
- Find the subscription for IBM MQ as a Service, then click on View instances.
- Click Open on the service instance to open the IBM MQ as a Service UI.
You are now presented with a view of your service instance from where you are able to view and manage your queue managers.
Getting started using the Guided Tour
IBM MQ as a Service on IBM Cloud comes with a Guided Tour, which provides step-by-step guidance through the following steps:
- Creating a queue manager
- Registering an application to put and get messages on a queue
- Administering a queue manager
You can launch the Guided Tour by selecting the Guided tours item from the help menu on the IBM Cloud header bar:
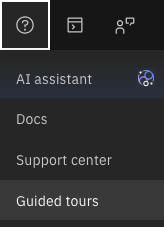
Click Get started, then select one of the available tours.
Manually creating and using an IBM MQ as a Service queue manager
Follow these steps to manually create a queue manager and begin using it.