General Page
Objective
Completing the tutorial gives you a working database instance on Azure Redhat OpenShift Service (ARO). Steps include:
-
Setting up an Azure account.
-
Creating an Azure ARO cluster.
-
Setting up Azure Disk storage to be used as the backend for Red Hat OpenShift Data Foundation (ODF).
-
Setting up storage for your cluster using ODF.
-
Deploying a Db2 database instance to your ARO cluster.
-
Connecting to the Db2 database externally.
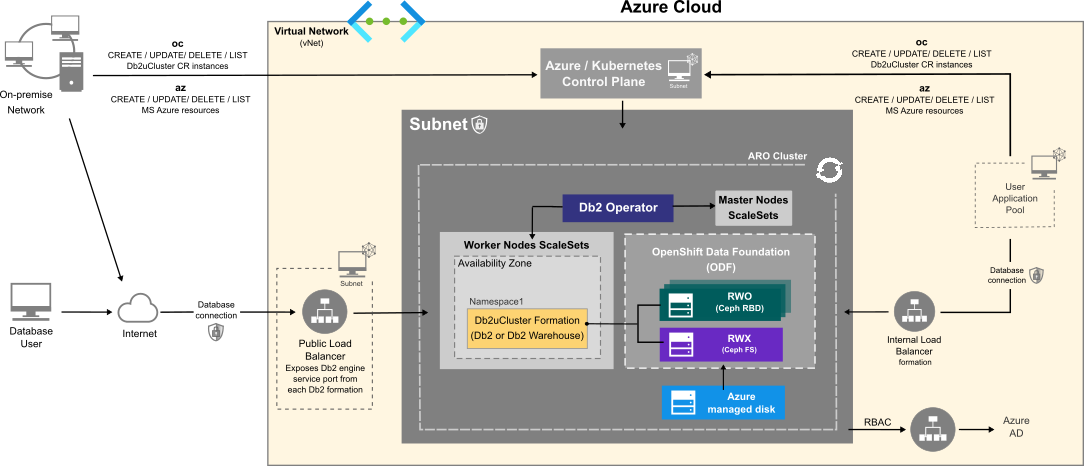
Overview of a Db2/Db2 Warehouse on ARO configuration
Deploying a Db2 or Db2 Warehouse database on ARO can be summarized as follows:
- Your system administrator creates an Azure account and chooses a managed service platform for your database instance. You can run your database on the following Azure managed services:
- Azure Red Hat OpenShift Service (ARO).
- Using a series of command-line tools, your administrator creates an ARO cluster based on your specific requirements. For storage, ODF should be installed on the cluster.
- Your administrator runs the Db2 Operator and deploys your database instance to your ARO cluster.
Once your database instance is deployed, users can connect to that database in the same way they connect to an on-premises data source.
The flowchart below shows how users interact with the database instance when it is hosted on Azure Redhat OpenShift Service:
Choosing an Azure VM instance type
Use the information in the following tables to determine the size requirements of your Db2 or Db2 Warehouse instance. Based on your selection, go to the list of Azure VM instance types to find the Azure VM instance type that's right for your database deployment. In addition to the sizing values shown in the tables, the instance type list shows other factors to consider, such as cost and region.
For Online Transactional Processing (OLTP) database workloads, choose an instance from the General Purpose or Memory Optimized categories.
Table 1. Sizing guidelines for Db2 OLTP on ARO systems:
|
Size |
CPUs |
Memory (GB) |
Azure Instance Type |
Description |
|
Small |
8 |
24 |
|
|
|
Medium |
16 |
128 |
General Purpose
Memory Optimized
|
|
|
Large |
49 |
1001 |
|
|
Table 2. Sizing guidelines for a single-partition Db2 Warehouse on ARO systems
|
Size |
CPUs |
Memory (GB) |
Azure Instance Type |
Description |
|
Small |
7 |
98 |
|
|
|
Medium |
15 |
226 |
|
|
|
Large |
31 |
482 |
|
|
Table 3. Sizing guidelines for a multi-partition Db2 Warehouse on ARO systems
| Size | CPUs | Memory (GB) | Azure Instance Type (Suggested) |
Description |
| Small | 39 |
610
|
4 vCPU per partition 2 partitions per pod 5 pods
4 vCPU per partition 3 partitions per pod 3 pods
4 (8) vCPU per partition 4(2) partitions per pod 2 pods
16 vCPU per partition 2 partitions per pod 1 pod
|
|
| Medium | 77 | 1201 |
4 vCPU per partition 3 partitions per pod 6 pods
8 vCPU per partition 2 partitions per pod 4 pods
16 vCPU per partition 2 partitions per pod 2 pods
32 vCPU per partition 2 partition per pod 1 pod
|
40 TB of uncompressed data. |
| Large | 153 | 2406 |
4 vCPU per partition 3 (4) partitions per pod 12 (10) pods
4 vCPU per partition 4 partitions per pod 8 pods
4 vCPU per partition 8 partitions per pod 5 pods
4 (8) vCPU per partition 6 (3) partitions per pod 6 pods
6 vCPU per partition 8 partitions per pod 4 pods
8 vCPU per partition 8 partitions per pod 3 pods
16 vCPU per partition 8 partitions per pod 2 pods
|
80 TB of uncompressed data. |
For more information on single or multi-partition Db2 warehouse environments, see IBM Db2 Warehouse database product portal.
NOTE: The resource requirements mentioned above are specific to installing and deploying Db2u. If other applications are being deployed, plan the resource sizing accordingly.
Planning Storage
This document describes configuring OpenShift Data Foundation (ODF) as the storage solution for Db2u. ODF requires a minimum of three nodes and can currently only be installed using internal mode.
Resource requirements for basic services:
-
30 CPU (logical)
-
72 GB memory
-
3 storage devices
Refer to the Red Hat ODF planning your deployment documentation for understanding resource requirements.
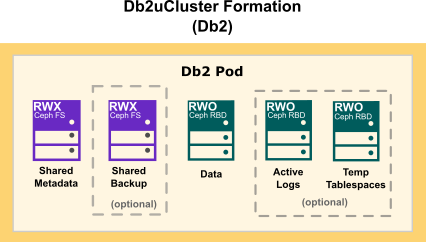
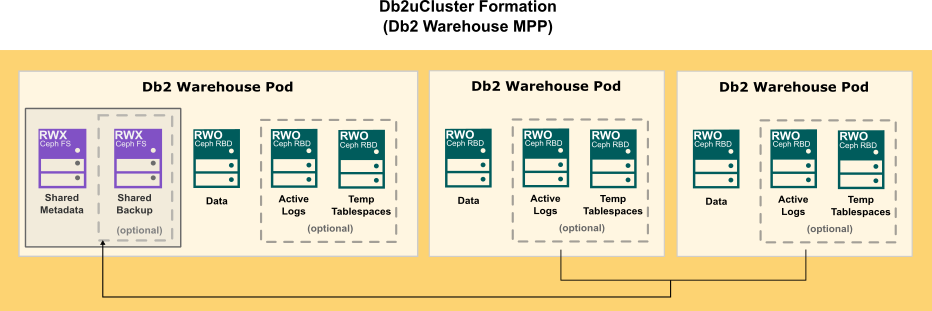
The following diagram show how storage is distributed in a Db2 multi-partition Warehouse formation:
- az: Azure CLI command-line utility for creating and managing Kubernetes or OpenShift clusters on Azure. When you first use Azure CLI, install the Azure CLI extension. For more information about extensions, see Use extensions with the Azure CLI. Run az version to find the version and dependent libraries that are installed. To upgrade to the latest version, run az upgrade.
- oc: OpenShift command-line utility that is used to communicate with the cluster API server
Environment
Before you start the configuration, you need to set some variables locally that are used for this tutorial. When choosing the naming convention for these variable values, we adapted best practices described in Azure Define your naming convention - Cloud Adaptation Framework topic. These variables are:
-
PRINCIPAL_ID: The Azure account name that will be used to do all the steps in this tutorial.
export PRINCIPAL_ID=<> -
SUBSCRIPTION_ID: Your Azure subscription ID associated with your Azure account.
export SUBSCRIPTION_ID=<> -
LOCATION: The region where your Azure instances are being deployed. Use eastus.
export LOCATION=eastus -
RESOURCE_GROUP: An Azure resource group is a logical group in which Azure resources are deployed and managed. Use rg-db2-demo-eastus-001.
export RESOURCE_GROUP=rg-db2-demo-eastus-001 -
CLUSTER: The name you use for your ARO Cluster. Use aro- db2-demo-eastus-001.
export CLUSTER=aro-db2-demo-eastus-001
- NODE_VM_SIZE: The kind of Azure VM size to select for deploying Db2 workloads in the user node pool:
-
For single-partition Db2 instances, use Standard_D8as_v4.
export NODE_VM_SIZE=Standard_D8as_v4 -
For single-partition Db2 Warehouse instances, use Standard_E16-8as_v4.
export NODE_VM_SIZE=Standard_E16-8as_v4 -
For multi-partition Db2 Warehouse instances, use Standard_E64-32ds_v4.
export NODE_VM_SIZE=Standard_E64-32ds_v4
-
- NUM_NODES: The minimum number of VM nodes for the Azure cluster:
-
For single-partition Db2 instances, use 3.
export NUM_NODES=3 -
For single-partition Db2 Warehouse instances, use 3.
export NUM_NODES=3 -
For multi-partition (small) Db2 Warehouse instances, use 6.
export NUM_NODES=6 -
NOTE: Single-partition Db2 instances only require one node. In this case, the minimum number of nodes is set to 3 to support ODF installation.
-
- NODE_VM_DISK_SIZE: The worker node disk size in Gigabytes (per node). This should be determined in sizing based on the number of nodes, workload size and the kind of storage that is being installed. This tutorial uses ODF as the storage provider and its corresponding requirements.
export NODE_VM_DISK_SIZE=1024
-
NAMESPACE: The namespace where your database instance will be deployed. Use db2u.
export NAMESPACE=db2u -
DB2U_CLUSTER: The name used in the metadata section of the db2ucluster custom resource used for deploying Db2. Use db2-aro-demo.
export DB2U_CLUSTER=db2-aro-demo -
LOAD_BALANCER_SVC: The name used in the metadata section of the Public Load Balancer service will expose Db2 database connection outside the ARO cluster. Use lb-db2-demo-eastus-001.
export LOAD_BALANCER_SVC=lb-db2-demo-eastus-001 - ARO_VNET: The name of the virtual network to be created for the ARO cluster.
export ARO_VNET=db2-ocp-vnet - ARO_CLUSTER: The name of the ARO cluster to be created.
export ARO_CLUSTER=db2-ocp - ARO_MASTER_SUBNET: The name of the subnet to be created for the master nodes.
export ARO_MASTER_SUBNET=db2-ocp-master-subnet - ARO_WORKER_SUBNET: The name of the subnet to be created for the worker nodes.
export ARO_WORKER_SUBNET=db2-ocp-worker-subnet
Create an Azure account
Before you begin to create your Azure cluster, you need to have an Azure account.
-
From a web browser, go to https://azure.microsoft.com/.
-
Follow the online instructions.
NOTE: You will be contacted by phone and be required to enter a verification code on your phone keypad.
Sign in with Azure CLI
Azure provides numerous authentication methods. We describe the two most common methods bellow.
-
Interactively using device code flow which will open a browser page with the one-time-passcode (OTP) that you can enter into the CLI terminal to complete the login process:
az login -
Non-interactively by providing the credentials in the CLI command:
az login – u <user> -p <password>
Refer to Azure topic Sign in with Azure CLI for details on all the supported authentication methods.
Grant appropriate access to resources
When you allow access to Azure resources, it's always a best practice to provide users with the least privilege that's required to do a given task. You can grant access to resources in Azure using two schemes:
- Azure role-based access control (Azure RBAC): you can grant access to user accounts (principals) at a specified scope: subscription, resource group, or individual resources. Azure RBAC lets you deploy resources into a resource group and grant permissions to a specific user or group.
- Service Principal (SP) objects: Along with providing access to user principals and groups, you can grant the same access to a service principal.
In this tutorial we will use Azure RBAC for granting access to the principal user at subscription scope for the Azure built-in role Contributor.
Add API Permission to Service Principal
- Create a Service Principal for configuring the Azure AD integration. You will also need sufficient Azure AD permissions (either a member user of the tenant, or a guest user assigned with role Application administrator) to create an application and service principal on your behalf for the cluster.
az ad sp create-for-rbac --role Contributor --name ${PRINCIPAL_ID} --scopes "/subscriptions/${SUBSCRIPTION_ID}"The above command will return the appID and password. Save the values as appID and appPassword which will be later used during cluster creation.appID=<> appPassword=<> -
Add User.Read permission to the service principal.
az ad app permission grant --id ${appID} --api 00000003-0000-0000-c000-000000000000 --scope User.Read
- Set the relevant subscription ID if you have multiple Azure subscriptions:
az account set –subscription "${SUBSCRIPTION_ID}" - Register the Microsoft.RedhatOpenShift resource provider:
az provider register -n Microsoft.RedhatOpenShift --wait - Register the Microsoft.Compute resource provider:
az provider register -n Microsoft.Compute --wait - Register the Microsoft.Storage resource provider:
az provider register -n Microsoft.Storage --wait - Register the Microsoft.Authorization resource provider:
az provider register -n Microsoft.Authorization --wait
- Access the Red Hat account by logging in or create an account.
- Click Download Pull Secret to download a pull secret to be used by the ARO cluster. Save the pull secret in a file redhat-pull-secret.txt. This secret will later be used when creating the cluster.
- Create a resource group:
az group create –-name ${RESOURCE_GROUP} –-location ${LOCATION} - Create a virtual network:
az network vnet create \ –-resource-group ${RESOURCE_GROUP} \ --name ${ARO_VNET} \ --address-prefixes 10.0.0.0/22 - Add an empty subnet for the master node:
az network vnet subnet create \ –-resource-group ${RESOURCE_GROUP} \ --vnet-name ${ARO_VNET} \ --name ${ARO_MASTER_SUBNET} \ --address-prefixes 10.0.0.0/23 - Add an empty subnet for the worker node:
az network vnet subnet create \
      –-resource-group ${RESOURCE_GROUP} \
      --vnet-name ${ARO_VNET} \
      --name ${ARO_WORKER_SUBNET} \
      --address-prefixes 10.0.0.0/23
az aro create \
      --resource-group ${RESOURCE_GROUP} \
      --name ${ARO_CLUSTER} \
      --client-id ${appID} \
      --client-secret ${appPassword} \
      --vnet ${ARO_VNET} \
      --master-subnet ${ARO_MASTER_SUBNET} \
      --worker-subnet ${ARO_WORKER_SUBNET} \
      --worker-count ${NUM_NODES} \
      --worker-vm-size ${NODE_VM_SIZE} \
      --worker-vm-disk-size-gb ${NODE_VM_DISK_SIZE} \
      --pull-secret @path-to-redhat-pull-secret.txt
- Run the following command to retrieve the password for kubeadm user:
az aro list-credentials \ --name ${ARO_CLUSTER} \ --resource-group ${RESOURCE_GROUP} kube_user=$(az aro list-credentials --name ${CLUSTER} --resource-group ${RESOURCE_GROUP} | jq -r .kubeadminUsername) kube_password=$(az aro list-credentials --name ${CLUSTER} --resource-group ${RESOURCE_GROUP} | jq -r .kubeadminPassword) -
Run the below command to the get the URL to the ARO OpenShift Console:
az aro show \ --name ${ARO_CLUSTER} \ --resource-group ${RESOURCE_GROUP} --query "consoleProfile.url" -o tsv - Run the below command to get API server url for logging in from command line:
url=$(az aro show -g ${RESOURCE_GROUP} -n ${CLUSTER} --query apiserverProfile.url -o tsv)
oc login ${url} -u ${kube_user} -p ${kube_password}
Installing OpenShift Data Foundation (ODF)
Red Hat ODF can be deployed in 3 modes: Internal, Internal-Attached, and External Mode. On ARO, only internal mode is supported.
To install a specific version of the OpenShift Data Foundation, check the Supportability and Interoperability Guide to find the supported ODF versions for a specific OpenShift version.
The below steps are documented based on this command line installation article for OpenShift Data Foundation.
For a complete installation guide, follow the official documentation on OpenShift Data Foundation installation on Microsoft Azure.
Installing the ODF Operator
- Create the openshift-storage namespace:
cat <<EOF | oc apply -f - apiVersion: v1 kind: Namespace metadata: labels: openshift.io/cluster-monitoring: "true" name: openshift-storage spec: {} EOF - Create the openshift-storage-operatorgroup in the above namespace:
cat <<EOF | oc apply -f - apiVersion: operators.coreos.com/v1 kind: OperatorGroup metadata: name: openshift-storage-operatorgroup namespace: openshift-storage spec: targetNamespaces: - openshift-storage EOF - Subscribe to the odf-operator for version 4.9 or later:
cat <<EOF | oc apply -f - apiVersion: operators.coreos.com/v1alpha1 kind: Subscription metadata: name: odf-operator namespace: openshift-storage spec: channel: "stable-4.9" installPlanApproval: Automatic name: odf-operator source: redhat-operators sourceNamespace: openshift-marketplace EOF - Label the nodes where ODF is to be installed. In this example, we are installing ODF on three nodes.
NOTE: ODF should be installed in multiples of 3 nodes.oc label node <node name> cluster.ocs.openshift.io/openshift-storage='' - Create the StorageCluster Custom Resource (CR) and specify managed-premium as the backend storage class:
cat <<EOF | oc apply -f - apiVersion: ocs.openshift.io/v1 kind: StorageCluster metadata: name: ocs-storagecluster namespace: openshift-storage spec: manageNodes: false resources: mds: limits: cpu: "3" memory: "8Gi" requests: cpu: "3" memory: "8Gi" monDataDirHostPath: /var/lib/rook storageDeviceSets: - count: 1 dataPVCTemplate: spec: accessModes: - ReadWriteOnce resources: requests: storage: "100Gi" storageClassName: managed-premium volumeMode: Block name: ocs-deviceset placement: {} portable: false replica: 3 resources: limits: cpu: "2" memory: "5Gi" requests: cpu: "2" memory: "5Gi" EOFNOTES:-
Under .spec.storageDeviceSets, a count of 1 represents a set of three OSDs. If you need to have more than one storageDeviceSet, then increment the count sequentially.
-
Under .spec.storageDeviceSets, for each storageDeviceSet in the list, spec.resources.requests.storage represents the storage size (minimum being 100Gi and maximum 4Ti). The underlying backend storage is using managed-premium which uses the disks provisioned along with cluster creation. NODE_DISK_VM_SIZE * NUM_NODES is the total available storage on the cluster.
-
- Verify if all the pods are up and running:
oc get pods -n openshift-storage - List CSV to see that ocs-operator is in Succeeded phase:
oc get csv -n openshift-storage - Storage Classes created with this installation are:
- ocs-storagecluster-cephfs for shared volume (RWX)
- ocs-storagecluster-ceph-rbd for local block volume (RWO)
Deploy a database instance on the ARO cluster
When you have finished creating your ARO cluster and configured your cloud storage option, you can deploy one of the following instances to the cluster, using the Db2 Operator:
-
A single-partition instance of Db2.
-
A single-partition instance of Db2 Warehouse.
-
A multi-partition instance of Db2 Warehouse.
When you log in to your ARO cluster you will need to complete the following tasks:
-
Create a CatalogSource object in the openshift-marketplace namespace to install the Db2 operator.
-
Create the namespace for the Db2 operator.
-
Deploy the Db2 operator in the namespace.
For information on how to modify your deployment, see Deploying Db2 using the Db2uCluster custom resource.
Procedure
- Log in to your ARO cluster.
- Install the ibm-db2uoperator-catalog in the namespace where openshift-marketplace is installed:
cat << EOF | oc apply -f - apiVersion: operators.coreos.com/v1alpha1 kind: CatalogSource metadata: name: ibm-db2uoperator-catalog namespace: openshift-marketplace spec: displayName: IBM Db2U Catalog image: icr.io/cpopen/ibm-db2uoperator-catalog@sha256:d8b79c87951e3c6659a5901f8e85136cc803b8553e7c05e77a1031704906519b publisher: IBM sourceType: grpc updateStrategy: registryPoll: interval: 45m EOF -
Create a namespace for installing the Db2 operator:
cat <<EOF | oc apply -f - apiVersion: v1 kind: Namespace metadata: name: ${NAMESPACE} spec: {} EOF -
Install an operator group in the namespace:
cat << EOF | oc apply -f - apiVersion: operators.coreos.com/v1 kind: OperatorGroup metadata: name: db2u-operator-group namespace: ${NAMESPACE} spec: targetNamespaces: - ${NAMESPACE} EOF -
Create a subscription in the namespace to deploy the Db2 operator:
cat << EOF | oc create -f - apiVersion: operators.coreos.com/v1alpha1 kind: Subscription metadata: name: ibm-db2uoperator-catalog-subscription namespace: ${NAMESPACE} generation: 1 spec: channel: v110508.0 name: db2u-operator installPlanApproval: Automatic source: ibm-db2uoperator-catalog sourceNamespace: olm startingCSV: db2u-operator.v110508.0.0 EOF -
Check that the db2u-operator pod is deployed:
oc get pods -n ${NAMESPACE} | grep db2u-operator - After the db2u-operator pod is up and running, run the YAML code to deploy your database instance.
Choose from the following:Parameters common to this code include:
Parameters common to this code include: Field Values
(with examples)Description metadata.name db2oltp-test The name of the Db2uCluster CR. metadata.namespace db2u The namespace where the database instance will be deployed. .spec.size 1 The number of Db2 nodes.
For single-partition Db2 and Db2 Warehouse instances, the value is 1; For multi-partition Db2 Warehouse instances, the value can be 2 or greater..spec.environment.database.name BLUDB The database name for the instance. .spec.environment.dbType db2oltp Accepted values: db2wh, db2oltp. .spec.environment.ldap.enabled false To enable LDAP, set this to true. .spec.license.accept true This is a required value that must be set to true. .spec.podConfig.resource.db2u.limits.cpu "2" The CPU limits for the db2u engine pods. Limits and request are set to the same value (which is the expected value). .spec.podConfig.resource.db2u.limits.memory 8Gi The memory limits for the db2u engine pods. Limits and request are set to same value (which is the expected value). .spec.version s11.5.8.0 The Db2u version that the operator supports. The value in the left column is the latest release. .spec.storage [] An array of storage configurations. This is the required storage configuration for meta and data (or shared). - Check the status of your Db2uCluster:
oc get db2ucluster -n ${NAMESPACE} ${DB2U_CLUSTER}DB2U_CLUSTER is the name value set in the metadata section of the YAML code. For example,name: db2oltp-testNOTE: You can define an alternate value for name by using the db2ucluster custom resource. - When the STATE value returned is Ready, the instance is deployed successfully.
oc -n ${NAMESPACE} get db2ucluster ${DB2U_CLUSTER} NAME STATE MAINTENANCESTATE AGE db2-001234567890 Ready None 6h8m - Log on to the database engine pod as db2inst1:
oc -n ${NAMESPACE} exec -it $(oc get pods -n ${NAMESPACE} | grep ${DB2U_CLUSTER}-db2u-0 | awk '{print $1}') -- su - db2inst1 - Connect to the database bludb on your Azure cluster:
db2 connect to bludbNOTE: While we are using the database name bludb for this tutorial, you can change this name by using the db2ucluster custom resource.
To connect to the Db2 database that you deployed on ARO externally, you need to create a Kubernetes LoadBalancer service to expose Db2 engine TCPIP listener port (50000).
Create an External Load Balancer service
Issue the following oc command after logging into the deployed ARO cluster to create a Load Balancer service to expose Db2 engine TCPIP listener port.
In the example below, we are exposing the non-SSL Db2 port number 50000 for a Db2 Warehouse deployment.
cat <<EOF | oc apply -f -
apiVersion: v1
kind: Service
metadata:
  name: ${LOAD_BALANCER_SVC}
  namespace: ${NAMESPACE}
spec:
  ports:
  - port: 50000
    protocol: TCP
    targetPort: 50000
  selector:
    app: ${DB2U_CLUSTER}
    component: db2wh
    formation_id: ${DB2U_CLUSTER}
    role: db
    type: engine
  externalTrafficPolicy: Local
  type: LoadBalancer
EOF
NOTES:
-
The component value in the Label selector used to create the Load Balancer service must match the value used in Db2uCluster CR spec field environment.dbType.
-
The default Load Balancer externalTrafficPolicy is set to Cluster which takes an extra hop to obscure the client source IP. By changing the externalTrafficPolicy setting to Local, the client source IP is preserved. Avoiding this extra hop results in improved stability of in-bound connections.
After the Load Balancer service is created, a public (external) IP is generated, and the target port defined in the service spec is exposed. You can query the service created in the cluster to get this information using following oc command:
oc get svc -n ${NAMESPACE} | grep ${LOAD_BALANCER_SVC}
lb-db2-demo-eastus-001               LoadBalancer   10.0.247.179
20.127.178.10
50000:30856/TCP
     14d d
curl -kv 20.127.178.10:50000
*   Trying 20.127.178.10:50000...
* Connected to 20.127.178.10 (20.127.178.10) port 50000 (#0)
> GET / HTTP/1.1
> Host: 20.127.178.10:50000
> User-Agent: curl/7.79.1
> Accept: */*
Was this topic helpful?
Document Information
Modified date:
21 April 2023
UID
ibm16850833