General Page
Objective
Completing the tutorial gives you a working database instance on AKS. Steps include:
-
Setting up an Azure account.
-
Creating an Azure AKS cluster.
-
Setting up file and block storage for your cluster.
-
Deploying a Db2 database instance to your AKS cluster.
-
Connecting to the Db2 database externally.
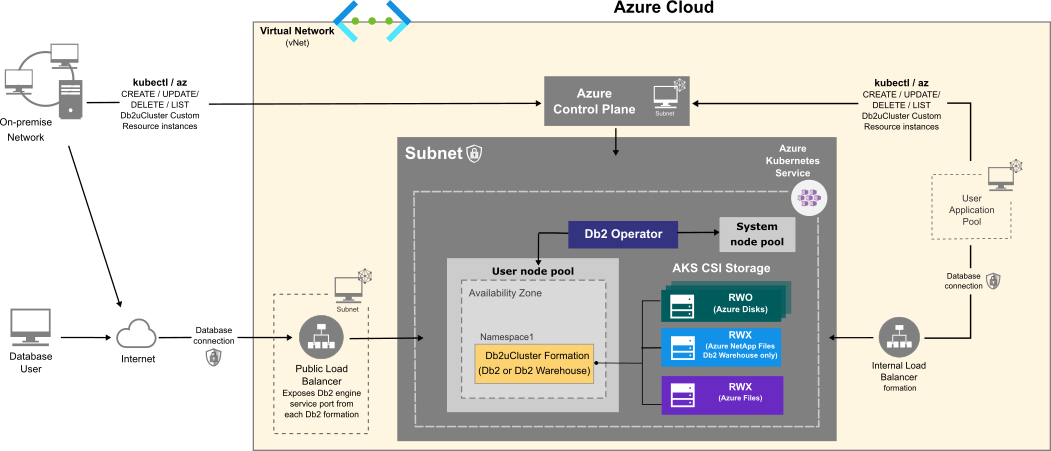
Overview of a Db2/Db2 Warehouse on AKS configuration
Deploying a Db2 or Db2 Warehouse database on Azure AKS can be summarized as follows:
- Your system administrator creates an Azure account and chooses a managed service platform for your database instance. You can run your database on the following Azure managed services:
- Azure Kubernetes Service (AKS).
- Using a series of command-line tools, your administrator creates an AKS cluster based on your specific requirements. An AKS instance is selected, and file and block storage classes are created.
- Your administrator then runs the Db2 Operator and deploys your database instance to your AKS cluster.
Once your database instance is deployed, users can connect to that database in the same way they connect to an on-premises data source.
The flowchart below shows how users interact with the database instance when it is hosted on Azure Kubernetes Service:
Choosing an Azure VM instance type
Use the information in the following tables to determine the size requirements of your Db2 or Db2 Warehouse instance. Based on your selection, go to the list of Azure VM instance types to find the Azure VM instance type that's right for your database deployment. In addition to the sizing values shown in the tables, the instance type list shows other factors to consider, such as cost and region.
For Online Transactional Processing (OLTP) database workloads, choose an instance from the General Purpose or Memory Optimized categories.
Table 1. Sizing guidelines for Db2 OLTP on Azure AKS systems:
|
Size |
CPUs |
Memory (GB) |
Azure Instance Type |
Description |
|
Small |
8 |
24 |
|
|
|
Medium |
16 |
128 |
General Purpose
Memory Optimized
|
|
|
Large |
49 |
1001 |
|
|
Table 2. Sizing guidelines for a single-partition Db2 Warehouse on Azure AKS system
|
Size |
CPUs |
Memory (GB) |
Azure Instance Type |
Description |
|
Small |
7 |
98 |
|
|
|
Medium |
15 |
226 |
|
|
|
Large |
31 |
482 |
|
|
Table 3. Sizing guidelines for a multi-partition Db2 Warehouse on Azure AKS system
| Size | CPUs | Memory (GB) | Azure Instance Type (Suggested) |
Description |
| Small | 39 |
610
|
4 vCPU per partition 2 partitions per pod 5 pods
4 vCPU per partition 3 partitions per pod 3 pods
4 (8) vCPU per partition 4(2) partitions per pod 2 pods
16 vCPU per partition 2 partitions per pod 1 pod
|
|
| Medium | 77 | 1201 |
4 vCPU per partition 3 partitions per pod 6 pods
8 vCPU per partition 2 partitions per pod 4 pods
16 vCPU per partition 2 partitions per pod 2 pods
32 vCPU per partition 2 partition per pod 1 pod
|
40 TB of uncompressed data. |
| Large | 153 | 2406 |
4 vCPU per partition 3 (4) partitions per pod 12 (10) pods
4 vCPU per partition 4 partitions per pod 8 pods
4 vCPU per partition 8 partitions per pod 5 pods
4 (8) vCPU per partition 6 (3) partitions per pod 6 pods
6 vCPU per partition 8 partitions per pod 4 pods
8 vCPU per partition 8 partitions per pod 3 pods
16 vCPU per partition 8 partitions per pod 2 pods
|
80 TB of uncompressed data. |
For more information on single or multi-partition Db2 warehouse environments, see IBM Db2 Warehouse database product portal.
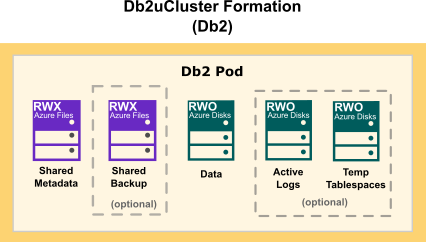
Choosing cloud storage
When choosing cloud storage options for your Db2 on Azure configuration, consider the following points:
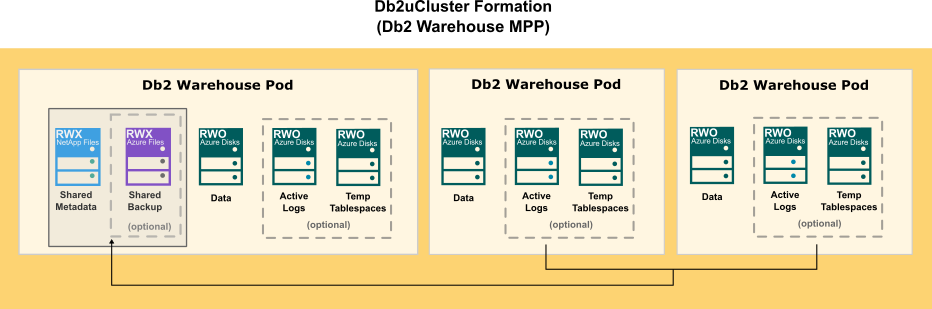
- For databases, logs, and temporary table spaces, use a block storage solution.
- For metadata and backups, use a shared file storage solution.
The following diagram show how storage is distributed in a Db2 multi-partition Warehouse formation:
- az: Azure CLI command-line utility for creating and managing Kubernetes clusters on Azure AKS. When you first use Azure CLI, install the Azure CLI extension. For more information about extensions, see Use extensions with the Azure CLI. Run az version to find the version and dependent libraries that are installed. To upgrade to the latest version, run az upgrade.
- kubectl: The native Kubernetes command-line utility that is used to communicate with the cluster API server. Optionally you can use az aks install-cli command to install kubectl along with kubelogin.
Environment
Before you start the configuration, you need to set some variables locally that are used for this tutorial. When choosing the naming convention for these variable values, we adapted best practices in Azure Define your naming convention - Cloud Adaptation Framework topic. These variables are:
-
PRINCIPAL_ID: The Azure account name that will be used to do all the steps in this tutorial.
export PRINCIPAL_ID=<> -
SUBSCRIPTION_ID: Your Azure subscription ID associated with your Azure account.
export SUBSCRIPTION_ID=<> -
LOCATION: The region where your Azure instances are being deployed. Use eastus.
export LOCATION=eastus -
RESOURCE_GROUP: An Azure resource group is a logical group in which Azure resources are deployed and managed. Use rg-db2-demo-eastus-001.
export RESOURCE_GROUP=rg-db2-demo-eastus-001 -
CLUSTER: The name you use for your AKS Cluster. Use aks- db2-demo-eastus-001.
export CLUSTER=aks-db2-demo-eastus-001
-
NODE_POOL: The name of the VM user node pool where Db2 will be deployed to. AKS Linux node pool names must be only alphanumeric characters up to 12. Use npdb2demo.
export NODE_POOL=npdb2demo - NODE_VM_SIZE: The kind of Azure VM size to select for deploying Db2 workloads in the user node pool:
-
For single-partition Db2 instances, use Standard_D8as_v4.
export NODE_VM_SIZE=Standard_D8as_v4 -
For single-partition Db2 Warehouse instances, use Standard_E16-8as_v4.
export NODE_VM_SIZE=Standard_E16-8as_v4 -
For multi-partition Db2 Warehouse instances, use Standard_E64-32ds_v4.
export NODE_VM_SIZE=Standard_E64-32ds_v4
-
- NUM_NODES: The minimum number of VM nodes for the Azure cluster:
-
For single-partition Db2 instances, use 1.
export NUM_NODES=1 -
For single-partition Db2 Warehouse instances, use 1.
export NUM_NODES=1 -
For multi-partition (small) Db2 Warehouse instances, use 6.
export NUM_NODES=6
-
-
BLOCK_STORAGE_ACCOUNT: Name of the Azure storage account for Block storage. A storage account provides a unique namespace for your Azure Storage data that is accessible from anywhere in the world. Storage account names must be between 3 and 24 characters in length and may contain numbers and lowercase letters only. Use stdb2blockstoracct.
export BLOCK_STORAGE_ACCOUNT=stdb2blockstoracct
-
FILE_STORAGE_ACCOUNT: Name of the Azure storage account for File storage access. Use stdb2filestoracct.
export FILE_STORAGE_ACCOUNT=stdb2filestoracct -
ANF_ACCOUNT: Name of the Azure NetApp account for Azure NetApp Files (ANF) storage access. Required only if you plan to deploy Db2 Warehouse MPP. Use anfdb2acct.
export ANF_ACCOUNT=anfdb2acct -
ANF_POOL: Name of the storage pool for ANF. Required only if you plan to deploy Db2 Warehouse MPP. Use anfpool-db2-demo-eastus-001.
export ANF_POOL=anfpool-db2-demo-eastus-001 -
ANF_VOLUME: Name of the NFS volume for ANF. Required only if you plan to deploy Db2 Warehouse MPP. Use anfvolume-db2-demo-eastus-001.
export ANF_VOLUME=anfvolume-db2-demo-eastus-001 -
ANF_SUBNET: Name of the subnet to delegate to ANF. This subnet must be in the same subnet as your AKS cluster. Required only if you plan to deploy Db2 Warehouse MPP. Use anfsubnet-db2-demo-eastus-001.
export ANF_SUBNET=anfsubnet-db2-demo-eastus-001
-
NAMESPACE: The namespace where your database instance will be deployed. Use db2u.
export NAMESPACE=db2u -
DB2U_CLUSTER: The name used in the metadata section of the db2ucluster custom resource used for deploying Db2. Use db2-aks-demo.
export DB2U_CLUSTER=db2-aks-demo -
LOAD_BALANCER_SVC: The name used in the metadata section of the Public Load Balancer service will expose Db2 database connection outside the AKS cluster. Use lb-db2-demo-eastus-001.
export LOAD_BALANCER_SVC=lb-db2-demo-eastus-001
Create an Azure account
Before you begin to create your Azure cluster, you need to have an Azure account.
-
From a web browser, go to https://azure.microsoft.com/ .
-
Follow the online instructions.
NOTE: You will be contacted by phone and be required to enter a verification code on your phone keypad.
Sign in with Azure CLI
Azure provides numerous authentication methods. We describe the two most common methods bellow.
-
Interactively using device code flow which will open a browser page with the one-time-passcode (OTP) that you can enter into the CLI terminal to complete the login process:
az login -
Non-interactively by providing the credentials in the CLI command:
az login – u <user> -p <password>
Refer to Azure topic Sign in with Azure CLI for details on all the supported authentication methods.
Grant appropriate access to resources
When you allow access to Azure resources, it's best practice to grant users with the minimum privileges that are required to perform a given task. You can grant access to resources in Azure using Azure role-based access control (Azure RBAC) to user accounts (principals) and groups at a specified scope: subscription, resource group, or individual resources.
In this tutorial, we will use Azure RBAC for granting access to the principal user for Azure built-in role Contributor at subscription scope.
az role assignment create --assignee "${PRINCIPAL_ID}" --role "Contributor" --subscription "${SUBSCRIPTION_ID}"
Notes:
- For Enterprise accounts, the subscription is managed by your organizations Azure administration team, who will need to do this role assignment via Azure portal or CLI.
- For your own organization a different built-in role or a custom role might be needed which is applied to a different scope.
Create an Azure Resource Group
Create a resource group using the az group create command.
az group create --name ${RESOURCE_GROUP} --location ${LOCATION}
Create an Azure AKS cluster
You use the az utility to create an Azure AKS cluster for your Db2® deployment. You can also use the utility to define the node type properties for your cluster.
Create an AKS cluster using the az aks create command. The new AKS cluster will be created with a system node pool for hosting critical system services such as CoreDNS. This can be made up of three General Purpose Dv3-series (Standard_D2_v3) compute nodes.
az aks create --resource-group ${RESOURCE_GROUP} --name ${CLUSTER} --vm-set-type VirtualMachineScaleSets --node-count 3 --node-vm-size Standard_D2_v3 --generate-ssh-keys --load-balancer-sku standard
az aks nodepool add --resource-group ${RESOURCE_GROUP} --cluster-name ${CLUSTER} --name ${NODE_POOL} --node-count ${NUM_NODES} --node-vm-size ${NODE_VM_SIZE}
Connecting to the Kubernetes Control plane in the AKS cluster
The majority of the remaining steps in this tutorial will be executed against the Kubernetes control plane of the newly created AKS cluster using kubectl command. To do that, you need to first set up your local kubeconfig to point to the AKS cluster.
Steps
- To manage a Kubernetes cluster, use the Kubernetes command-line client, kubectl. Refer to Before you begin for details on how to install Azure CLI and kubectl.
- Configure kubectl to connect to your Kubernetes cluster using the az aks get-credentials command.
az aks get-credentials --resource-group ${RESOURCE_GROUP} --name ${CLUSTER} - Verify the connection to your cluster using the kubectl get command. This command returns a list of the cluster nodes.
kubectl get nodes
Configure your Azure AKS cluster for file and block storage
Before configuring persistent storage for the AKS cluster, you need to create storage accounts.
Create an Azure Storage Account
A storage account is tied to a specific resource group and a location. In general, resources that have the same lifecycle can use the same resource group, which is the approach taken in this tutorial.
Also, there are different types for storage accounts that support different storage services, redundancy options and varying throughput characteristics.
For this tutorial, we will use Premium Local Redundant Storage (LRS) for both Disk and File storage. Therefore, we need to create two storage accounts one for Disk and other for File access.
az storage account create --name ${BLOCK_STORAGE_ACCOUNT} --resource-group ${RESOURCE_GROUP} --location ${LOCATION} --sku Premium_LRS --kind BlockBlobStorage
az storage account create --name ${FILE_STORAGE_ACCOUNT} --resource-group ${RESOURCE_GROUP} --location ${LOCATION} --sku Premium_LRS --kind FileStorage
AKS leverages Kubernetes dynamic volume provisioning using Container Storage Interface (CSI) drivers. There are three different CSI drivers in AKS that can be used with Db2U deployments:
-
Azure Files
-
Azure Disks
-
Azure NetApp Files
AKS Azure Files and Azure Disks CSI drivers
AKS Container Storage Interface (CSI) drivers are enabled by default on new AKS clusters. If they were not enabled during the cluster creation you can explicitly enable by running the following command:
az aks update -n ${CLUSTER} -g ${RESOURCE_GROUP} --enable-disk-driver --enable-file-driver
Azure Files storage class for file storage
Db2 (OLTP) or Db2 Warehouse SMP can leverage Azure Files CSI driver for both meta and backup storage.
Run the following command on the terminal:
kubectl create -f - <<EOF
---
allowVolumeExpansion: true
apiVersion: storage.k8s.io/v1
kind: StorageClass
metadata:
  name: azurefile-nfs
provisioner: file.csi.azure.com
parameters:
  protocol: nfs
  skuName: Premium_LRS
EOF
Note: If the resource group associated this file storage account is different from the user node pool resource group, explicitly specify them in the parameters of the storage class. For example:
parameters:
  protocol: nfs
  skuName: Premium_LRS
  storageAccount: ${FILE_STORAGE_ACCOUNT}
  resourceGroup: ${RESOURCE_GROUP}
kubectl create -f - <<EOF
---
allowVolumeExpansion: true
apiVersion: storage.k8s.io/v1
kind: StorageClass
metadata:
  name: azuredisk-premium
provisioner: disk.csi.azure.com
parameters:
  skuName: Premium_LRS
EOF
Integrate Azure NetApp Files (ANF) with AKS
Azure File NFS only supports v4.1 protocol. With NFS v4 protocol, lock management does not use side-band RPC/NLM locking like NFS v3; instead, it resorts to a leasing algorithm. Therefore, only the server-side is allowed to manage file locks and there is no mechanism to delegate it to the client-side. However, with NFS v3, which uses RPC/NLM locking, clients can mount with nolock option to take control of lock management.
To deploy Db2 Warehouse MPP (> 1 pod), you need to use a shared volume for metadata, such as Db2 instance home directory location. When NFS v4.1 is used, we have observed file lock contention between the NFS server side and the client side (Db2) around Db2 diagnostic logs saved under DIAGPATH on share meta volume. Therefore, to deploy Db2 Warehouse MPP (> 1 pod), the shared meta volume must use ANF storage.
Register the Microsoft.NetApp resource provider
Use the following az cli command to register ANF CSI provider in your cluster.
az provider register --namespace Microsoft.NetApp --wait
Note: ANF CSI provider registration can take some time to complete.
Create an Azure NetApp Files Account
An account which is different from Azure storage accounts is required to integrate ANF into your AKS cluster. The same resource group however can be still used.
az netappfiles account create --resource-group ${RESOURCE_GROUP} --location ${LOCATION} --account-name ${ANF_ACCOUNT}
Create a subnet to delegate Azure NetApp Files
Create a subnet to delegate Azure NetApp Files using az network vnet subnet create. This subnet must be in the same virtual network as your AKS cluster.
#Get the NODE_RESOURCE_GROUP

NODE_RESOURCE_GROUP=$(az aks show --name ${CLUSTER} --resource-group ${RESOURCE_GROUP} --query nodeResourceGroup -o tsv)
#Get the vnet name for the cluster

VNET_NAME=$(az network vnet list --resource-group ${NODE_RESOURCE_GROUP} --query [].name -o tsv)
#Get vnet id of the vnet

VNET_ID=$(az network vnet show --resource-group ${RESOURCE_GROUP} --name ${VNET_NAME} --query "id" -o tsv)
#Create a subnet under the vnet that was created in the previous step

az network vnet subnet create --resource-group ${RESOURCE_GROUP} --vnet-name ${VNET_NAME} --name ${ANF_SUBNET} --delegations "Microsoft.NetApp/volumes" --address-prefixes 10.0.0.0/28
Create a new capacity pool
Create a new capacity pool by using az netappfiles pool create. The following example creates a new capacity pool named ${ANF_POOL} with 4 TB in size and Premium service level:
az netappfiles pool create --resource-group ${RESOURCE_GROUP} --location ${LOCATION} --account-name ${ANF_ACCOUNT} --pool-name ${ANF_POOL} --size 4 --service-level Premium
Note: The size for the ANF pool must be an integer number of tebibytes (TiB) in multiples of 4. For majority of Db2U deployments the minimum ANF pool size should be sufficient.
Dynamically accessing NetApp Volumes on AKS Cluster
To access NetApp volumes on AKS, you can either use NFS Subdir External Provisioner or Astra Trident open-source storage orchestrator for Kubernetes. In this tutorial, the NFS Subdir External Provisioner is used. To deploy and use Astra Trident, follow the steps documented on the vendor’s official website.
File Storage with NFS Subdir external provisioner
If you are deploying Db2 Warehouse MPP and using NFS Subdir external provisioner, you need to the following steps:
-
Explicitly create an NFS volume exported over NFSv3 protocol from the NetApp capacity pool created previously.
-
Deploy the NFS Subdir external provisioner which will then manage dynamic provisioning of NFS volumes.
-
Create the NFS Subdir external provisioner storage class.
Create an NFS volume for NetApp Files
Create a new NFS volume by using az netappfiles volume create. The following example creates a new NFS volume name ${ANF_VOLUME} with 100GB in size using NFS v3 protocol:
az netappfiles volume create -g ${RESOURCE_GROUP} --account-name ${ANF_ACCOUNT} --pool-name ${ANF_POOL} --name ${ANF_VOLUME} -l ${LOCATION} --service-level premium --usage-threshold 100 --file-path "unique-file-path" --vnet ${VNET_NAME} --subnet ${ANF_SUBNET} --protocol-types NFSv3
Deploy NFS Subdir External Provisioner
The following process is required to deploy the NFS Subdir external provisioner:
- Clone the NFS Subdir external provisioner Git repository.
mkdir external-provisioner cd external-provisioner/ git clone https://github.com/kubernetes-sigs/nfs-subdir-external-provisioner.git cd nfs-subdir-external-provisioner/ -
Create the namespace to deploy the provisioner and create the RBAC.
kubectl create ns external-provisioner NS=$(kubectl config get-contexts|grep -e "^\*" |awk '{print $5}') NFS_NAMESPACE=${NS:-external-provisioner} sed -i'' "s/namespace:.*/namespace: $NFS_NAMESPACE/g" ./deploy/rbac.yaml ./deploy/deployment.yaml kubectl create -f deploy/rbac.yaml -
Get the NFS Volume IP address and the path using az netappfiles volume CLI command.
export NFS_VOL_IP=$(az netappfiles volume show -g ${RESOURCE_GROUP} --account-name ${ANF_ACCOUNT} --pool-name ${ANF_POOL} --name ${ANF_VOLUME} --query mountTargets[].ipAddress -o tsv) export NFS_VOL_PATH=$(az netappfiles volume show -g ${RESOURCE_GROUP} --account-name ${ANF_ACCOUNT} --pool-name ${ANF_POOL} --name ${ANF_VOLUME} --query creationToken -o tsv) -
Update the NFS_SERVER and NFS_PATH in the YAML file used for deploying the NFS Subdir external provisioner to reference the Volume IP address and the path retrieved in the previous step.
-
You can use yq tool to make the above change programmatically using the below process.
os_type=$(uname -s)

case ${os_type} in
    Linux*) sudo wget -qO /usr/local/bin/yq https://github.com/mikefarah/yq/releases/latest/download/yq_linux_amd64; sudo chmod +x /usr/local/bin/yq ;;
    Darwin*) brew install yq ;;
esac

yq -i '(.spec.template.spec.containers[0].env.[] | select(.name == "NFS_SERVER").value |= env(NFS_VOL_IP) | select(.name == "NFS_PATH").value) |= env(NFS_VOL_PATH) | (.spec.template.spec.volumes.[] | select(.name == "nfs-client-root").nfs.server |= env(NFS_VOL_IP) | select(.name == "nfs-client-root").nfs.path) |= env(NFS_VOL_PATH)' ./deploy/deployment.yaml
-
-
Create the NFS Subdir external provisioner using the updated YAML file.
kubectl create –f deploy/deployment.yaml
NFS Subdir External Provisioner storage class for file storage
Run the following command on the terminal:
kubectl create -f - <<EOF
apiVersion: storage.k8s.io/v1
kind: StorageClass
metadata:
  name: nfs-client
provisioner: k8s-sigs.io/nfs-subdir-external-provisioner
parameters:
  archiveOnDelete: "false"
EOF
Installing Operator Lifecycle Manager (OLM) to Deploy Db2u Operator
OLM is a component of the Operator Framework, an open-source toolkit to manage Kubernetes native applications, called Operators, in an effective, automated, and scalable way. OLM extends Kubernetes to provide a declarative way to install, manage, and upgrade Operators and their dependencies in a cluster. You must install the OLM to run the Db2 Operator.
- Create the OLM namespace:
kubectl create namespace olm - Install OLM:
curl -sL https://github.com/operator-framework/operator-lifecycle-manager/releases/download/v0.20.0/install.sh | bash -s v0.20.0 - Check for pods in the olm namespace:
kubectl get pods -n olm
Deploy a database instance on your Azure AKS cluster
When you have finished creating your Azure AKS cluster, and configured your cloud storage option, you can deploy one of the following instances to the cluster, using the Db2 Operator:
-
A single-partition instance of Db2.
-
A single-partition instance of Db2 Warehouse.
-
A multi-partition instance of Db2 Warehouse.
When you log in to your AKS cluster you will need to complete the following tasks:
-
Create the namespace for the Db2 operator.
-
Create a CatalogSource object in the olm namespace to install the Db2 operator.
-
Deploy the Db2 operator in the namespace.
For information on how to modify your deployment, see Deploying Db2 using the Db2uCluster custom resource.
Procedure
- Log in to your Azure AKS cluster.
- Install the ibm-db2uoperator-catalog in the namespace where OLM is installed:
cat << EOF | kubectl create -f - apiVersion: operators.coreos.com/v1alpha1 kind: CatalogSource metadata: name: ibm-db2uoperator-catalog namespace: olm spec: displayName: IBM Db2U Catalog image: icr.io/cpopen/ibm-db2uoperator-catalog@sha256:13d8219d19d6980224200699c4c423332e64de5644b5e5564389012e1a3ff9c1 publisher: IBM sourceType: grpc updateStrategy: registryPoll: interval: 45m EOF -
Create a namespace for installing the Db2 operator:
kubectl create namespace ${NAMESPACE} -
Install an operator group in the namespace:
cat << EOF | kubectl create -f - apiVersion: operators.coreos.com/v1 kind: OperatorGroup metadata: name: db2u-operator-group namespace: ${NAMESPACE} spec: targetNamespaces: - ${NAMESPACE} EOF -
Create a subscription in the namespace to deploy the Db2 operator:
cat << EOF | kubectl create -f - apiVersion: operators.coreos.com/v1alpha1 kind: Subscription metadata: name: ibm-db2uoperator-catalog-subscription namespace: ${NAMESPACE} generation: 1 spec: channel: v110509.0 name: db2u-operator installPlanApproval: Automatic source: ibm-db2uoperator-catalog sourceNamespace: olm startingCSV: db2u-operator.v110509.0.1 EOF -
Check that the db2u-operator pod is deployed:
kubectl get pods -n ${NAMESPACE} | grep db2u-operator - After the db2u-operator pod is up and running, run the YAML code to deploy your database instance.
- Check the status of your Db2uInstance:
kubectl get db2uinstance -n ${NAMESPACE} ${DB2U_INSTANCE}DB2U_INSTANCE is the name value set in the metadata section of the YAML code. For example,name: db2oltp-test - When the STATE value returned is Ready, the instance is deployed successfully.
kubectl -n ${NAMESPACE} get db2uinstance ${DB2U_INSTANCE} NAME STATE MAINTENANCESTATE AGE db2oltp-test Ready None 6h8m - Log on to the database engine pod as db2inst1:
kubectl -n ${NAMESPACE} exec -it $(oc get pods -n ${NAMESPACE} | grep ${DB2U_INSTANCE}-db2u-0 | awk '{print $1}') -- su - db2inst1 - Connect to the database bludb on your Azure cluster:
db2 connect to bludb
To connect to the Db2 database that you deployed on AKS externally, you need to do the following two things:
-
Ensure the AKS cluster is created with Outbound Type: LoadBalancer (--load-balancer-sku standard) option. This was already done at the start of this tutorial.
-
Create a Kubernetes LoadBalancer service to expose Db2 engine TCPIP listener port (50000).
The Azure Public Load Balancer supports both inbound and outbound flows operating at layer (L4) of the OSI model. It distributes inbound flows that arrive at the Load Balancer's front end to the backend node pool instances.
A public Load Balancer when integrated with AKS serves two purposes:
-
To provide outbound connections to the cluster nodes inside the AKS virtual network. A Load Balancer frontend can also be accessed from an on-premises network in a hybrid scenario.
-
To provide access to applications via Kubernetes services of type LoadBalancer. With it, you can easily scale your applications and create highly available services.
An internal (or private) Load Balancer is used where only private IPs are allowed as frontend. Internal Load Balancers are used to load balance traffic inside a virtual network.
Create an External Load Balancer service
Issue the following kubectl command after logging into the deployed AKS cluster to create a Load Balancer service to expose Db2 engine TCPIP listener port.
In the example below, we are exposing the non-SSL Db2 port number 50000 for a Db2 Warehouse deployment.
kubectl create -f - << EOF
---
apiVersion: v1
kind: Service
metadata:
  name: ${LOAD_BALANCER_SVC}
  namespace: ${NAMESPACE}
spec:
  ports:
  - port: 50000
    protocol: TCP
    targetPort: 50000
  selector:
    app: ${DB2U_CLUSTER}
    component: db2wh
    formation_id: ${DB2U_CLUSTER}
    role: db
    type: engine
  externalTrafficPolicy: Local
  type: LoadBalancer
EOF
Notes:
-
The component value in the Label selector used to create the Load Balancer service must match the value used in Db2uInstance CR spec field environment.dbType.
-
The default Load Balancer externalTrafficPolicy is set to Cluster which takes an extra hop to obscure the client source IP. Changing the externalTrafficPolicy setting to Local, the client source IP is preserved, resulting in improved stability for in-bound connections. Refer to AKS topic Maintain the client's IP on inbound connections for more details.
After the Load Balancer service is created, AKS will automatically create a public (external) IP and expose the target port defined in the service spec. You can query the service created in the cluster to get this information using following kubectl command:
kubectl get svc -n ${NAMESPACE} | grep ${LOAD_BALANCER_SVC}
lb-db2-demo-eastus-001   LoadBalancer   10.0.247.179   20.127.178.10   50000:30856/TCP   14d
curl -kv 20.127.178.10:50000
*   Trying 20.127.178.10:50000...
* Connected to 20.127.178.10 (20.127.178.10) port 50000 (#0)
> GET / HTTP/1.1
> Host: 20.127.178.10:50000
> User-Agent: curl/7.79.1
> Accept: */*
Was this topic helpful?
Document Information
Modified date:
21 February 2024
UID
ibm16827085