Authenticating users with LDAP registries in a Microsoft Active Directory forest
Authenticating a user across multiple repositories, or
across a distributed Lightweight Directory Access Protocol (LDAP)
repository, such as a Microsoft Active
Directory forest can be challenging. In any search of the whole user
registry, if there is more than one match at run time, authentication
fails because of ambiguous match results.
Before you begin
In any multiple Microsoft Active
Directory domain environment, the WebSphere® Application
Server administrator must consider that the default unique ID in the Microsoft Active Directory
is the sAMAccountName attribute of a user.
About this task
User IDs are guaranteed to be unique within a single domain.
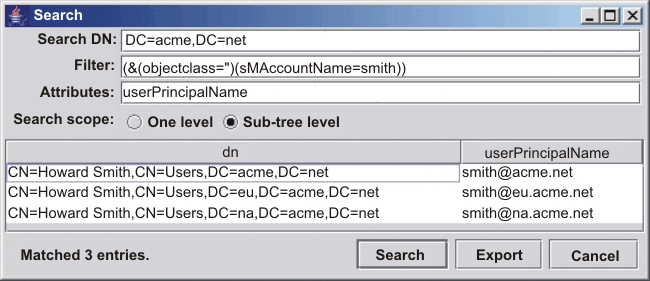
However they are not guaranteed across a tree or a forest. For example,
suppose the user ID, smith, is added in the forest and in each
subdomain. The search for sAMAccountName=smith returns
three matches. WebSphere Application
Server does not authenticate this user when there is more than one
possible match in the registry.
Figure 1. Forest search strategy. . Search illustration of a non-unique sAMAccountName across the
entire forest.
You can mitigate this condition
by changing the user filter to be based on the userPrincipalName attribute
of the user, which is unique across the forest, instead of being based
on their sAMAccountName attribute. However, users must then know
to log in using their userPrincipalName, which they might not know.
The
specific procedure to establish a user filter on a LDAP user registry
depends on the type of LDAP registry. The following examples illustrate
a procedure for a stand-alone LDAP registry and a procedure for a
federated repository registry.
Procedure
Establish a user filter on a stand-alone LDAP registry:
You can set the user filter on the Advance Lightweight Access
Protocol (LDAP) user registry settings page to search for userPrincipalName
instead of sAMAccountName value.
For example:
(&(objectClass=user)(userPrincipalName=%w))
Establish a user filter on a federated repositories
registry:
You can change the log-in property in the
LDAP repository to uid;cn, for example, by using
the administrative console.
Click Security > Global security.
Under Available realm definitions, select Federated
repositories, and then Configure. In a multiple security
domain environment, click Security domains > domain_name.
Under Security Attributes, expand User Realm, and click Customize
for this domain. Select the Realm type as Federated repositories and
then click Configure.
Under Related items, click Manage repositories.
Click Add > LDAP repository.
Under General Properties, add the following information:
Repository identifier
forest
Directory type
Microsoft Windows
Active Directory
Primary host name
forest.acme.net
Port
389
Failover server used when primary is not available
None
Bind distinguished name
cn=wasbind, CN=Users, DC=ib
Bind password
********
Login properties
uid;cn
Click OK and Save to save the changes to
the master configuration.
On the LDAP repository configuration page, under Additional properties,
click Federated repositories property names to LDAP attributes mapping.
Click Add > Supported.
In the Name field, enter userPrincipalName.
In the Property name filed, enter cn.
In the Entity types field, enter PersonAccount.
Click OK and Save to save the
changes to the master configuration.
Locate the {WAS_HOME}\profiles\{profileName}\config\cells\{cellName}\wim\config\wimconfig.xml or profile_root/conf/cells/<cell>/wim/config/wimconfig.xml file
in the deployment manager configuration.
Edit the wimconfig.xml file.
Find the <config:attributeConfiguration> attribute
in the file.
Note: The wimconfig.xml file is
overwritten by the processing of the administrative console. The addition
of these "3" lines to the wimconfig.xml file may
be lost.
Save the wimconfig.xml file.
Run the profile_root/bin/syncNode.bat or profile_root/syncNode.bar/sh script
on all of the nodes in the configuration.
Results
Avoid trouble: When you select any
of these scenarios, consult appropriate Microsoft Active Directory information
to completely understand any implications the scenarios might have
on your configuation planning.