subscribe iconSubscribe to this information

Exchanging the I/O backplane in the model 561 and 570

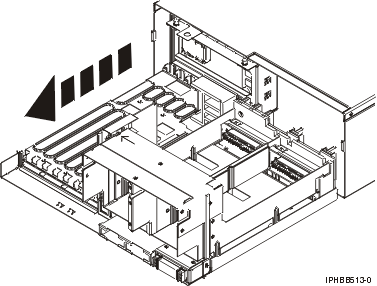
How to remove and replace the I/O backplane.

To remove the I/O backplane from the model 561 and 570, perform the following procedure.

Attention: Before continuing with this procedure, check the SMP processor cable connections and the service processor cable connections. Reference codes, which can be caused by an SMP processor cable or a service processor cable connection, might instruct you to unnecessarily replace the I/O backplane or the service processor card. Before replacing an I/O backplane or a service processor card, check the SMP processor cable and the service processor cable connections (if the cables are installed) by using the following procedure:
  1. If the server is started, stop all the system units that are connected by SMP processor cables and service processor cables.
  2. Check each connection by removing the cable connectors from the server and checking for any damage to the connectors or cables.
  3. Reconnect the SMP processor cables and service processor cables. Ensure that each connector is fully seated and secured into position.
  4. Verify the server operation. If the problem is not corrected, continue with this procedure.
    1. Power off the system (see Powering on and powering off).
    2. Disconnect the plugs to each power supply.
    3. Perform the following from the back of the system: 7
      1. Remove and label all cables from the back of the system.
      2. Remove the PCI adapter cards and empty cassettes from slots 1 through 6 (see model 570 PCI adapters and cassettes).
      3. Remove the model 570 power supplies.
      4. Remove the RIO/HSL card if it is installed in position -C7 (see RIO/HSL card).
        Note: When completing the next step, you only need to remove the service processor assembly temporarily. Therefore you do not need to record the service processor settings or remove the time-of-day battery. If you remove the time-of-day battery some of the service processor settings might be lost.
      5. Remove the model 570 service processor assembly and time-of-day battery.
      6. Remove the VPD card (see Exchanging the VPD card in the model 561 and 570).
  5. Remove the model 570 front cover.
  6. Perform the following from the front of the system:
    1. Model 570 and 9116-561 control panel.
    2. Remove the fans (see Remove the model 570 system unit fan).
    3. Remove the model 570 media-device enclosure.
    4. Remove the model 570 disk drive enclosure.
    5. Remove the voltage regulator card assembly (see model 570 voltage regulator assembly).
    6. Remove the model 570 system processor assembly.
  7. Loosen the thumbscrews (A) at the front of the backplane.
    Loosening the thumbscrews
  8. Slide the backplane from the enclosure.
    I/O Backplane Removal
  9. To install the new I/O backplane, reverse this procedure.
    Note: After installing the backplane securely tighten both thumbscrews. Step 10 must be completed before attempting to power on or IPL the system. If step 10 is not completed before attempting to power on or IPL the system, bus renumbering may occur.
  10. Perform the following to set the configuration ID and MTMS values:
    1. Use the Hardware Management Console (HMC) or PC Web browser to access the ASMI (see Accessing the Advanced System Management Interface).
      Note: The machine type-model-serial (MTMS) value must be set to match the original value found on a label affixed to the side of the enclosure. It cannot be left with the new serial number of the newly replaced I/O backplane, if it is the customer's LPAR I/O assignments will be incorrect. Updating the MTMS value keeps the configuration and error information in sync, and is used by the system when creating the location codes. This must be done using the ASMI, not with the control panel. Refer to Managing the Advanced System Management Interface (ASMI) for information on setting up the ASMI, and Managing your server using the Advanced System Management Interface for information on using the ASMI, for information on using the ASMI, including updating the system configuration settings.
    2. To update the processing unit power control network ID, follow the instructions in Changing processing unit power control network identifier. Change the identifier to one of the following:
      • B2 for a single enclosure system
      • B3 for a multiple enclosure system
    3. To change the system enclosure type, follow the instructions in Setting the system enclosure type.
  11. Reactivate any Capacity on Demand devices using the ASMI. Refer to Using on-demand utilities.This ends the procedure.

Send feedback | Rate this page

Last updated: Fri, Oct 30, 2009