You might need to install, remove, or replace the voltage regulator
assembly. This section includes procedures so that you can perform these tasks.
The system unit might contain
up to three voltage regulator assemblies. The following procedures describe
the installation, removal, and replacement of the voltage regulator assemblies.
To complete these procedures, print the following
topics and then return here.
If the IBM® Systems Hardware Information Center is
available on a PC or a notebook that is close to the system on which you are
installing or replacing parts, you can use the online version.
To print PDFs of these topics, go to Select by feature or part.A voltage regulator assembly can be removed with the system power on if,
when you start the removal procedure, at least one more voltage regulator
assembly is installed than the number of system processor assemblies installed.
That is, one system processor assembly requires two voltage regulator assemblies
to be installed, and two system processor assemblies require three voltage
regulator assemblies to be installed.
A voltage regulator assembly can be added into an empty slot with the system
power on or the system power off.
To determine how many voltage regulator assemblies and system processor
assemblies are installed, do the following:
- If necessary, open the front rack door.
- Remove the front cover from the model 9116-561 or 570.
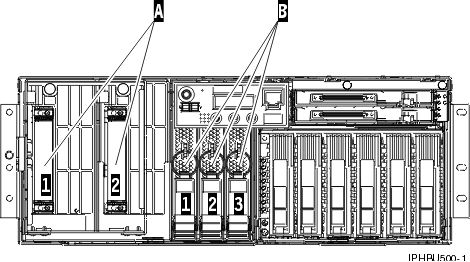
- Count the number of system processor assemblies and voltage regulator
assemblies installed. For example, Figure 1 shows
two system processor assemblies A and three voltage
regulator assemblies B.
Figure 1. System processor assemblies and voltage regulator assemblies (front
view)
Table 1 shows
the possible valid combinations of system processor assemblies and voltage
regulator assemblies for replacing a voltage regulator assembly with the system
power on.
Table 1. Determining when a 9116-561 or 570 voltage
regulator assembly can be removed with the system power on| System processor assemblies A |
Voltage regulator assemblies B |
Replace with system power
on? |
|---|
| x |
|
x |
|
|
No |
| x |
|
x |
x |
|
Yes |
| x |
x |
x |
x |
|
No |
| x |
x |
x |
x |
x |
Yes |
Select the appropriate instructions from this list:
- Install the model 9116-561 or 570 voltage regulator assembly with power on.
- Remove and replace the model 9116-561 or 570 voltage regulator assembly with power on. To remove and replace the
voltage regulator assembly with the power on, you need to have at least one
more voltage regulator assembly installed than the number of system processor
assemblies installed. You also will be removing the
control panel. To remove a control panel with the system power on, you must
first complete the following tasks:
- Gain access to the Advanced System Management Interface (ASMI). For
instructions, see Managing
the Advanced System Management Interface (ASMI).
Note: Only
the primary system unit on a model 9116-561 or 570 has
a functional control panel. For secondary system units, you can remove the
control panel with the power on, and you do not need to access the ASMI.
- Determine if your system has the level of firmware needed to support the
procedure. To determine the level of the system firmware, see View existing
levels of server firmware. If the first 4 characters of the
9-character firmware release level are SF22, SF23, and SF24, the control panel
can be serviced with the system power on. If the first 4 characters of the
9-character firmware release number are SF21, the control panel must be serviced
with the system power off.
- Install the model 9116-561 or 570 voltage regulator assembly with power off.
- Remove and replace the model 9116-561 or 570 voltage regulator assembly with power off.
Ensure that you do not have one more voltage regulator assembly installed
than the number of system processor assemblies installed.