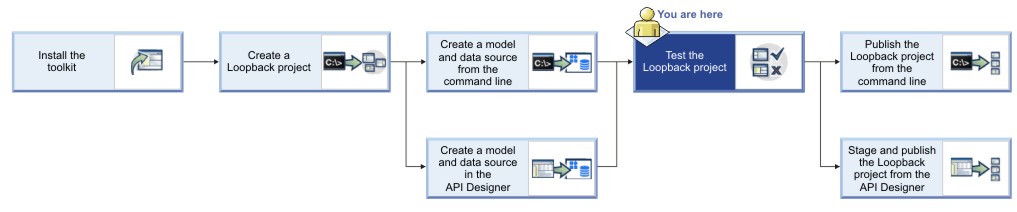
Tutorial: Testing a LoopBack project
This tutorial shows you how to run a LoopBack® project locally for testing by using either the command line or the API Designer Explore tool in IBM® API Connect Version 5.0.6 and earlier.
Before you begin
Before you begin, you must install the developer toolkit on your local machine. For details, see Installing the toolkit.
cd acme-bankAbout this tutorial
- Test a LoopBack project by using the command line
- Test a LoopBack project by using the API Designer Explore tool
Test a LoopBack project by using the command line
[].Test a LoopBack project by using the API Designer Explore tool
To test your API endpoints by using the API Designer Explore tool, complete the following steps:
- Change directories to your LoopBack project and enter the following command:
apic editAfter a brief pause, the console displays this message:Express server listening on http://127.0.0.1:9000API Designer opens in your web browser, initially displaying the login page if you haven't logged in recently.
Note: The login page prompts you to Sign in with IBM Cloud. Enter your IBM Cloud credentials, which authenticates you on IBM Cloud and provides access to the API Manager features such as Publish, Explore, and Analytics. You will continue to work in API Designer locally to create APIs, models and data sources.Note: If you need to run the editor on a different port, use the following command:where port_number is the port number to use.![[Icon indicating that this applies on Linux platforms]](../buildfiles/icon_linux.gif)
![[Icon indicating that this applies on Mac OS X platforms]](../buildfiles/icon_macosx.gif)
PORT=port_number apic edit![[Icon indicating that this applies on Windows platforms]](../buildfiles/icon_win.gif)
set PORT=port_number && apic edit ![[V5.0.0 only]](../buildfiles/icon_v500_only.jpg) Start the local test servers by completing the following steps:
Start the local test servers by completing the following steps:- Click Run.
 then click Start.
- Wait until the
Runningmessage is displayed:
Depending on your project configuration and whether other processes are running, different port numbers might be displayed.
- Click Run.
- Start the local test servers by completing the following steps:
- In the test console at the bottom of the screen, click the Start the servers icon:

- Wait until the
Runningmessage is displayed:
Depending on your project configuration and whether other processes are running, different port numbers might be displayed.
- In the test console at the bottom of the screen, click the Start the servers icon:
- Click http://127.0.0.1:port_number to display the API
root endpoint. For the default LoopBack (empty or
hello-world) project, you'll see something like
this:
{"started":"2016-03-07T22:24:55.322Z","uptime":35.839}Note:- To stop your project, click Stop. To restart it,
click Restart

![[V5.0.1 or later]](../buildfiles/icon_v501.jpg) To stop your project, click the Stop the servers
icon:To restart it, click the Restart the servers icon:
To stop your project, click the Stop the servers
icon:To restart it, click the Restart the servers icon:

- Click
 . You will see the API Explore tool. The side bar shows all the REST operations for the
LoopBack models in the API. Models that are based on
. You will see the API Explore tool. The side bar shows all the REST operations for the
LoopBack models in the API. Models that are based on PersistedModelby default have a standard set of create, read, update, and delete operations. - Click POST /branches in the left pane to display the endpoint to create a
new model instance. The center pane displays summary information about the endpoint, including its parameters, model instance data, and response codes. The right pane provides template code to call the endpoint using the

curlcommand, and languages such as Ruby, Python, Java, and Node. - Edit the values in the JSON shown in the Model instance data section. Try
changing the generated dummy data, then click Call Operation again. You should see the request and response parameters, along with the JSON instance data that you entered.

You can experiment with other operations if you wish, to get a feeling for the standard REST
endpoints of a LoopBack PersistedModel.
-e or --external in the command, opens the Explore tool on 0.0.0.0
instead of the default 127.0.0.1. This option binds the server to all IP addresses on the machine,
and makes the tool accessible on the wider network.What you did in this tutorial
- Tested a LoopBack project from the command line.
- Tested a LoopBack project from the API Designer Explore tool.