Installing, removing, or replacing an accessor and spooling mechanism
 |
CAUTION: Parts can be damaged by electrostatic discharge. Keep parts in electrostatic
containers until needed. Ensure that you are properly grounded when static sensitive components are
touched.
|
Powering off the library
Verify that all host processes are idle, then power off the library from the front panel. Depress
Power and hold it for 5 seconds. If the library does not complete a soft
shutdown, depress and hold Power for 10 seconds.
Important: Under
normal circumstances, when the library is powered off by using the front
Power, the robot automatically parks and locks into the Base Module behind
the Operator Panel. If you are given a choice during the power down procedure, choose the default
park position. To protect the spooling cable or other sensitive parts, the accessor must be
in the Base Module before any components are removed from the library. If it is not, follow the
procedure for returning the accessor to the base module. See Returning the accessor to the Base Module.
Preparing to remove the accessor and spooling mechanism from the Base Module
 |
Warning:
When a module is extended from the library - to reduce the risk of personal injury or damage to equipment
|
- Loosen the front captive screws that connect the Base Module to the rack two full turns.
- If adjacent Expansion Modules exist
- Loosen the front captive screws two full turns on the adjacent expansion modules.
- Unlock the alignment lever.
- Disconnect and completely remove the expansion interconnect cables from the Base Module and from the adjacent modules. Removing the expansion interconnect cables completely prevents damaging the cables when the module is moved in and out of the rack.
- Disconnect the power supply cables on the Base Module.
- Disconnect the Ethernet, SAS, and Fibre Channel cables from the Base Module.
- Completely loosen the front captive screws of the Base Module.
- Slowly extend the Base Module from the front of the rack and remove it from the rack.
- Place the Base Module on a flat, level surface, such as a table.
- Remove the top library cover plate, if present.
- Unlock the top cover with two small screwdrivers.
- Remove the cover from the module.
Removing the accessor and spooling mechanism from the Base Module
- Remove the left and right magazines by using the magazine release levers (circled in Figure 1). Push up on the lever, then pull the
magazine out.
Figure 1. Magazine release levers 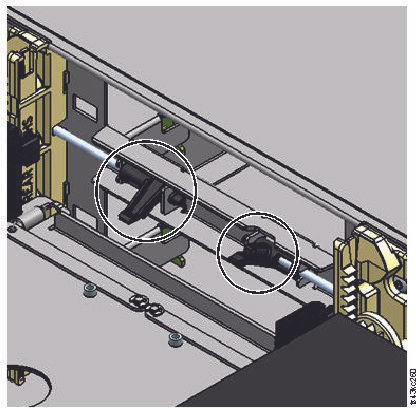
- Slide the cartridge carrier toward the center of the accessor to access the robot-locking lever.
- Standing at the front of the module, unlock the robot by moving the blue lever to the left, then
toward you, then to the right.
Figure 2. Unlocking the robot 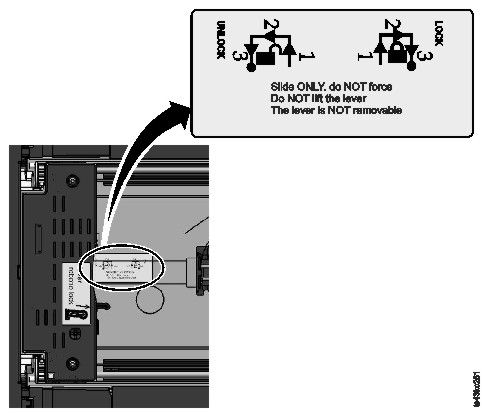
- Place your fingers into the large holes on the accessor and pull up slowly.Note: The accessor offers resistance. Lift the accessor no faster than 12 mm (0.5 inches) per second.
Figure 3. Finger holes 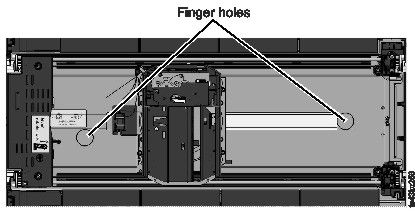
- Lift the accessor gently from the module and place it on top of the gear mechanism. Take care not to damage the spooling cable.
- Lock the robot to keep it from lowering
- On the top of the accessor where the spooling cable is attached, press down on the latch
(1 in Figure 4), then tilt out the piece that holds the spooling cable
(2).Note: Note where the end of the spooling cable pivots in the accessor. It is important to know when you attach the new spooling cable to the accessor. See 2 in Figure 5.
- Lift the spooling cable from the accessor and place it in its cradle at the top of the spooling
mechanism (3 in Figure 4).
Figure 4. Unlocking the spooling cable and placing it in its cradle 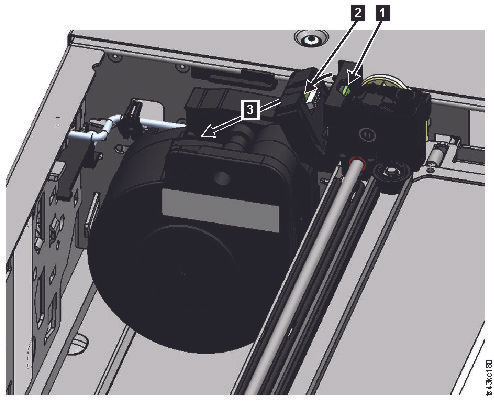
- Place the spooling connector (1 in Figure 5) to the park position.
Figure 5. Spooling cable in park position 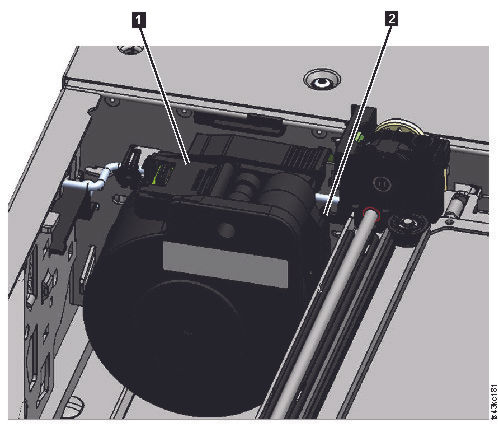
- Unlock the lever and set aside the accessor. See Figure 2.Important: If a tape cartridge is still in the cartridge carrier, remove the cartridge by lifting it straight up. You might need to move the cartridge slightly from side to side.
- Replace the spooling mechanism. Refer to Removing or replacing a spooling mechanism.
Installing the accessor into the Base Module
Important: If an accessor assembly is replaced, the minimum library firmware must be
1.2.1.0-A00. Go to
to update the library firmware.
- Each corner of the accessor has a gear with two protruding pins. Rotate one of the gears on the
accessor so that the two pins are aligned horizontally. See Figure 6
Figure 6. Pins are aligned horizontally 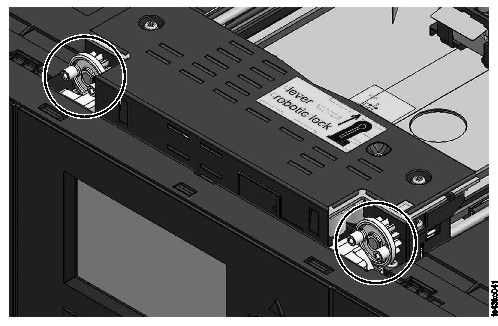
- The accessor is shipped with the robot in the unlocked position. Verify that the replacement unit is locked, then set it on top of the gears.
- Place the gears of the accessor into the grooves on the inside corners of the module. Confirm that all four of the pins are touching the outside of the grooves.
- Standing at the right side of the module, remove the end of the spooling cable from the park position.
- Place the spooling cable into the grooves where it attaches to the accessor and rotate it until
it snaps into place. See Figure 7.
Figure 7. Installing the spooling cable 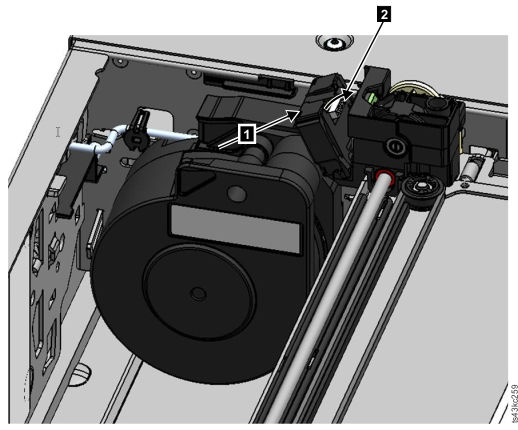
- Unlock the accessor. The accessor drops smoothly. If it does not, check the alignment of the gears.
- Before the accessor gets to the bottom, lock the robot. Standing at the front of the module,
move the blue lever to the left, then away from you, then to the right.Tip: If the end of the spooling cable drops into the module, unlock the accessor, remove it from the module, return the end of the spooling cable to its cradle, return the accessor to its previous position in the module, relock the accessor, and repeat the procedure.
After the accessor and spooling mechanism installation
- Push the magazines back into the module until they lock into place.
- Replace the top cover on the Base Module if you removed one.
- Slide the module into the rack.
- If no adjacent modules exist, tighten the front screws.
- If adjacent modules exist
- Set the alignment mechanisms to the lock position. If you encounter resistance, adjust the upper module so the pin in the alignment mechanism moves into the hole in the lower module.
- When the alignment mechanism is in the locked position, tighten the front screws on the module
- Reconnect the expansion interconnect cables.
- Reconnect the Ethernet, SAS, and Fibre Channel cables to the Base Module.
- Reconnect the power supply cables to the Base Module.
- Pack the failed accessor and spooling mechanism to return to your service.
Powering on the library
- Power on the library by pressing Power on the Base Module just below the Operator Panel for 5 seconds.
- The green light illuminates.
- When the library is powered on, it inventories the tape cartridges in the magazines, checks the firmware version on all modules, configures the tape drives, confirms the presence of the existing modules, and searches for any new modules.
Verifying the installation
- Verify that the library powers on and initializes correctly, and that the status is Ready.
- If the UID LEDs are still illuminated, deactivate them by using the Operator Panel or Management GUI.
- Run Library Verify to ensure that the library is working correctly.