More about the new features in the 1.4 release
New features in the 1.4 release of WebSphere Automation include fix deployment, an improved method of getting information for server registration, and improved email notifications.
- Fix deployment provides one-click download and deploy of fixes
- Easier access to configuration information during server registration
- Improved CVE notification email text
Try out the new features in the cloud and on-premises.
Fix deployment provides one-click download and deploy of fixes
Keeping current with the most recent security vulnerabilities and deploying critical security fixes is one of WebSphere® customers' most reported challenges. WebSphere operations teams currently experience labor intensive, repetitive tasks throughout the application maintenance and vulnerability remediation process. To achieve continuous security, the burden and cost to maintain software needs to be lessened.
The new Fix Deployment capability of WebSphere Automation 1.4 delivers automation that determines which APARs and interim fixes resolve a specific vulnerability, and enables one-click download and deploy of fixes. This capability augments the existing automated vulnerability assessment and fix history tracking.
Selection of the wanted fix – interim fix/APAR, or published fix pack - is possible through the new Prepare fix dialog, which can be found in the CVE details view. Select the target server to fix. The dialog shows all the affected servers that are known to WebSphere Automation, and you can select the fix that you want to apply.

After you select the fix, WebSphere Automation provides two options: Fetch fix and Fetch then install fix. The Fetch then install fix option automatically downloads the fix and then installs it after the download is complete. Previously fetched fixes are stored within WebSphere Automation for immediate reuse. When the installation is deferred to a later time, then the Fetch fix option causes the fix to be downloaded, and stored for later use. This option can be preferable for fix packs because they can take longer to download than interim fixes, especially for traditional WebSphere fix packs.
The Confirm installation dialog, which is shown in the following image, presents a Create backup option and, if you chose to install a fix pack, the Accept license checkbox. After you click Proceed, WebSphere Automation takes over and initiates the requested action.

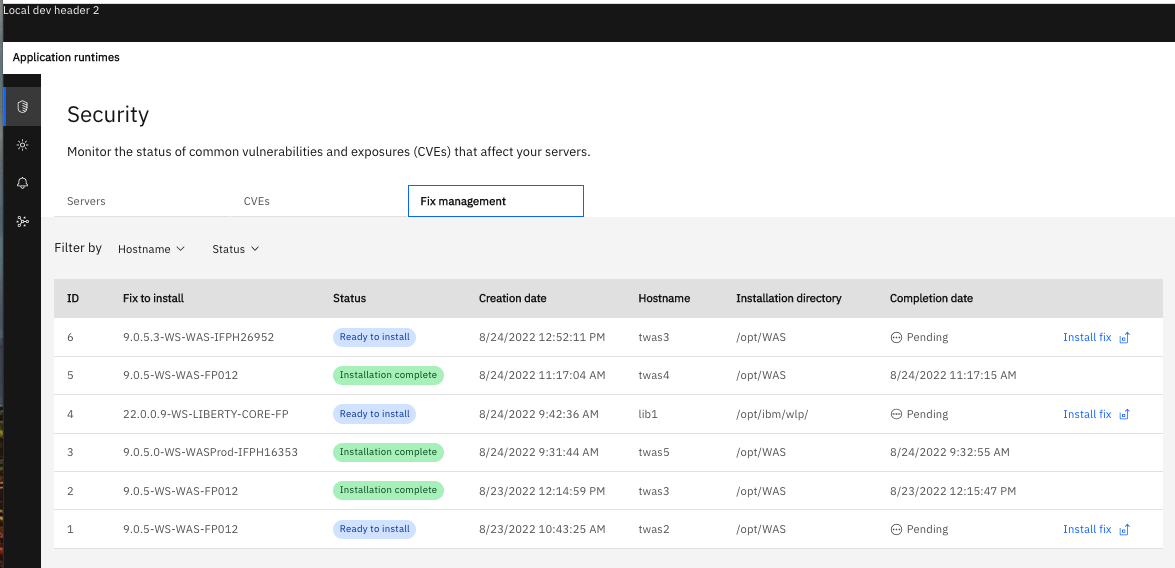
When initiated, a fix management record is created and logged in the Fix management view, which is shown in the following image. This view provides access to all previously initiated fix activities, both successful and unsuccessful, and is the interface to the individual fix management record.
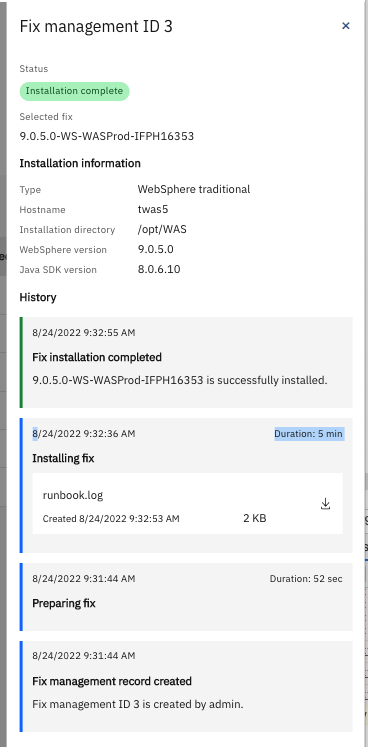
The action history of a specific installation is recorded in the fix management record. The core technology that enables the fix deployment is Ansible®. The runbook log for all actions that are taken through Ansible is available for review, or if the installation was unsuccessful. Click a fix management record to see the action history, similar to the following image.
The new Fix Deployment capability from WebSphere Automation 1.4 alleviates the need to directly access Fix Central to download and deploy fixes. It also integrates with the already-present capabilities to record the changes that are made to the installation to provide security compliance data.
Automate your existing IBM® WebSphere security activities to reduce the cycle time of threat remediation, so your threat exposure is minimized, and your business and most critical assets are protected. Ensure continuous security compliance with automated vulnerability assessment, tracking, and remediation.
You can try the new Fix History features at no cost in the IBM Cloud hosted trial.
This new feature resolves the following requests for enhancement (RFEs):
Easier access to configuration information during server registration
Until now, the Register server button was limited to a simple pointer to the documentation. To get the necessary WebSphere server configuration, you needed to read documentation and have access to the oc interface, and have permissions to query the Red Hat OpenShift cluster directly. This user experience was not ideal. In version 1.4, users can add WebSphere Application Server and Liberty servers to WebSphere Automation without referring to documentation.
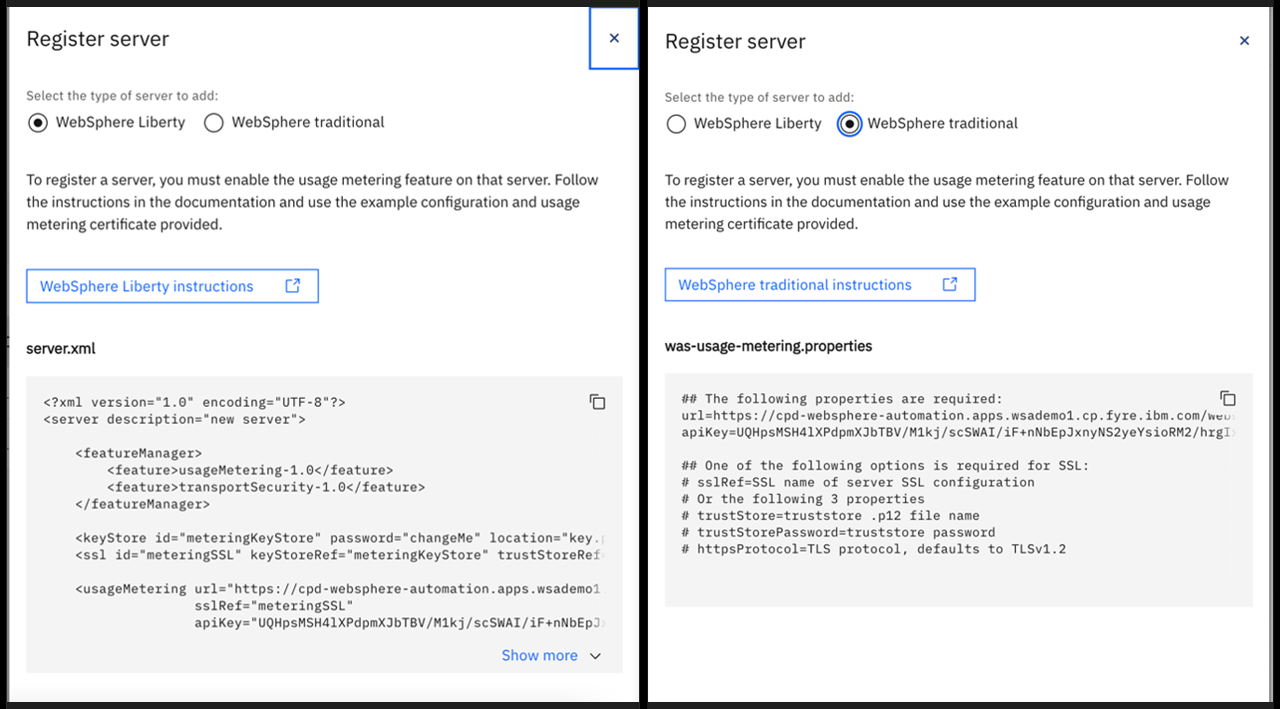
Now the Register server button provides the configuration information that you need by the WebSphere administrator to register a traditional WebSphere Application Server or Liberty server, without ever needing to run oc or kubectl commands. The button provides the traditional WebSphere Application Server and Liberty configuration snippets, with the route and API key values already completed, so you can simply copy and paste the values into the server configuration. New REST APIs that return this same information exist as part of the current set of Technology Preview REST APIs to enable scripting. Examples for both Liberty and WebSphere Application Server are shown in the following image.
Improved CVE notification email text
Customers said that the CVE notification emails were not worded differently enough to distinguish between newly published CVE bulletins and previous CVEs that were unaddressed in newly registered servers. WebSphere Automation 1.4 improves the clarity of the email notifications.
This new feature resolves the https://cloud-platform.ideas.ibm.com/ideas/WASINTOPS-I-66 RFE.
Try out the new features
You can explore the new features and capabilities of WebSphere Automation in the cloud and on-premises. You can try the new fix history features in the IBM Cloud hosted trial at no expense.
You can also get access to a trial of WebSphere Automation that can be used for 60 days at no cost, either on-premises or in a hosted cloud environment. For more information, see Accessing a 60-day trial.