FAQ
Basic Concepts
In this section, the basic questions about the IBM Live Migration Service will be answered.
-
What is a License Bundle?
A license bundle include the licenses that are required for installing agents on the source machines. Once, IBM Live Migration Service account is created, always associate it with a license bundle.A license enables the activation of one agent on a single source machine. When an agent is installed and run on a machine, one license is used. The number of licenses required depend on the number of machines in the source infrastructure that is required to migrate. Each License bundle has 20 licenses. These licenses are single-use and cannot be reused.
-
When does license bundle expire?
The expiration date for each license bundle of the IBM Live Migration Service account license is always 90 days.When a license bundle expires, data replication continues indefinitely for any source machines that have active data replication but cannot launch target machines.
The individual machine licenses also have expiration date. This expiration date refers to the date of agent installation on the source machines. When an individual license date expires, a target machine for the specific source machine that is associated with the license cannot be launched.
-
Who are the different users of IBM Live Migration Portal?
There are three distinct user roles: account owner, account admin, and regular user.-
Account owner
An account owner is a superuser, who is incharge of entire IBM Live Migration Service account. They have special administrator privileges, including full access to all the projects as well as user management capabilities.
An account owner can do everything an account admin can do, while also being able to set another user as an account owner. Each account can have only single account owner. An account owner cannot be deleted. -
Account admin
The Account Admin is a superuser that has special administrator privileges, including full access to all projects as well as User management capabilities, including the ability to:
- Invite users
- Assign users to projects
- Remove users from projects
- Promote users from the regular User role to the account Admin role
- Demote users from account Admin to the regular User role
- Re-invite users
- Delete users.
Multiple account admins per each IBM Live Migration Portal account can be created.
-
User
The user can only work within the projects that the user has been assigned to. They cannot perform any user management actions.
-
Basic Operations
In this section some of the common questions which might arise about the IBM Live Migration Service and the migration steps are explained.
-
How do I sign into the IBM Live Migration Service user console?
You can sign into the IBM Live Migration Service user console by navigating to http://ibm.cloudendure.com/ -
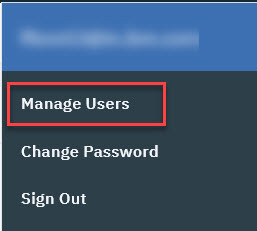
How do I manage users inside the IBM Live Migration Service?
You can manage users through the IBM Live Migration Service user console which can be accessed by clicking the Manage Users from the dropdown in the top-right corner of the screen. -
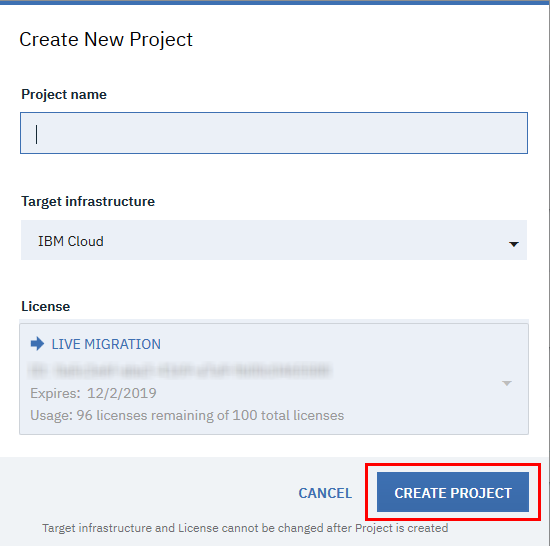
How do I create a project?
You can create a project by signing into the IBM Live Migration Service user console and click on the Blue plus sign at the top-left corner of the console.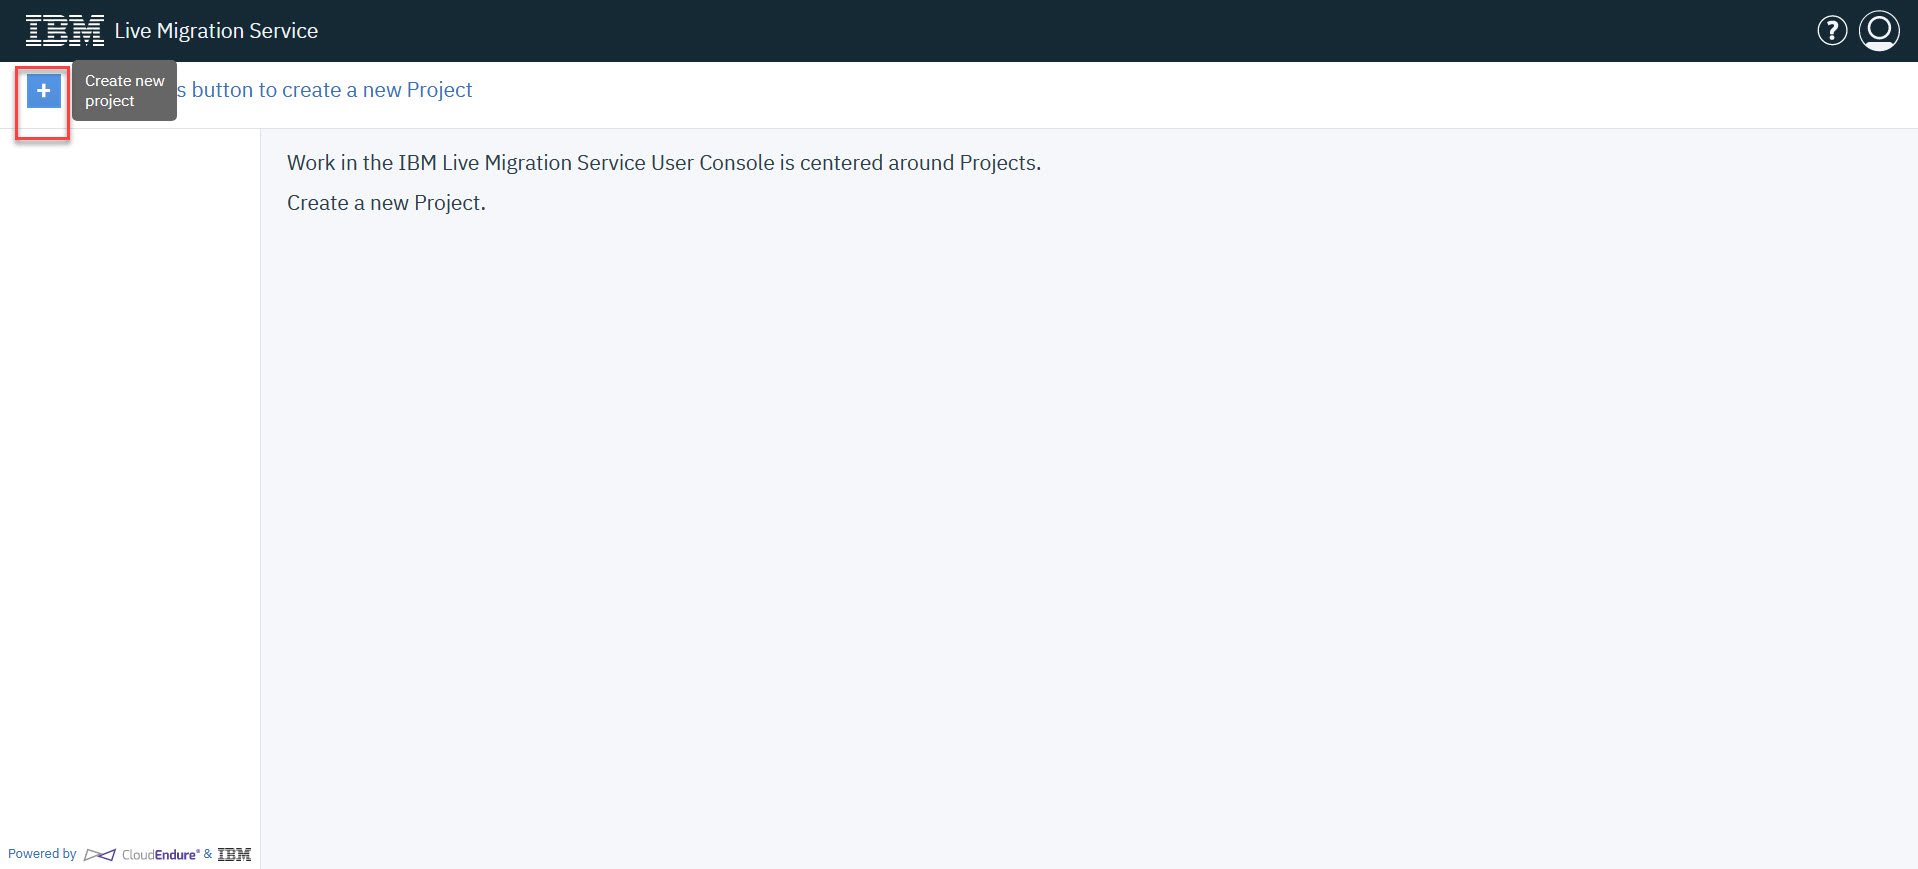
When creating a project, you must define the project name, select the target cloud for the project, and a license Package to associate with the project.
-
How do I add a machine to the IBM Live Migration Service user console?
You can add a machine by installing the migration agent on the machine from the "Setup & Info>OTHER SETTINGS" menu option -
How do I install the IBM Live Migration Service migration agent?
You can install the IBM Live Migration Service migration agent by navigating to the Setup & Info menu on the leftand go to OTHER SETTINGS of the IBM Live Migration service user console and click the link How to Add Machines.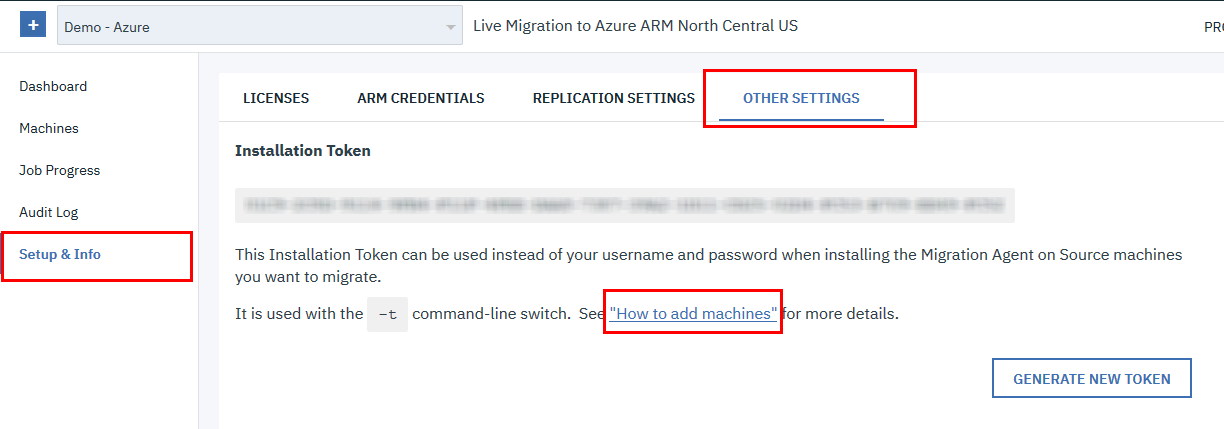
Download the agent installer from How to Add Machines dialog and then run the installation command. The agent installer and installation commands are different for Linux and Windows. You can learn more about performing a standard installation here.
-
How do I remove a machine from the IBM Live Migration Service user console?
You can remove a machine by uninstalling the migration agent from the machine. This can be performed through the console or manually. -
How do I uninstall the Migration agent?
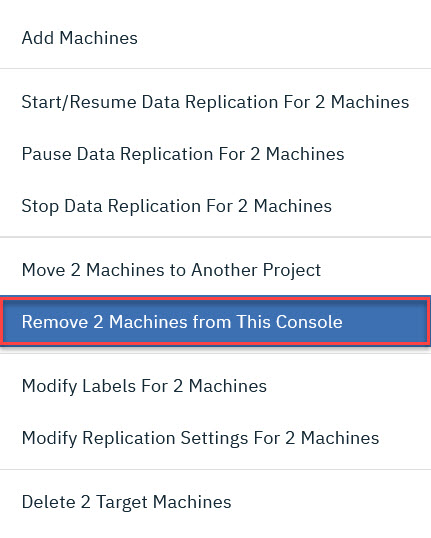
Uninstalling a migration agent from a source machine stops the replication of that machine. When you uninstall the agent via the IBM Live Migration Service user console, you also remove the source machine from it.On the user console, open the Machines tab. Then, check the box next to the name of the source machine from which you want to uninstall the agent.NoteYou can uninstall an agent from multiple machines at once, by selecting all the required machines on the user console.
Then, open the Machine Actions menu, and select Remove X Machine from This Console.

After that, a confirmation message will appear. Click CONTINUE.
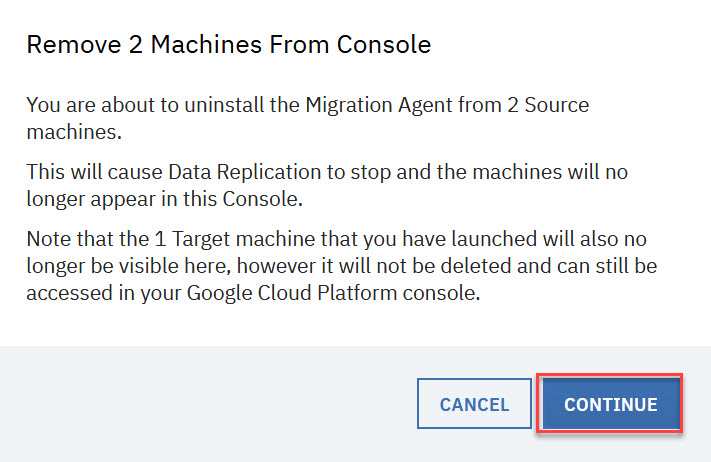
The agent will be uninstalled, the machine will be removed from the user console, and a confirmation message will appear on the top-right corner of the user console.

-
How do I obtain AWS,GCP or Azure Credentials?
You can obtain the credentials through the respective infrastructure. Detailed instructions on how to obtain the credentials for each infrastructure can be found here: -
How do I define my replication Settings for AWS,GCP or Azure?
Each target infrastructure has different replication settings. The following documentation provides a detailed overview of each infrastructure's replication settings: -
How do I define the target machine blueprint?
The target machine blueprint is a set of instructions on how to launch a target machine for the selected source machine. The blueprint settings will serve as the default settings for the creation of the target machine.You can change the blueprint after the target machine has been launched. For the new blueprint setting to take effect, you will need to launch a new target machine.
Accessing a Machine's Blueprint
Select the BLUEPRINT tab from the right-hand top navigation menu.
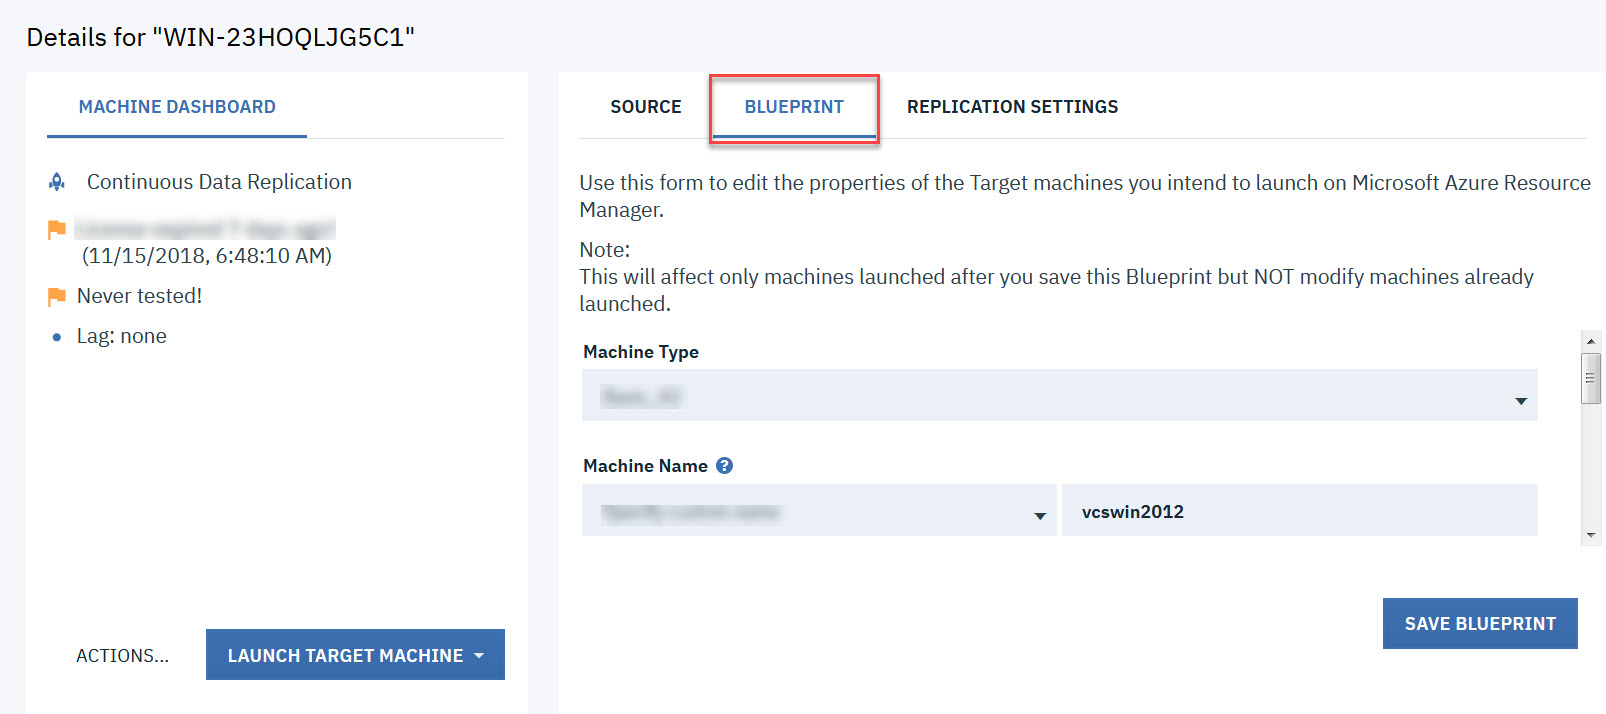
Configuring a Machines Blueprint
You can configure an individual machine's blueprint by editing the fields in the BLUEPRINT tab. Settings differ by platform. The following fields are:

List of blueprint tab field names v/s platforms used
Blueprint Tab Name of the Platform
Field Name GCP Azure AWS Machine Type Select the type of target machine from the dropdown menu. Make sure to select the correct type of machine. Select the type of target machine from the dropdown menu. Make sure to select the correct type of machine. Select the type of target machine from the dropdown menu. Make sure to select the correct type of machine. Subnet You can select an existing subnet, create a totally new subnet, or create a new subnet within an existing subnet. You can select an existing subnet, create a totally new subnet, or create a new subnet within an existing subnet You can select an existing subnet, create a totally new subnet, or create a new subnet within an existing subnet Private IP Inside the subnet,define a VPN. This VPN will communicate with the source machines. Each machine that is launched in the cloud will be allocated a Private IP. By default, a new private IP is created. You can also set a custom private IP.
Note:If you set a new Private IP, verify that it is part of the subnet range and that it is not already taken/used.Inside the subnet, define a VPN. This VPN will communicate with the source machines. Each machine that is launched in the cloud will be allocated a private IP. By default, a new private IP is created. You can also set a custom private IP.
Note: If you set a new private IP, verify that it is part of the subnet range and that it is not already taken/used.Inside the subnet, define a VPN. This VPN will communicate with the source machines. Each machine that is launched in the cloud will be allocated a private IP. By default, a new private IP is created. You can also set a custom private IP.
Note: If you set a new private IP, verify that it is part of the subnet range and that it is not already taken/used.Disks Select the machine disk type, either SSD or Standard. NA NA Network Security Group NA Select the network security group for this machine. NA Security groups NA NA security groups are connected to subnets. You can change the default security group only if you selected an existing subnet (and NOT the Create New ption). Therefore, if you want to configure the security groups value, it is recommended to set in advance its subnet, so the subnet will already appear on the subnet drop-down list. Elastic IP NA NA A fixed public IP that the cloud allocates. Select whether you would like to not use an elastic IP (none), create a new one, or use an existing. public IP (ephemeral) NA NA Free access to all. If you are using a VPN, there is no need for using a public IP for the communication over TCP Port 1500. You can use VPN for both port 1500 and 443. According to the subnet. Use if you want two-way access to and from the Internet. The address does not have to be fixed (it changes every time the machine reboots). Select whether you would like to use a public IP. You also have the option to use the public IP according to subnet configuration. IAM Role NA NA Select an IAM role of the machine if you would like to associate it with a particular IAM in AWS. Initial target Instance State NA NA Select whether you want the initial target instance to be in a started state or in a stopped state. Tags NA NA Add a limited number of optional AWS tags. Volumes NA NA Select the volume type for your target disk. You can select standard, SSD, or provisioned SSD. Please contact support if you wish to use other volume types. -
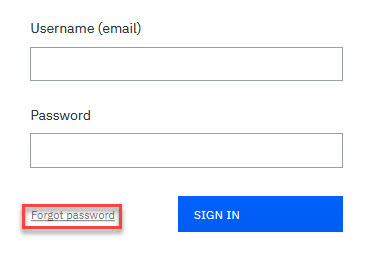
How do I reset my password?
If you forgot your password then, you cannot sign into the user console. Instead you can change it from outside the user console.-
Open the IBM Live Migration Service user console and click the Forgot password Option.
-
This will re-direct you to IBM Support Portal. From the portal create a support ticket for password reset.
- The support team will respond to your ticket with a password reset procedure with steps.
-
-
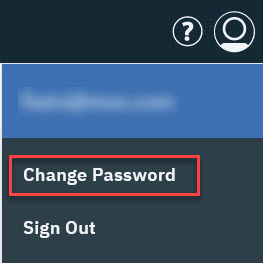
How do I change my password?
To change your password, login with the current password and enter the new password. You can do it from within the user console.-
Open IBM Live Migration Service user console, and click the User icon on the upper-right corner.

-
From the User menu, select the Change Password option.
-
The Change Password dialog box will appear. Enter your current password and a new password. Click CHANGE PASSWORD.
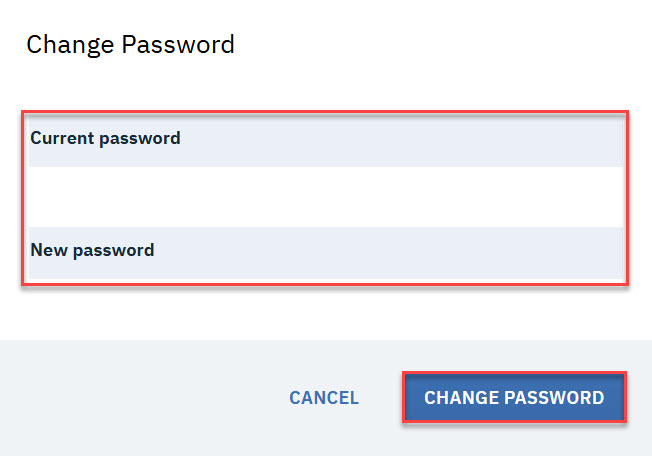
NoteThe password must include at least 8 characters. These characters should contain at least: One uppercase, One lowercase, One digit, One special character.Your password will be changed and you will receive a confirmation message at the upper-right corner of the user console.

-
-
How can I view a report of user activity and events in my projects?
The audit log allows you to view a granular report of all the user activity events that have occurred in each of your projects. The audit log displays each individual event, the time at when that event occurred, the username of the user who initiated the event and a brief description of the event. You can use the audit log to monitor all your IBM Live Migration Service activities, practice enterprise readiness, and as an aid with testing and compliance.
You can access the audit log by navigating to Audit Log on the left-hand navigation menu from any project. The audit log works for all project types.
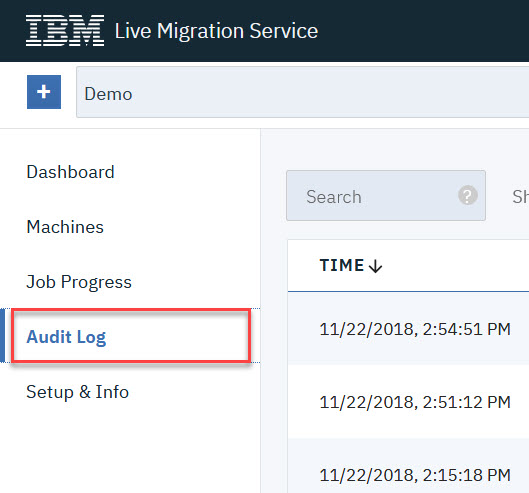
You can learn more about the audit log here.<< please add the refferencess>>
-
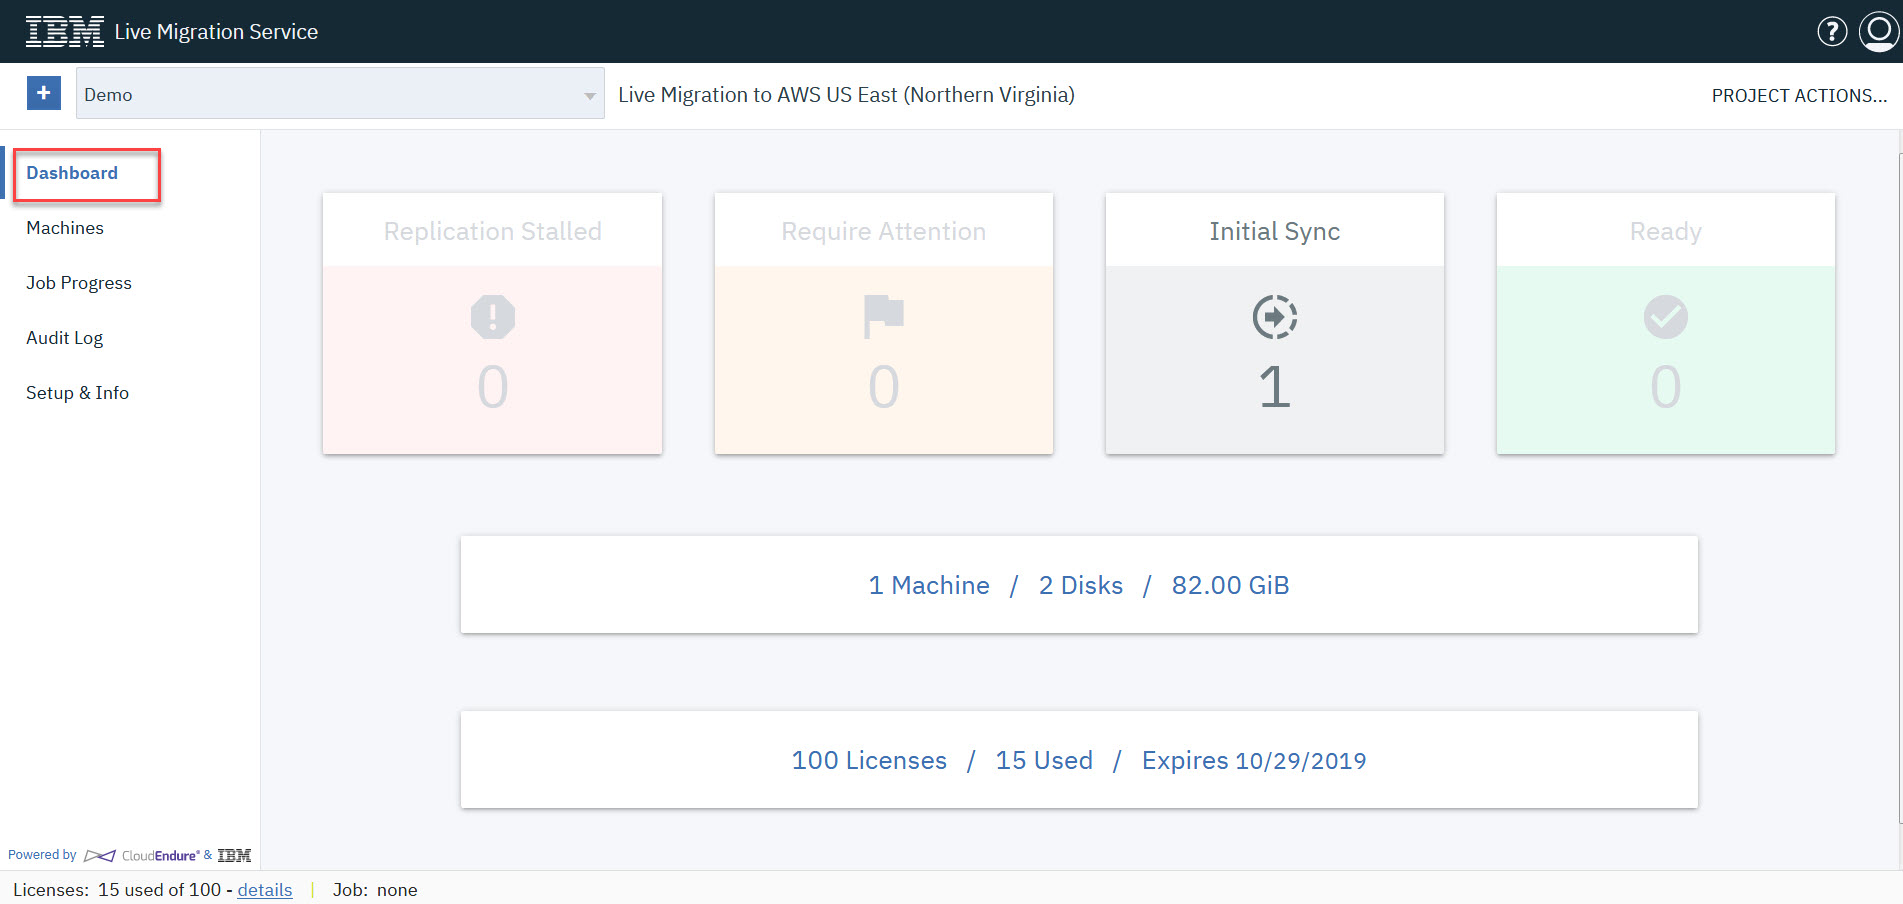
How can I determine the general health of my project?
The dashboard page enables you to view and track the overall state of your solution at the project level.
-
The squares at the top display the replication status of the source machines that are included in the project.

-
The machine information in the middle displays the number of source machines included in the project, the overall number of replicated disks, and the size of the replicated disks:

-
The license information at the bottom displays the number of allocated project licenses, the number of used licenses, and the expiration date of the license package.

-
-
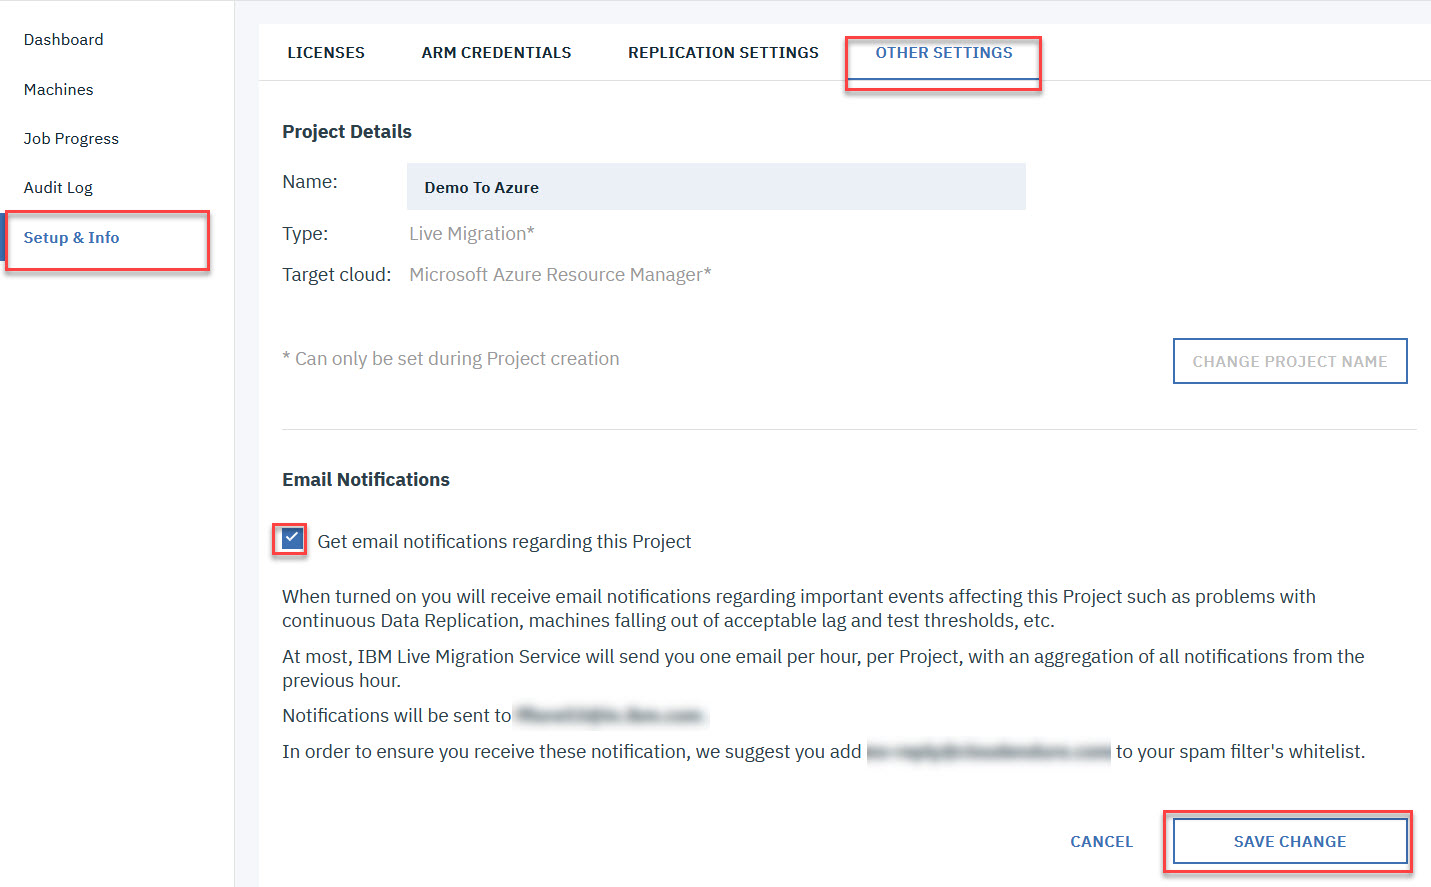
How do I set up email notifications?
You can set email notifications in order to receive notifications regarding important events affecting each of your projects, such as problems with continuous data replication, machines falling out of acceptable lag, and test thresholds.NoteEmail notifications are set based on project. You will have to enable email Notifications for each individual project.NoteIBM Live Migration Service will send you a maximum of one email per hour, with an aggregation of all the notifications received during that time period.NoteEmails are sent to the email associated with your IBM Live Migration Service Account.- To enable email Notifications, navigate to Setup & Info > OTHER SETTINGS and check the box to the left of Get email notifications for this Project. Click SAVE CHANGE.
User Management
In this section the user management inside the IBM Live Migration Service portal will be explained.
-
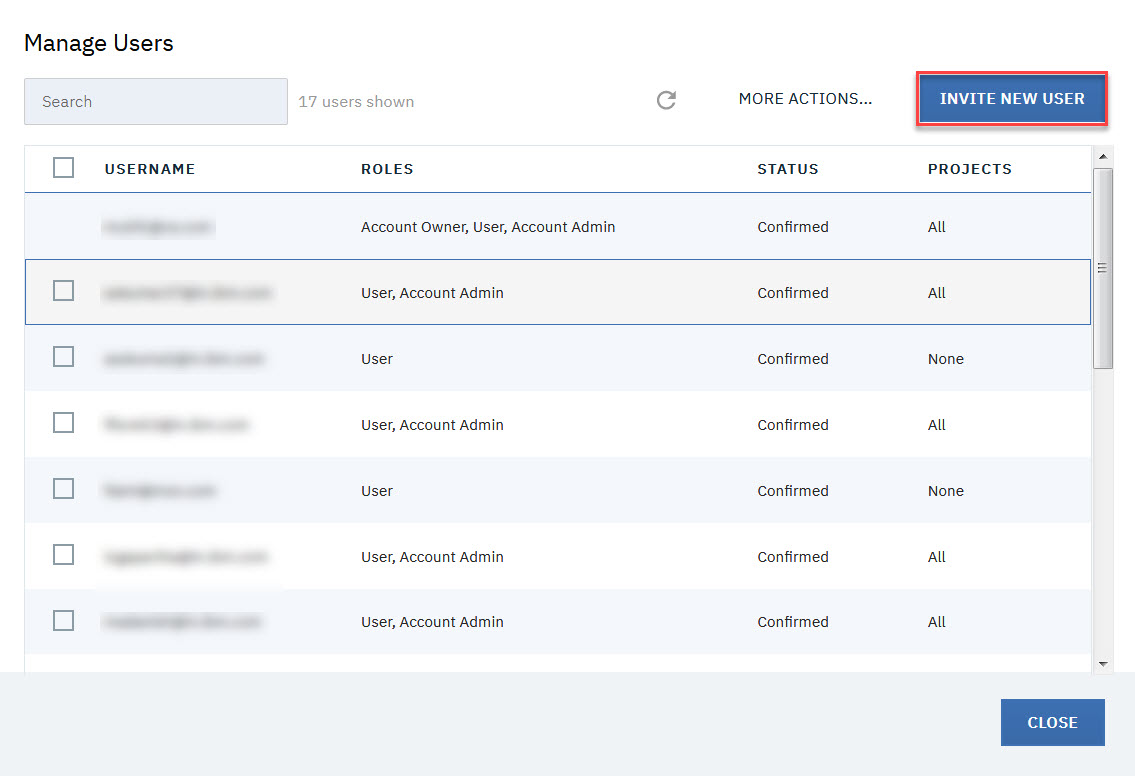
How do I create a new user?
Account admins can create new users by inviting a user to join your account.-
Open the User Menu (on the top-right corner of the IBM Live Migration Service user console) and select Manage Users.

-
Invite new users by clicking on INVITE NEW USERS.
-
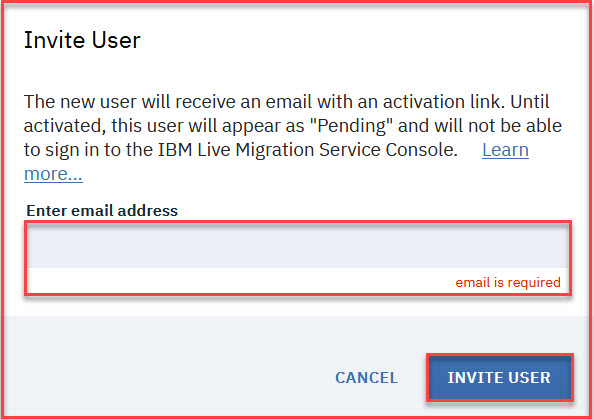
The invite user dialog will open. Enter the email of the user you want to invite and click INVITE USER.
-
The top-right hand corner of the console will display a confirmation about the sent invitation.

-
The invited user will receive an email with an activation link.
NoteThe email link is valid for a single use and expires after one week. You can re-invite users at any time by using the Re-Invite option in the MORE ACTIONS menu.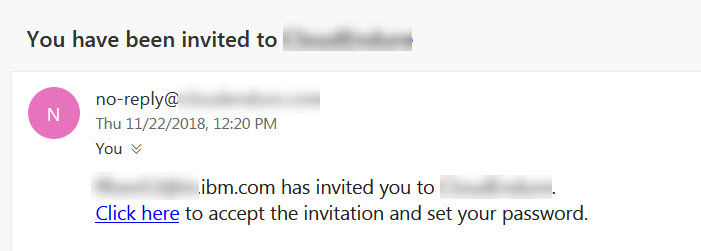
-
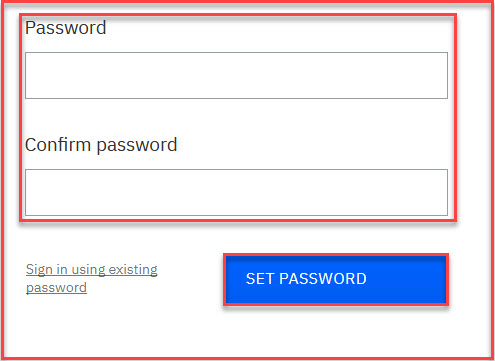
Once the User has accepted their invitation, the user must set a password. The password must be at least eight characters long and must contain at least one lowercase letter, one uppercase letter, one number, and one of these special characters: !@#$%&*"
NoteThe User is not confirmed and cannot sign into the User Console until a password is set. -
Each user must set a password, confirm it, and click SET PASSWORD.
-
After setting the password, the user will be prompted to sign in. Upon signing in for the first time, the user will be asked to accept IBM Live Migration Service's terms of service.


-
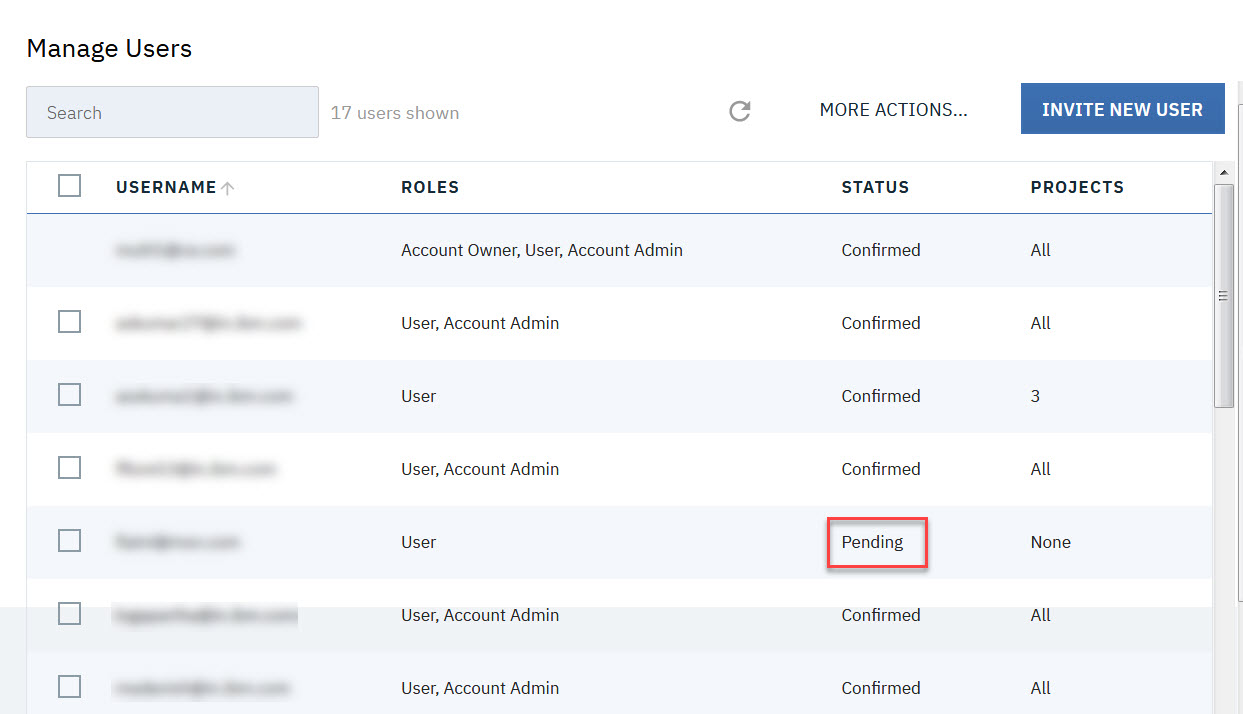
Once a user has set a password, that user will show as Confirmed under the STATUS column.
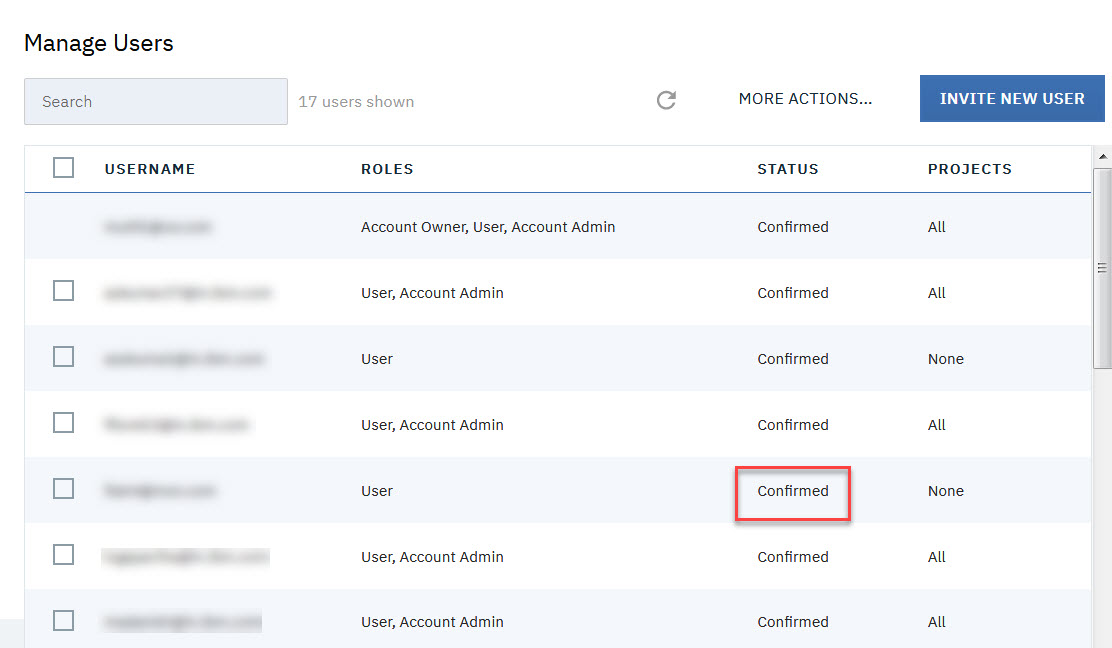
-
Users who have not activated their account by clicking the email link and set the password will appear as Pending under the STATUS column of the Manage Users dialog.
-
-
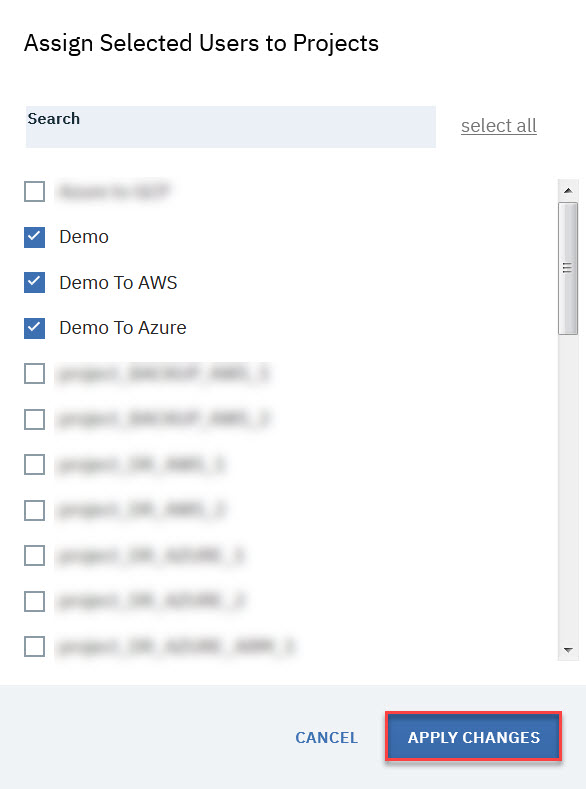
How do I assign users to projects or delete users from projects?
To assign users to the projects or remove users from the projects, first select the users you want to assign or remove by checking the box to the left of the username. Then open the MORE ACTIONS menu and select Assign/Remove Users To/From Projects.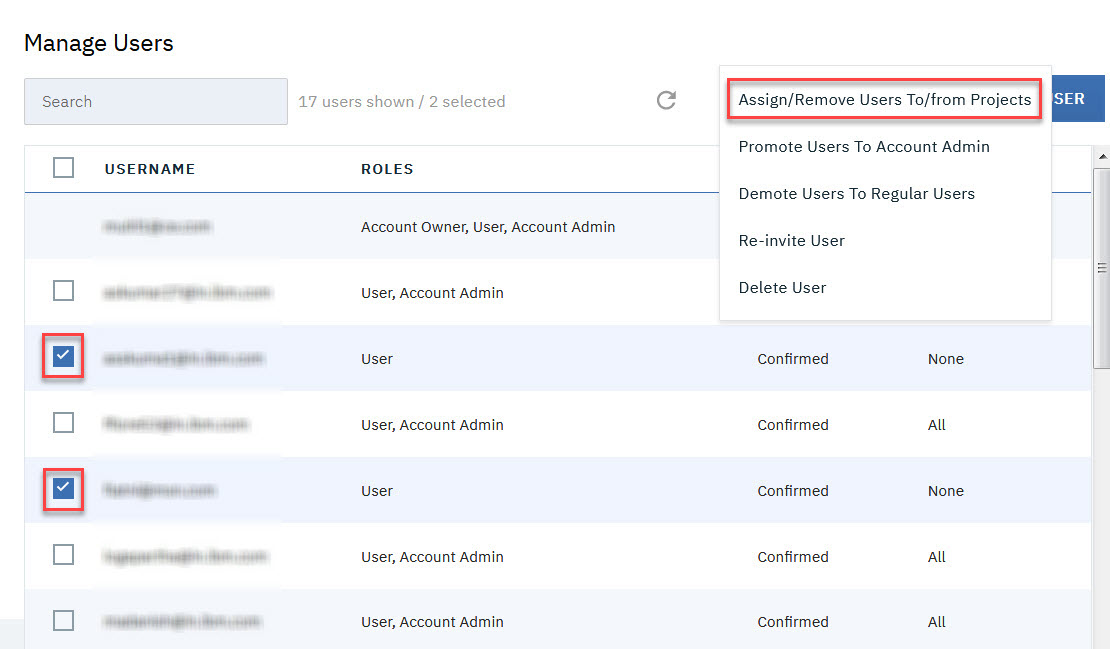
The Assign Selected Users to Projects dialog will appear. Check the box to the left of each project you want to assign the user to. Uncheck the box for the projects from which you want to remove the users. Click APPLY CHANGES to save the changes.
-
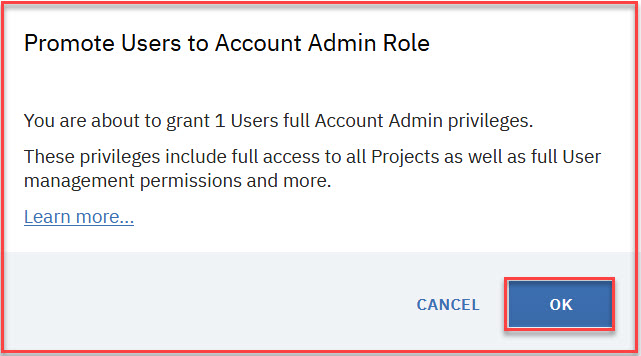
How do I promote Users to the account admin role?
To promote users to the account admin role, first select the users you want to promote by checking the box to the left of the username, then open the MORE ACTIONS menu, and select Promote Users to Account Admin.
The Promote Users to Account Admin Role dialog will appear. Click OK to confirm the promotion.
-
How do I demote users from the account Admin role to a regular user?
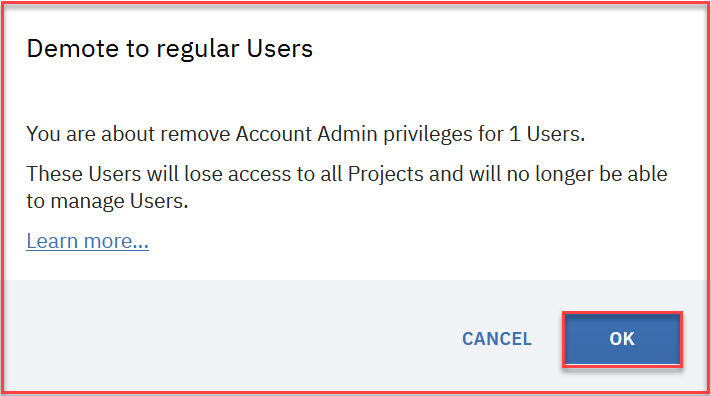
To demote users from the account Admin role to regular users, first select the users you want to demote by checking the box to the left of the username, then open the MORE ACTIONS menu, and select Demote Users To Regular Users.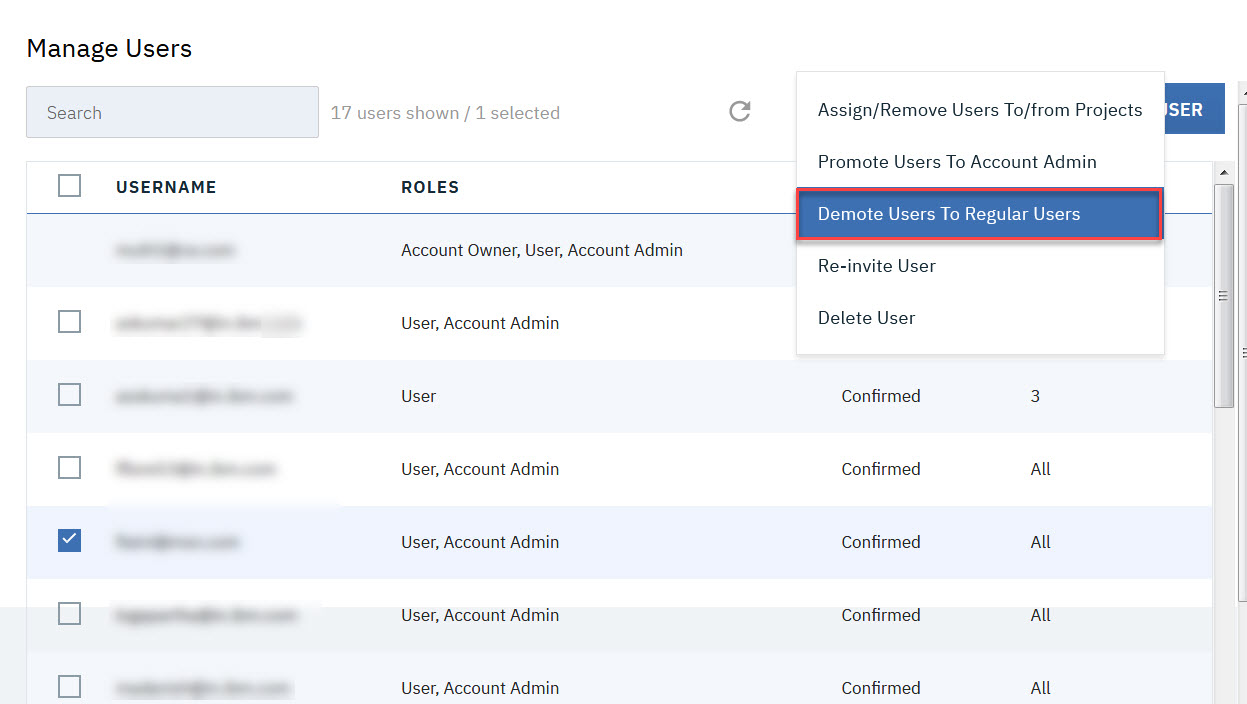
- The Demote to regular Users dialog will appear. The selected users will have their administrator privileges revoked and will be demoted to regular users.
-
Click OK to confirm the demotion.
-
How do I delete users?
To delete a user, select the single user that you want to delete by checking the box to the left of the username, open the MORE ACTIONS menu, and select Delete User.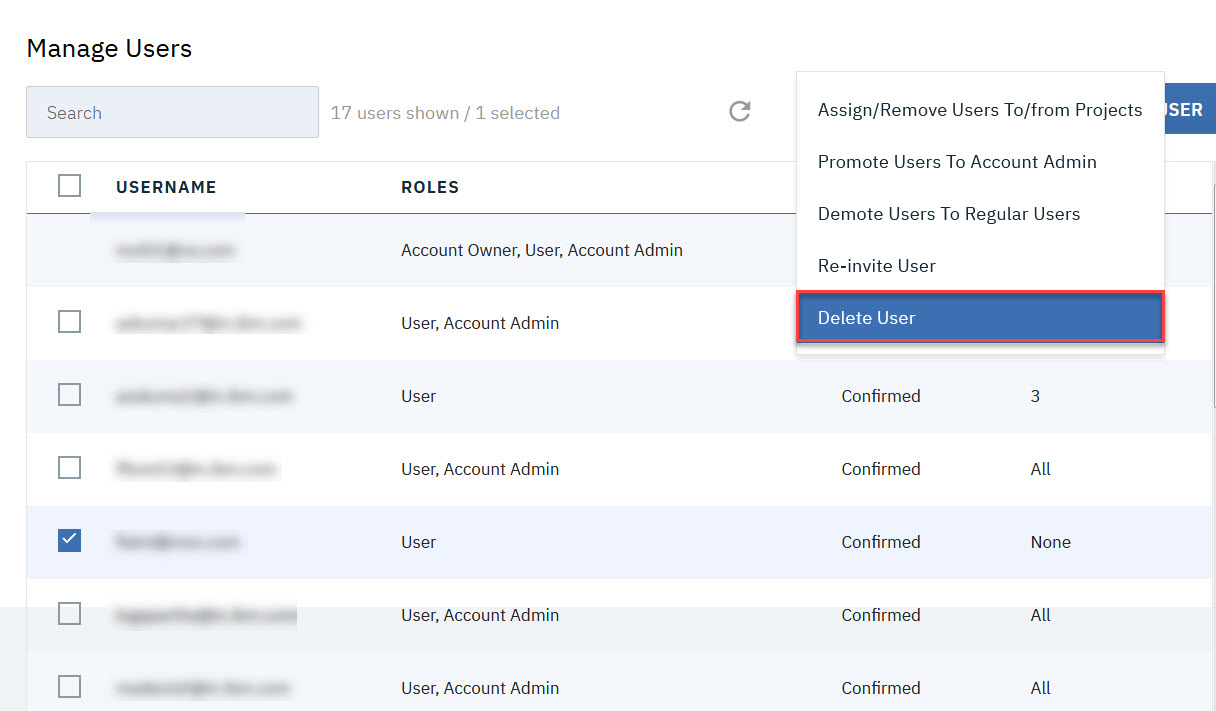
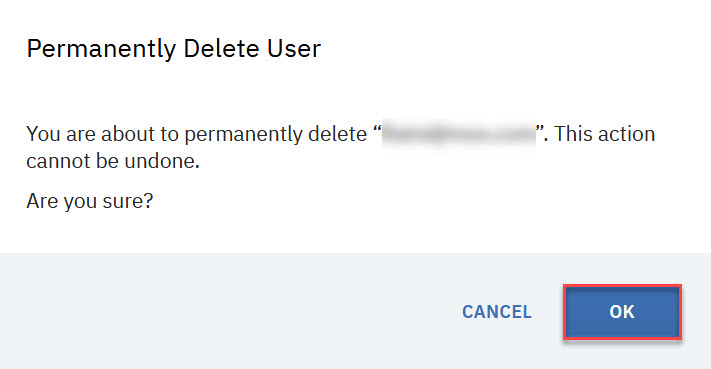
- The Permanently Delete User dialog will appear. The selected user will be permanently deleted from your account.
-
Click OK to confirm the permanent deletion of the user.
Common Questions
In this section you can find answers and guidance to some of the common questions related to IBM Live Migration Service.
-
Can IBM Live Migration Service migrate physical servers?
As IBM Live Migration Service works at the OS layer, it can migrate not only virtual servers but physical ones as well. -
Does IBM Live Migration Service have a more restrictive IAM policy for AWS?
The general AWS IAM policy required for IBM Live Migration Service can be found here. For organizations requiring a stricter policy, there are two JSON files that can be used:- Restricted_IAM_Policy_Tag_Dependent.json can be utilized for generic (on-prem or other cloud provider) to AWS.
-
AWS-AWS-Restrictive.json can be utilized for AWS to AWS replication.
NoteThe [BRACKETED VALUES], including the brackets [] need to be replaced with your respective account values.
-
What data is stored on and transmitted through IBM Live Migration Service servers?
IBM Live Migration Service store only configuration and log data on the IBM Live Migration Service managers’ encrypted database. Replicated data is always stored on your own cloud VPC. The replicated data is encrypted in transit. -
Can IBM Live Migration Service run a script upon target machine boot?
IBM Live Migration Service can run scripts on a target machine after it is launched. This is done by placing scripts in the following folder on the source machine:- Linux: /boot/post_launch (any files that are marked as executable)
-
Windows: c:\Program Files (x86)\CloudEndure\post_launch (any .exe, .cmd or .bat files)
Once you put these scripts in the above folders on the source machine, the folder will be replicated to the target and be executed once after the target instance boots for the first time.
-
What to consider when replicating Active Directory?
There are two main approaches when it comes for migrating Active Directory or domain controllers:- Replicating the entire environment, including the AD server(s): In this approach, it is recommended to launch the target AD servers first, wait until it is up and running. Then launch the other target machines, to make sure the AD servers are ready to authenticate them.
- Leaving the AD server(s) in the source environment: In this approach, the target machines will communicate back to the AD server in the source environment and will take the source machines’ place in the AD automatically. In this case, it is important to conduct any tests using an isolated subnet in the target cloud, so to avoid having the target machines communicate into the source AD server outside of a cutover.
-
Does IBM Live Migration Service work with LVM and RAID configurations?
Yes, IBM Live Migration Service works with any such configuration. -
What is there to note regarding SAN/NAS Support?
- If the disks are represented as block devices on the machine, as most SAN are, IBM Live Migration Service will replicate them transparently, just like actual local disks.
- If the disks are mounted over the network, such as an NFS share, as most NAS implementations are, the Migration agent would need to be installed on the actual NFS server in order to replicate the disk.
-
What are the email notifications does IBM Live Migration Service allow you to set?
You can enable built-in email alerts, which are automatically triggered by common events in the project that may prevent you from meeting your objectives. The notifications can be enabled within the IBM Live Migration Service user console on the Setup & Info > OTHER SETTINGS tab. Notifications are sent no more than once per hour. The following email alerts can be set:- License Expiration - Receive a single notification prior 30 days of expiration of the IBM Live Migration Service license associated with the project.
- Lag Exceeds Threshold - Receive a notification when data replication lag (RPO) for a machine exceeds preset threshold.
- Lag No Longer Exceeds Threshold - Receive a notification when the previously noted data replication (RPO) lag no longer exceeds the threshold.
- Replication Stalled - Receive a notification when data replication for a machine in the project becomes completely stalled.
- Replication No Longer Stalled - Receive a notification when a machine for which data replication was previously stalled, is no longer stalled.
- Machines Not Tested - Receive a notification if a machine has not been tested for over 90 days.
Networking and Ports
In this section you can find detailed explanation and answers to the network and port connectivity in IBM Live Migration service.
-
What is the network topology of the IBM Live Migration Service ?

The following is the basic network diagram of IBM Live Migration Service.
In general, there are three points of contact for IBM Live Migration Services’ components with the external network:
- The IBM Live Migration Service agent needs to communicate with the IBM Live Migration Service Service manager.
- The IBM Live Migration Service agent needs to communicate with the IBM Live Migration Service Replication servers.
- IBM Live Migration Service Replication servers need to communicate with the IBM Live Migration Service Service manager and S3.
-
Which Ports does IBM Live Migration Service utilize?
IBM Live Migration Service utilizes TCP Port 443 and 1500.- Communication over TCP Port 443:
- Between the source machines and the IBM Live Migration Service manager.
- Between the Staging area and the IBM Live Migration Service manager.
-
Communication over TCP Port 1500:
- Between the source machines and the Staging area
- Communication over TCP Port 443:
-
Which IP addresses do you need to whitelist in your firewall for Port 443?
Add the following IP addresses and URLs to your firewall:- Required for all customers
- IBM Live Migration Service Service manager IP Address (requires for utilizing IBM Live Migration Service software)
- 50.19.144.132
- 13.52.54.28
- Amazon S3 Buckets (required for downloading IBM Live Migration Service software)
- s3.amazonaws.com
- s3.us-east-2.amazonaws.com
- AWS specific (required for customers using AWS)
- The Replication Server requires outbound access to the EC2 endpoint of its AWS region.
- GCP specific (required for customers using GCP)
- 52.53.64.125
-
Azure specific (required for customers using Azure)
- login.microsoftonline.com
- management.azure.com
- blob.core.windows.net
NoteAzure customers that have a Firewall enabled on their storage Account and only allow access from selected networks must add the IBM Live Migration Service manager IPs (50.19.144.132 and 13.52.54.28) and the Replication server subnets above to the rules by navigating to firewalls and virtual networks in their storage Account and adding the values under the firewall category.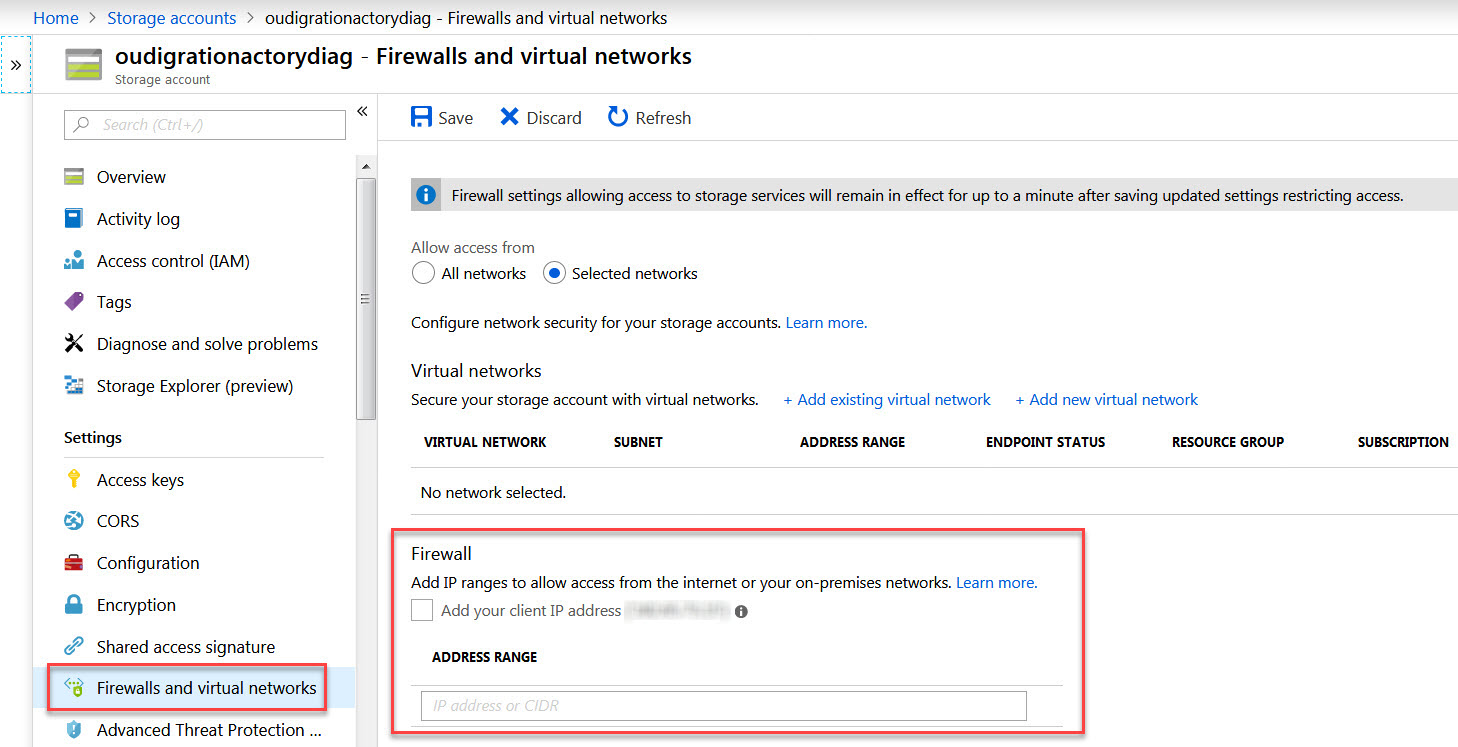
-
Which operations does IBM Live Migration Service perform between the source Machines and the IBM Live Migration Service manager over port 443?
Each source machine that is a part of your IBM Live Migration Service must continuously communicate with the IBM Live Migration Service manager and IBM Live Migration Service console over TCP port 443. The following are the main operations performed through TCP port 443:- Downloading the agent through the IBM Live Migration Service agent installer onto the source machines.
- Upgrading the installed agents.
- Connecting the source machines to the console, and display their replication status.
- Monitoring the source machines for internal troubleshooting, and the use of resource consumption metrics (CPU, RAM).
-
Reporting replication-related events (for example, replication started, replication stopped, replication reached X%).
-
How do you establish communication between the source machines and the IBM Live Migration Service Manager over Port 443?
You can establish communication between the source machines and the IBM Live Migration Service Manager over TCP port 443 in two ways:- Direct communication between the source machines and the service manager.
- Indirect communication by using a proxy.
-
Ensure that you have whitelisted https://ibm.cloudendure.info for both SSL interception and authentication.
NoteAWS clients should whitelist s3.amazonaws.com and should not enforce authentication. -
To use a proxy, the following environment variables need to be configured on the source machines:
-
For https_proxy, use: https://server-ip:port/
NoteThe value must end with '/'.NoteUser Variables should not be modified.
-
Which operations are performed between the Staging Area and the IBM Live Migration Service Service Manager over Port 443?
The replication servers on the Staging area must continuously communicate with the IBM Live Migration Service manager over TCP Port 443. The main operations that are performed through this route are:- Downloading the replication software by the replication Servers.
- Connecting the replication servers to the service manager, and display their replication status.
- Monitoring the replication servers for internal troubleshooting use and resource consumption metrics (CPU, RAM).
- Reporting replication-related events.
-
How do you configure communication over port 443 between the Staging area and the IBM Live Migration Service Manager?
You can establish communication between the Staging area and the IBM Live Migration Service manager over TCP port 443 in two ways: direct or indirect communication.-
Direct communication between the Staging area and the Service manager:
- AWS - there are 3 ways to establish direct connectivity to the Internet for the VPC of the Staging Area, as described in the VCP FAQ.
- GCP - there are 2 ways to establish direct connectivity to the Internet for the VPC of the Staging Area:
- Public IP address
- Private IP address + NAT instance
- Azure
- Public IP address
- Private IP address + NAT instance
-
Indirect communication through the use of a proxy.
To use a proxy:
Open the IBM Live Migration Service user console, and navigate to Setup & Info > REPLICATION SETTINGS.
On the Define whether to route communication from the replica Server via a proxy field, enter the details of the proxy after the https://
NoteIf your proxy uses a non-standard port, then the firewall of the Replication Servers may need to be modified to allow outbound traffic to that specific port. You can modify outbound traffic in the following ways:AWS - Modify the security group.
Azure - Modify the network.
GCP - Modify the firewall rule.
-
-
Which operations are performed between the source machines and the Staging area over port 1500?
Each source machine with an installed agent must continuously communicate with IBM Live Migration Service Replication servers in the Staging area over TCP Port 1500. TCP Port 1500 is needed for the transfer of replicated data from the source machines to the Staging area.
The replicated data is encrypted and compressed when transferred over TCP port 1500. Prior being moved into the Staging area, the data is encrypted on the source infrastructure using Advanced Encryption Standard (AES) 256-bit and SSL. The data is decrypted once it arrives at the Staging area and before it is written to the disks.
-
How do you calculate the required bandwidth needed for a connection over Port 1500?
The required bandwidth for transferring the replicated data over TCP Port 1500 should be based on the write speed of the participating source machines. The recommended bandwidth should be at least the sum of the average write speed of all replicated Source machines.Minimal bandwidth = the sum of the write speed of all source machines
For example, suppose you are replicating two source machines. One has a write speed of 5 MBps (meaning, 5 megabytes of data every second), while the other has 7 MBps. In this case, the recommended bandwidth should be at least 12 MBps.
Finding the write speed of Your source machines
To calculate the required bandwidth for transferring replicated data over TCP port 1500, you need to know the write speed of your source machines. Use the following tools to find the write speed of your source machines:
-
Linux
-
Use the iostat command-line utility, located in the systat package. The iostat utility monitors system input/output device loading and generates statistical reports.
The iostat utility is installed with yum (RHEL/CentOS), via apt-get (Ubuntu), and via zypper (SUSE.)
-
To use iostat for checking the write speed of a source machine, enter the following:
iostat -x <interval>-x - displays extended statistics.
<interval>- the number of seconds iostat waits between each report. Each subsequent report covers the time since the previous report.For example, to check the write speed of a machine every 3 seconds, enter the following command:
iostat -x 3We recommend that you run the iostat utility for at least 24 hours, since the write speed to the disk changes during the day, and it will take 24 hours of runtime to identify the average running speed.
-
-
Windows
-
Install and use the DiskMon application. DiskMon logs and displays all hard disk activity on a Windows system.
-
Installing DiskMon
DiskMon presents read and write offsets are presented in terms of sectors (512 bytes). Events can be either timed for their duration (in microseconds), or stamped with the absolute time that they were initiated.
-
-
About projects
This section talks about the project related questions.
-
How do I rename a project?
You can change the name of an existing project. This change will not affect the operation of the project.- On the user console, from the project list, select the project whose name you want to change.
- Select the Setup & Info menu, and click the OTHER SETTINGS tab.
- On the Project Details section - Name field, enter a new name for the project. Click the CHANGE PROJECT NAME button.
-
How do I delete a project?
Deleting the project will delete the following from the target infrastructure:- Replication servers
- Conversion servers
- Snapshots
- Volumes
-
In addition, IBM Live Migration Service agents will be uninstalled from the source infrastructure.
Importanttarget machines are NOT deleted following a project deletion.Deleting a project is highly destructive. Please do not delete a project unless you are absolutely sure that you wish to delete it!
- You can delete a project after completing its Live Migration procedure.
- From the project list, select the project you want to delete.
- Click the PROJECT ACTIONS button at the top-right and select the Delete Current project action.
- A message display, to confirm the deletion. Click the DELETE PROJECT button.
About agents
This section discusses the important topics around IBM Live Migration Service agent and the questions related to the agents.
-
What does the IBM Live Migration Service agent do?
The IBM Live Migration Service agent performs an initial block-level read of the content of any volume attached to the server and replicates it to the Replication server. The agent then acts as an OS-level read filter to capture writes. It synchronizes any block level modifications to the IBM Live Migration Service Replication Server, ensuring near-zero RPO. -
What kind of data is transferred between the agent and the IBM Live Migration Service Manager?
The IBM Live Migration Service agent sends the following types of information to the IBM Live Migration Service Manager:- Monitoring metrics of the agent itself
- Replication status (started, stalled, resumed)
- Backlog information
- OS and hardware information.
-
Can a proxy server be used between the source server and the IBM Live Migration Service console?
Yes. The proxy is configured using an environment variable prior to the install.https_proxy=https://PROXY:PORT/For example:
https_proxy=https://10.0.0.1:8088/Make sure the proxy has a trailing forward slash.
-
What are the pre-requisites needed to install the IBM Live Migration Service agent?
- Windows server
- The IBM Live Migration Service agent needs to be installed as an administrator (either local or domain).
- When replicating a Windows machine to AWS, .NET Framework 4.5 or higher should also be installed on the machine, otherwise the installation of the agent will fail.
- Linux
- Python is installed on the machine - Python 2 (2.4 or above) or Python 3 (3.0 or above).
- At least 60MB of free space under /boot
- The active bootloader software is GRUB 1 or 2.
- Ensure /tmp is mounted as read+write.
- /tmp is mounted with the exec option (mounting it with noexec will fail installation and prevent replication from working)
- The IBM Live Migration Service agent needs to be either a root or a user in the sudoers list.
- For some Linux machines, the installation of the agent will need to use the gcc, make and kernel-devel packages. gcc and make can be of any version. Ensure gcc, make, openssl, wget & curl are installed. Verify PATH is set correctly for the above - ie, 'which make', 'which lsmod' (if not, set /sbin and /usr/sbin to 'root's PATH). On such machines, if the packages above are not installed, the IBM Live Migration Service agent Installer will attempt to install them automatically.
- Install the correct kernel-headers package (verify which kernel is currently running [uname -r] and install that same version of kernel-headers-
uname -r). If that version is not in the YUM repo', please download its RPM from http://rpm.pbone.net/. Kernel-devel has to be of the same version as the running kernel.
- Windows server
-
What ports does the IBM Live Migration Service agent utilize?
The Agent utilizes TCP port 443 to communicate to the IBM Live Migration Service manager and TCP Port 1500 for replication to the target. -
How can I perform an unattended install of the IBM Live Migration Service agent?
The IBM Live Migration Service agent can be installed using standard software distribution tools. The install is silent and does not require a reboot.For Windows you can use the following command line:
installer_win.exe --no-prompt -t INSTALLATION_TOKENIn PowerShell, running remote commands using Invoke-Command does will not accept the parameters provided. The parameter need to be passed in the following method:
$arguments = @("--no-prompt", "-u $using:cloudEndureLoginId", "-p $using:cloudEndurePassword")start-process "C:\CloudEndure\installer_win.exe" -ArgumentList $arguments
For Linux use the following:
Usage: cloudendure_installer [options]
Options:
-u USERNAME, --username=USERNAME
-p PASSWORD, --password=PASSWORD
--no-prompt
--devices=DEVICES Devices to protect
--no-replication
Example of an unattended installation:
sudo python installer_linux.py --no-prompt -t INSTALLATION_TOKEN -
What kind of resources does the IBM Live Migration Service agent utilize?
The IBM Live Migration Service agent is lightweight and non-disruptive. The agent utilizes approximately 5% CPU and 250MB of RAM. -
Can IBM Live Migration Service migrate or protect containers?
IBM Live Migration Service only supports the replication of full machines. Nevertheless, IBM Live Migration Service replicates on a server level and therefore any containers within the selected machines will be replicated. -
Does the IBM Live Migration Service agent cache any data to disk?
IBM Live Migration Service does not write any cache or do any sort of journaling to disk. The agent holds a buffer which is large enough to map all volumes’ blocks ~250MB in memory.The agent then acts as a sort of write filter and will replicate changed blocks directly from memory to the Replication server. If the data is no longer in memory, the agent will read the block from the volume directly. This is the case where you may see backlog in the IBM Live Migration Service user console. The cause of this is the volume of change is greater than the bandwidth available.
-
How is communication between the IBM Live Migration Service agent and the IBM Live Migration Service Manager secured?
All communication is encrypted using SSL. In addition, each agent is assigned a key during installation which is used to encrypt all traffic. All keys are unique and are not shared across multiple agents. -
How do I manually restart the IBM Live Migration Service agent?
Windows
Restart the service called CloudEndureService
Linux
Run:
/var/lib/cloudendure/stopagent.sh/var/lib/cloudendure/runagent.sh -
Is it possible to change the port the IBM Live Migration Service agent utilizes from TCP Port 1500 to a different port?
No. The IBM Live Migration Service agent can only utilize TCP Port 1500 for replication. -
How do I manually uninstall the IBM Live Migration Service agent from a source or target machine?
- 64 bit Windows
- Copy the c:\Program Files (x86)\CloudEndure\dist folder somewhere
- From the new location, run: install_agent_windows.exe --remove
- 32 bit Windows
- Copy the c:\Program Files\CloudEndure\dist folder somewhere
- From the new location, run: install_agent_windows.exe --remove
-
Linux
(Run as root or with sudo):cd /var/lib/cloudendure/var/lib/cloudendure/stopagent.sh/var/lib/cloudendure/install_agent --removePlease note that on a Linux machine, the Cloudendure user and the Cloudendure group that have been created by IBM Live Migration Service during installation may not be removed automatically. Please make sure to remove those as well, if needed.
- 64 bit Windows
-
When do I need to re-install the agent?
Typically, you need to re-install the agent after any major upgrade to the source machine.Linux
Any kernel upgrades.
Windows
Any OS upgrade (ex. Windows Server 2012 to Windows Server 2016) -
Where is the IBM Live Migration Service agent log?
The agent log can be found in either:Windows:
C:\Program Files (x86) \Cloudendure\agent.log.0Linux:
/var/lib/cloudendure/agent.log.0 -
How much bandwidth does the IBM Live Migration Service agent consume?
The IBM Live Migration Service agent opens up to five connections and will attempt to maximize available bandwidth.Throttling can be enabled by selecting the specific machine and clicking the REPLICATION SETTINGS tab in the IBM Live Migration Service user console. Then scroll down to Network Bandwidth Throttling section in that page.
About target Environment
In this section topics around target environment and some of the key questions will be answered.
-
What does the IBM Live Migration Service Machine Conversion server do?
The Machine Conversion server converts the disks to boot and run in the target infrastructure.
Specifically, the machine Conversion server makes bootloader changes, injects hypervisor drivers and installs cloud tools. -
When moving to GCP, does the Google guest agent get installed automatically?
Yes. -
For AWS to AWS replication, does IBM Live Migration Service configure the target VPC?
When performing AWS to AWS replication, IBM Live Migration Service will configure the target VPC as well.
The replicated environment consists of any AWS settings you defined in the VPC of the source site. It can include, among others: VPC, subnets, security groups, route rules, ACL rules, NAT instances (not Gateways), ELB, and other AWS configurations. -
How do I change the server AMI on AWS after Migration?
After the machine is launched by IBM Live Migration Service, switching the AMI can be done by launching a vanilla machine from the required AMI. To stop that machine, detach all the disks (including the root) and then attach the disks from the target machine created by IBM Live Migration Service. -
Is it possible to enable canIpForward property during Migration in GCP?
IBM Live Migration Service enables canIPForward property by default during the migration process. -
Which AWS services are automatically installed when launching a target instance?
IBM Live Migration Service automatically installs EC2Config. After installation, EC2Config automatically installs the SSM EC2 configuration service.
CloudWatch, AWS Powershell or CLI are not automatically installed. This can be done by combining the IBM Live Migration Service APIs and the AWS APIs - you can use the IBM Live Migration Service APIs to determine the EC2 instance IDs of the machines and then use AWS API/CLI to turn on the detailed monitoring. An alternative approach would be to do it via AWS API only based on the tags you associate with the machine. A third approach would be to do so from the post-launch script.
IBM Live Migration Service installs EC2Launch (Windows 2016 only.) Customers need to configure EC2Launch based on the specific requirements explained here. This configuration step needs to be performed post migration in C:\Program Data\Amazon\EC2-Windows\Launch\Settings\Ec2LaunchSettings.exe on the target machine. -
How long does it take to copy a disk from the IBM Live Migration service Staging area to production?
IBM Live Migration Service uses internal cloud provider snapshots. This process typically takes less than a minute and the size of the volume does not impact the time. -
How long does the average machine conversion process take?
The actual IBM Live Migration Service machine conversion process typically takes less than a minute. -
What are the differences between Conversion Servers and Replication Servers?
- Replication Servers run on Linux and Conversion Servers (for Windows machines) run on Windows.
- The conversion is done by IBM Live Migration Service automatically bringing up a vanilla Windows Conversion Server machines in the same subnet with the Replication servers as part of the launch job.
- Both Conversion and Replication servers have public IPs
- The Conversion Servers will use the same Security Groups as the Replication server.
- The Conversion Server must be able to access the IBM Live Migration Service Manager.
- The Conversion Server machines, just like the Replication servers are managed automatically by IBM Live Migration Service. Any attempt to disrupt their automated functionality will result in failed conversions.
-
Can I prevent IBM Live Migration Service from cleaning up target test resources in AWS?
IBM Live Migration Service, by default, removes any resources created during the test process either when requested by the user or when a new test instance is launched.
To prevent this in AWS, you can enable termination protection, for the target instance, and the resources will not be removed upon a new target launch. -
Can you select availability zones for AWS as a target?
In AWS, every subnet is in a specific availability zone. This means that once you select a subnet, you also select the availability zone. -
What are the network requirements for replication to GCP?
- source machines:
- Outbound 443 to ibm.cloudendure.com
- Outbound 1500 to the target cloud network
- Replication servers:
- Inbound 1500 from the on-prem or cloud network
- Outbound 443 to ibm.cloudendure.com
- Outbound 443 to amazonaws.com
- Outbound 443 to googleapis.com
- source machines:
-
How can I safely test my Domain-Joined server replica without conflicting with the original server?
You can achieve this in three ways:- Create a local account on the source machine, create the target machine on an isolated network and use the local account rather than the domain account to login.
- Use IBM Live Migration Service to replicate the domain controller along with the machine into an isolated network and then the target machine will use the target domain controller.
- Use IBM Live Migration Service to replicate the machine into an isolated network, login into the target machine using a local user, regenerate the SSID, then remove the isolation of the network and rejoin the machine to the source domain via the source domain controller (as once SSID changes, the machine is no longer in the domain).
-
What should I note when using GCP as a target with Linux?
Make sure the minimum kernel requirements are set:- Ubuntu/Debian - Kernel 3.9 or above (or a 3.4 kernel or above with virtio_scsi enabled).
- RHEL/CentOS - Kernel 2.6.32-279 or above
- RHEL/CentOS 5.x (Kernel 2.6.18) must have these installed prior to launching a target machine.
-
Why are my Windows Server disks read only after launching the target?
When launching target instances, Windows server may boot with all the disks as read only.
This a common issue that occurs when detaching and attaching data disks. This issue can be resolved using steps in this Microsoft TechNet article.
To simplify this step, you can also leverage this IBM Live Migration Service post launch script which automates this process.NoteThis script will just clear the read only flag, and will not bring the disks online. If you want it to ensure all disks are brought online as well, delete the REM from the following line: ECHO REM online disk>>offreadonlyfile.txt -
What impacts the conversion and boot time of target servers?
Prior to launching the target server, IBM Live Migration Service goes through a machine conversion server process on the boot volume. The conversion process is fairly quick.
While the actual conversion process itself is quick, the time to boot the target server varies depending on many factors unrelated to any IBM Live Migration Service processes. Some of these are controllable and should be taken into account when Cutover times are of importance.- Operating system - The amount of time required to boot the operating system is dependent on the OS itself. While Linux servers typically boot quickly, Windows servers may take additional time, due to the nature of the Windows OS. If opportunity permits, test the boot time of the source server. If Linux OS takes a long time to boot, ensure to check that dhclient (Dynamic Host Configuration Protocol Client) is installed on the system so it can pull an IP.
- Scheduled Windows Updates - If the Windows server has pending patches, ensure those are installed prior to launching the target server. If pending patches remain, the boot time in the cloud may be severely impacted as the patch process may commence upon the initial boot.
- Boot volume type - Depending on services/applications, boot time may be impacted by disk performance. It is recommended that boot volumes be tested with a higher performance SSD and even by provisioning IOPs to ensure throughput. This may be more critical during the first initial boot of the server in the cloud, as all initial settings are applied. In many cases, the boot volume type may be scaled back after the initial boot and should be tested.
-
Does IBM Live Migration Service support the Azure Availability Set during Failover?
The Azure Availability Set is not supported for target machines. However, the virtual machine can be moved into the required Availability Set after migration. -
How are Tags/Labels added in GCP?
Tags/Labels can be added after performing a Cutover to GCP target machines. You can learn more in this link. -
How do you configure which resource group and storage account IBM Live Migration Service replicates into in Azure?
The resource group and storage account need to be configured during agent installation. If you wish to replicate your machines into a different storage ccount from the one you configured, you can simply run the installer on the source machine with the following flag:- --storage-account "MyResourceGroup/MyStorageAccount"
- (Replace "MyResourceGroup/MyStorageAccount" with your specific group and account.
Security
This section talks about the security related queries that may arise when using the IBM Live Migration Service.
-
Which URLs and IPs need to be whitelisted for IBM Live Migration Service?
Add the following IP addresses and URLs to your firewall:Required for all customers
- IBM Live Migration Service Service Manager IP Address (requires for utilizing IBM Live Migration Service software)
- 50.19.144.132
- 13.52.54.28
- Amazon S3 Buckets (required for downloading IBM Live Migration Service software)
- s3.amazonaws.com
- s3.us-east-2.amazonaws.com
- AWS specific (required for customers using AWS)
The Replication server requires outbound access to the EC2 endpoint of its AWS region. - GCP specific (required for customers using GCP)
- 52.53.64.125
- Azure specific (required for customers using Azure)
- login.microsoftonline.com
- management.azure.com
- blob.core.windows.net
- IBM Live Migration Service Service Manager IP Address (requires for utilizing IBM Live Migration Service software)
-
Does IBM Live Migration Service perform user activity monitoring and detect anomalous behavior?
Yes, IBM Live Migration Service has both an Intrusion Detection System (IDS) and anIntrusion Prevention System (IPS) running on all production servers. -
Where and how are IBM Live Migration Service user passwords stored?
User passwords are never stored. Only a unidirectional hash of the passwords is stored in an encrypted database. -
Does IBM Live Migration Service use a SDLC?
IBM Live Migration Service utilizes OWASP top 10. -
Has IBM Live Migration Service performed a PEN test?
Yes, IBM Live Migration Serviced has performed a PEN test. Please contact your IBM Live Migration Service account executive if you require a copy of the results. -
How is user authentication performed by the IBM Live Migration Service?
While using the web based IBM Live Migration Service User Console, IBM Live Migration Service authentication is being done by using a username and comparing the hash of the password to a hash stored in our encrypted database (BCrypt hash runs against the password 2^12 times).
IBM Live Migration Service does not store the user password, only the hash. -
Is the data stored by IBM Live Migration Service encrypted?
All user data including the IBM Live Migration Service account configuration, application stack properties, and most importantly, the access credentials are always stored encrypted and sent encrypted. -
How does the IBM Live Migration Service agent authenticate with the IBM Live Migration Service Manager?
During installation, the IBM Live Migration Service agent is assigned a new key. This key is used to encrypt all traffic passes to and from that agent. Each agent maintains a unique key which is never shared across multiple agents.Authentication between IBM Live Migration Services’ agents and the IBM Live Migration Service Manager is achieved by sending the cryptographically strong unique key over SSL (verifying the certificate).
IBM Live Migration Service uses a Level 2 SSL certificate for encryption.
-
Is the in-transit data encrypted between the source server and the IBM Live Migration Service Replication Server?
All communication between the IBM Live Migration Service agents and IBM Live Migration Service Replication Server is encrypted using AES 256-bit symmetrical encryption. -
How is the communication between the browser and IBM Live Migration Service transmitted?
All communication between the browser and IBM Live Migration Service is encrypted using SSL.
IBM Live Migration Service uses a Level 2 SSL certificate for encryption. -
What permissions does IBM Live Migration Service need when replicating to GCP?
IBM Live Migration Service requires a service account with the Compute Engine API. The account should have minimum permissions of Editor on the project level.
Specifically, within the Compute Engine IAM, the following roles are required:- roles/compute.instanceAdmin
- roles/compute.securityAdmin
- roles/compute.storageAdmin
IBM Live Migration Service also requires compute.subnetworks.list on the host project.
For further instructions on enabling GCP access refer to the GCP documentation.
Post Launch Scripts
IBM Live Migration Service can run scripts on a target machine after it's launched. This is done by placing scripts in the following folder on the source machine:
- Linux: /boot/post_launch (any files that are marked as executable)
- Windows: c:\Program Files (x86)\CloudEndure\post_launch (any .exe, .cmd or .bat files)
Once you put these scripts in the above folders on the source machine, the folder will be replicated to the target and be executed once after the target instance boots the first time.
Clearing Read-Only Disks
The following script may be utilized to clear target disks that come up as "read-only". You can learn more about this issue here.
@ECHO OFF

setlocal enableextensions enabledelayedexpansion

SET "cmd=echo list disk | diskpart"

SET /a index = -1

FOR /F "skip=7 usebackq delims=" %%? in (`"%cmd%"`) do (

IF "%%?" NEQ "DISKPART> " IF !index! NEQ -1 (

ECHO select disk !index!>>offreadonlyfile.txt

ECHO attributes disk clear readonly>>offreadonlyfile.txt

ECHO REM online disk>>offreadonlyfile.txt

DISKPART /S offreadonlyfile.txt

DEL offreadonlyfile.txt

)

SET /a index += 1

)
ECHO REM online disk>>offreadonlyfile.txt
Uninstalling VMTools from Windows
The following script can be utilized to uninstall VMTools post migration from Windows. IBM Live Migration Service does not recommend doing this for failed servers.
This is a powershell script. It needs to be wrapped by a .CMD file, as powershell scripts are not ran automatically by the post_launch.
$regpath = "HKLM:\Software\Microsoft\Windows\CurrentVersion\uninstall"
Get-childItem $regpath | % {
$keypath = $_.pschildname
$key = Get-Itemproperty $regpath\$keypath
if ($key.DisplayName -match "VMware Tools") {
$VMwareToolsGUID = $keypath
}
MsiExec.exe /x $VMwareToolsGUID /qn /norestart
}