This tutorial shows you how to run a LoopBack®
project locally for testing by using either the command line or the API Designer Explore tool in IBM® API
Connect Version 5.0.7 and
later.
Before you begin
Important: From IBM API Connect Version 5.0.8.7, the apic start command
referred to on this page is no longer supported by the API Connect toolkit. This tutorial therefore
applies only to IBM API Connect versions earlier than Version 5.0.8.7.
Before you begin, you must install the developer toolkit on your local machine. For details, see
Installing the toolkit.
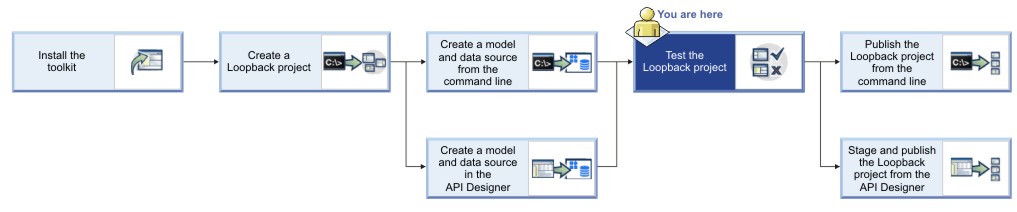
The following diagram shows the sequential flow through the IBM API
Connect Developer toolkit tutorials for working with LoopBack projects. Before beginning a tutorial, ensure that you have completed the previous tutorials in the sequence. You can click a tutorial in the diagram to open the instructions for that tutorial.
Also ensure your current working directory is the project top-level directory. Enter the
following command:
cd acme-bank
Test a LoopBack project by using the command
line
Complete the following steps:
- Start the local Micro Gateway (using the default TLS certificate) with the following
command:
TLS_SERVER_CONFIG=node_modules/microgateway/config/defaultTLS.json apic start
This
runs the LoopBack project (API) and the Micro Gateway
locally. You will see the
message:
Service acme-bank (id 1) started on port 4001
Service acme-bank-gw (id 2) started on port 4002
Note: If
you previously ran other projects, you may see different port numbers.
- To confirm that the project is running locally, open
http://localhost:4001 in
your browser. For the default LoopBack (empty-server or
hello-world) project, you'll see something like
this:{"started":"2016-03-07T22:24:55.322Z","uptime":35.839}
- You can then test the API endpoints by using
curl. First,
create a model instance by entering the following command:
curl --request POST \
  --url 'https://localhost:4002/api/branches' \
  --header 'accept: application/json' \
  --header 'content-type: application/json' \
  --header 'x-ibm-client-id: default' \
  --header 'x-ibm-client-secret: SECRET' \
  --data '{"type":"ATM location", "phone": "555-1212"}' \
The
console displays the data that is added to the model, ("type":"ATM location","phone":"555-1212"}.
Note the id property that LoopBack adds
automatically.Note: If you receive the following error from curl: curl: (60) SSL certificate
problem: Invalid certificate chain, and you are accessing a local server, you can turn off
the certificate verification by using the -k or --insecure option.
If you are accessing an external server, the non-secure options are not recommended.
- To display all of the model instances in the "acme-bank" project, enter the
following
command:
curl --request GET \
--url 'https://localhost:4002/api/branches' \
--header 'accept: application/json' \
--header 'content-type: application/json' \
--header 'x-ibm-client-id: default' \
--header 'x-ibm-client-secret: SECRET' \
The
console displays the JSON data in the model.Note: If you receive the following error from curl:
curl: (60) SSL certificate
problem: Invalid certificate chain
, and you are
accessing a local server, you can turn off the certificate verification by using the
-k or --insecure option. If you are accessing an external server,
the non-secure options are not recommended.
Test a LoopBack project by
using the API Designer Explore
tool
To test your API endpoints using the API Designer Explore tool, complete
the following steps:
- Change directories to your LoopBack project and enter the following command:
apic edit
After a brief pause, the console displays this
message:
Express server listening on http://127.0.0.1:9000
API Designer opens in your web
browser, initially displaying the login page if you haven't logged in recently.
Note: The login
page prompts you to Sign in with IBM Cloud. Enter your IBM Cloud credentials, which authenticates you
on IBM Cloud and provides access to the
API Manager features such as Publish, Explore, and Analytics. You will continue to work in API
Designer locally to create APIs, models and data sources.
where port_number is the port number to use.
- Start the local test servers by completing the following steps:
- In the test console at the bottom of the screen, click the Start the servers icon:
- Wait until the
Running message is displayed: Depending on your project configuration and whether other processes are running, different port numbers might be displayed.
- Click http://127.0.0.1:port_number to display the API
root endpoint. For the default LoopBack (empty or
hello-world) project, you'll see something like
this:
{"started":"2016-03-07T22:24:55.322Z","uptime":35.839}
Note: To stop your project,
click the
Stop the servers icon:
To restart it, click the
Restart the servers icon:
- Click
 . You will see the API Explore tool. The side bar shows all the REST operations for the LoopBack models in the API. Models that are based on
PersistedModel by default have a standard set of create, read, update, and delete operations.
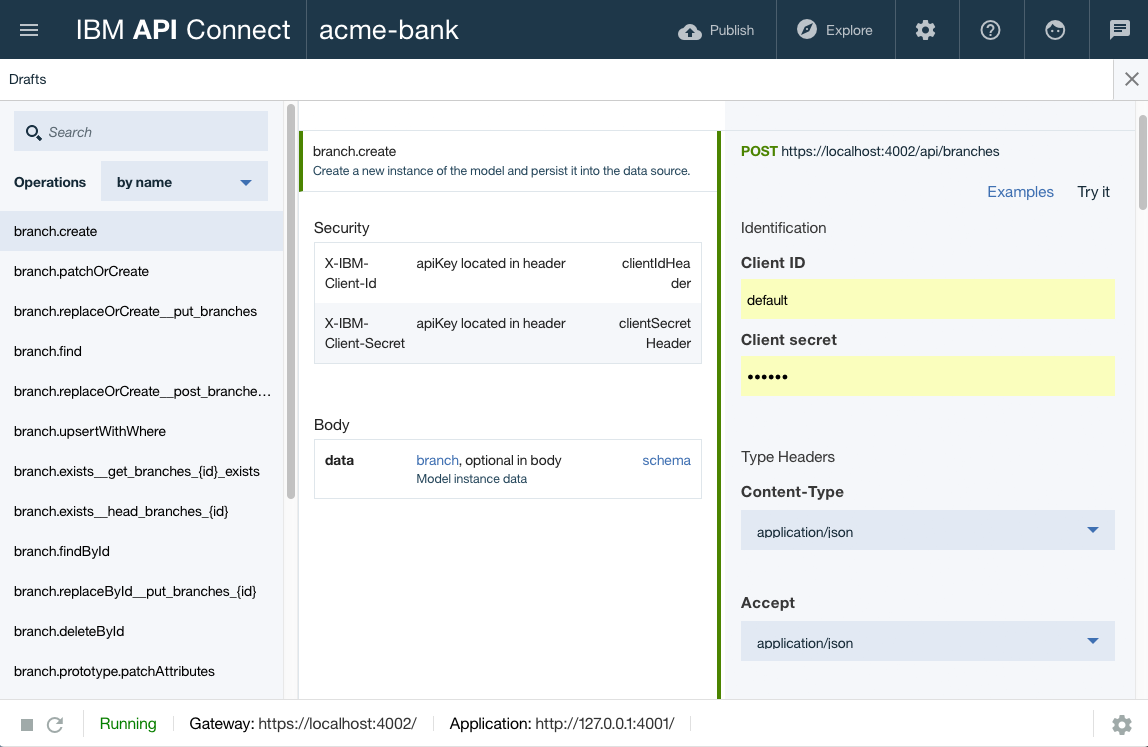
- Click the operation branch.create in the left pane to display the
endpoint. The center pane displays summary information about the endpoint, including its parameters,
security, model instance data, and response codes. The right pane provides template code to call the
endpoint using the
curl command, with a drop down menu to choose languages such as
Ruby, Python, Java™, and Node.
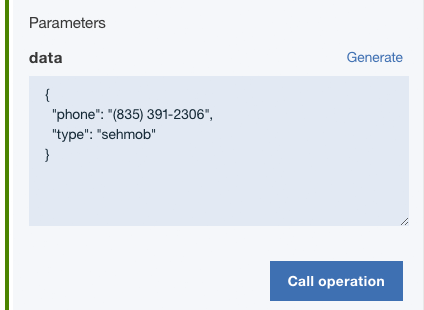
- To test the REST endpoints in the API Explore tool, on the right pane click Try
it, and then scroll down to Parameters and click
Generate to generate some dummy data. By default, the generated data includes
the properties defined for the endpoint, for example:
- Click Call operation to call the endpoint with that data. You should see
the request and response parameters, along with the JSON instance data that you entered.
Note: If you
see an error message due to an untrusted certificate for
localhost, click the link
provided in the error message in API Explore to accept the certificate, then proceed to call the
operations in your web browser. The exact procedure depends on the web browser you are using.
If
you load the REST endpoints directly in your browser, you will see the message:
{"name":"PreFlowError","message":"unable to process the request"}. You must use API
Explore to test REST endpoints in your browser because it includes the requisite headers and other
request parameters.
- Test the REST endpoints by using the
curl command shown, for example:
curl --request POST \
  --url https://localhost:4002/api/branches \
  --header 'accept: application/json' \
  --header 'content-type: application/json' \
  --header 'x-ibm-client-id: default' \
  --header 'x-ibm-client-secret: SECRET' \
  --data '{"type":"ATM location","phone":"408-123-4567"}' -k
- Paste the command into a console window being sure to include the
-k at the end
of the command (as shown in the example) to avoid certificate errors. If you wish, edit the JSON
data to make it more meaningful. When you enter the command, the console will show the data entered,
for example {"type":"ATM location","phone":"408-123-4567"}.
- To confirm that the operation added a model instance, click branch.find
then click Call operation with no filters to display all branch instances. An
example result (with two model instances) would blook like
this:
[
{
     "type": "standalone",
     "phone": "831-555-1212"
   },
   {
     "type": "ATM location",
     "phone": "408-123-4567"
   }
 ]
You can experiment with other operations if you wish, to get a feeling for the standard REST
endpoints of a LoopBack
PersistedModel.
![[V5.0.6 or later]](../buildfiles/icon_v506.jpg) Note:
Note: You can also run the API Explore tool directly from the
command line. Ensure that your local test servers are running, then run the command
apic
explore. The API Explore tool opens, and shows the operations, definitions, and
documentation for all of the APIs that are contained in your project directory. You can specify a
single API to explore by specifying the name of the API in the command. The
-e or
--external options open the Explore tool on 0.0.0.0 instead of the default
127.0.0.1. The external option binds the server to all IP addresses on the machine, and makes the
tool accessible on the wider network.
What you did in this tutorial
In this tutorial, you completed at least one of the following activities:
- Tested a LoopBack project from the command line.
- Tested a LoopBack project from the API Designer Explore tool.
What to do next
Publish your project by following either of these tutorials:
![[Icon indicating that this applies on Linux platforms]](../buildfiles/icon_linux.gif)
![[Icon indicating that this applies on Mac OS X platforms]](../buildfiles/icon_macosx.gif)
![[Icon indicating that this applies on Windows platforms]](../buildfiles/icon_win.gif)