Troubleshooting
Problem
Resolving The Problem
- Record the network information from the old App Host appliance as the administrator needs to manually type the information into the new appliance's network configuration.
- It is recommended the administrator have a recent backup of the application data on the App Host. Refer to the link for more details on: Backing up and restoring app data.
- The software version of the new App Host must match the software version of the Console. QRadar does not allow appliances at different software versions.
- Apps that are stopped will not consume memory or CPU resources. Make sure all your apps are stopped before performing these procedures.
- Ensure there is enough disk space on the console's /store partition for the app Host app data.
On the App Host run the command:
# du -h /store/docker/volumes/
On the console ensure /store has enough space based on the previous output from the App Host # df -hFor information on App Host disk space, refer to App Host disk space recommendations.
Step 1: Preparing your old App Host
- Stop the apps currently running on the App Host
- The apps currently running can be two stopped in two ways, via qappmanager utility or via the interactive API.
- Use SSH to log in to your QRadar Console as the root user.
- On the console run the following command to bring up the qappmanager utility.
/opt/qradar/support/qappmanager - After the qappmanager utility runs, use option 24 to stop app instances.
- You will then be asked to select a security profile, you will need to ensure that this security profile is an "Admin Admin" one similar to that of the one below.

- Once you select a security profile, a list of all the installed application instances will be displayed.

- You will then need to enter an ID of the app you wish to stop, once entered, press the enter key to submit, this will stop the corresponding app, please repeat this until all applications are in the 'STOPPED' state.
Stopping applications via the interactive API
- Use SSH to log in to your QRadar Console as the root user.
- SSH from the Console to the App Host.
- On the App host, run the following command, which will print out a list of apps installed on their 4-digit app ID:
/opt/qradar/support/recon ps - After you made notes of all the App IDs, log in to the Console as an admin user.
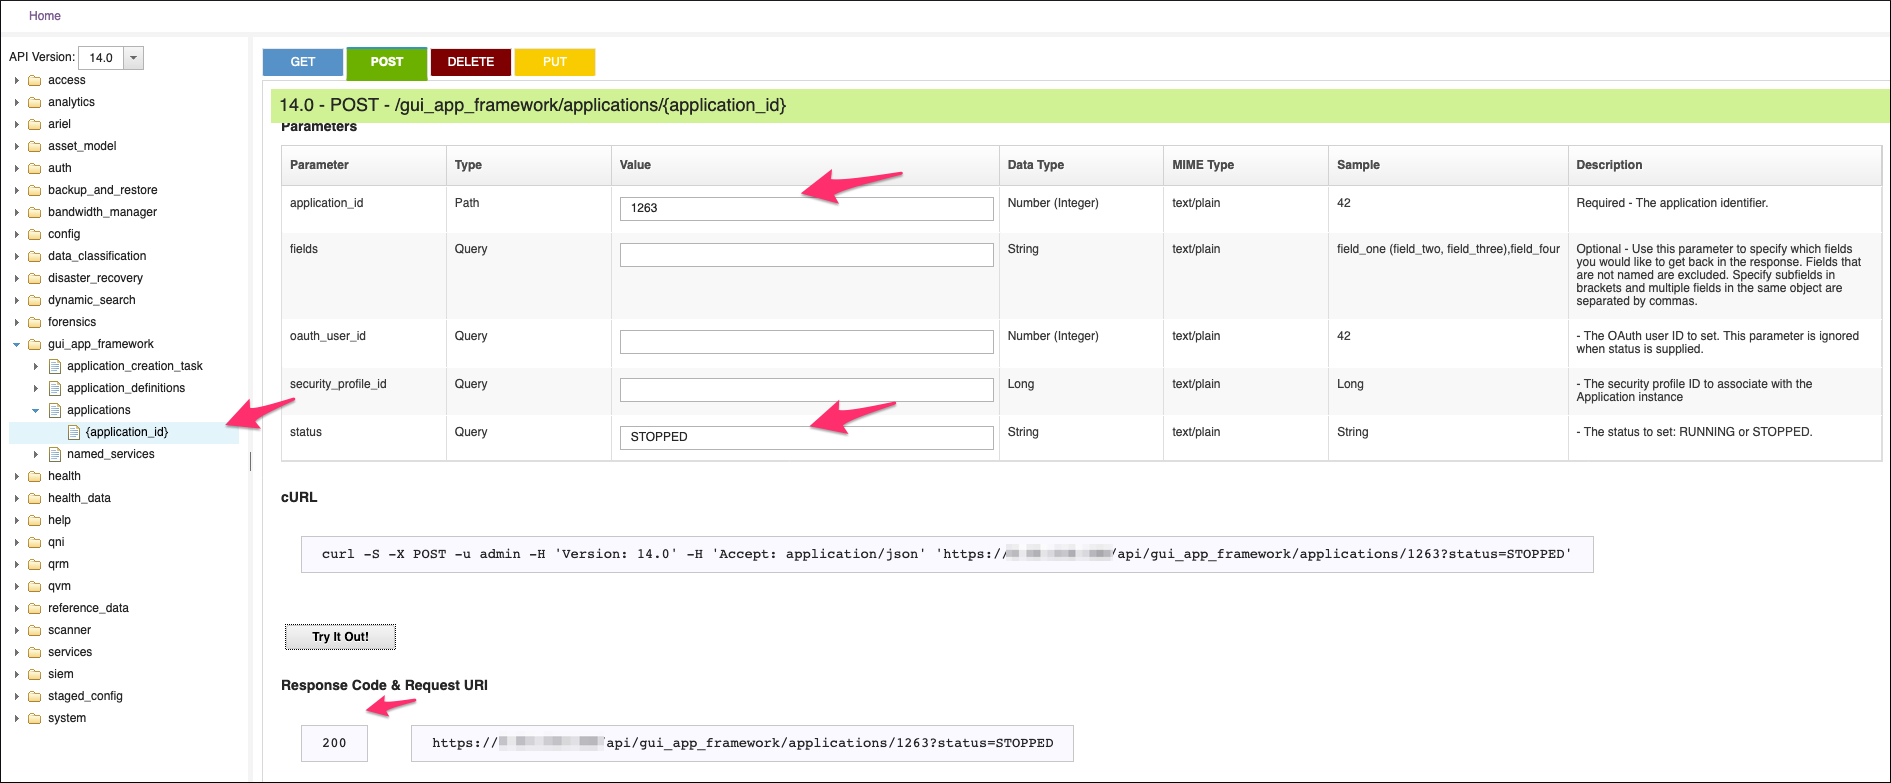
- Click the navigation menu (☰) > Interactive API for Developers.
- Expand gui_app_framework.
- Expand applications.
- Click application_id.
- Click POST.
- In the Parameter application_id, enter an App-ID gathered from before and enter "STOPPED" in the status parameter.
- Click on "Try It Out" and ensure you get a 200 status response.
- Repeat previous steps until all apps are in a "STOPPED" state.

- Migrate the apps back to the console
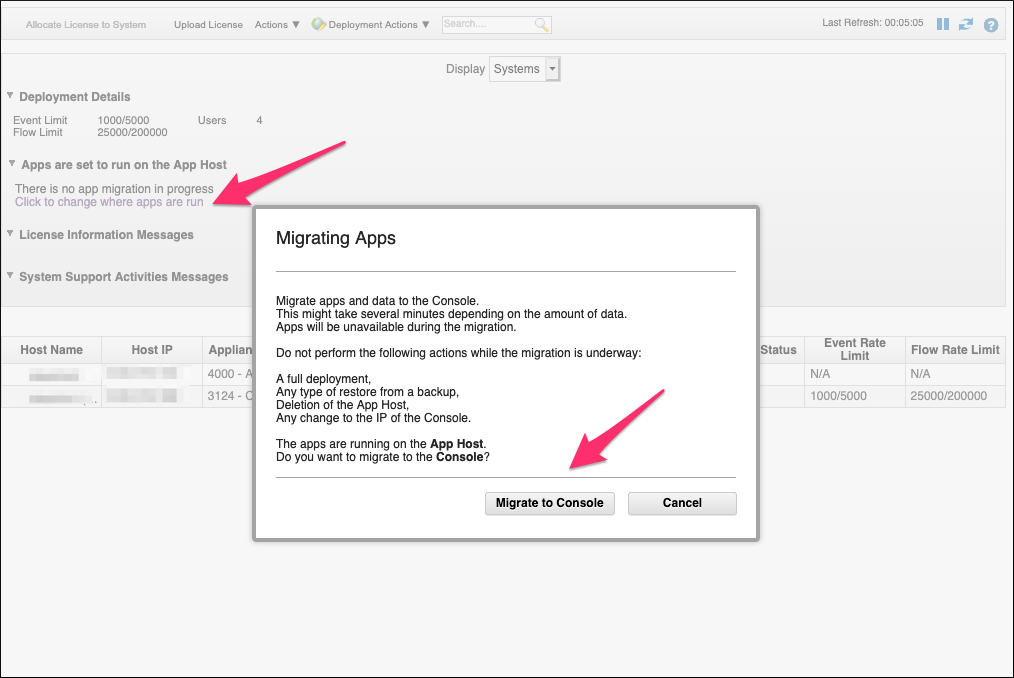
- Log in to the Console as an admin user and navigate to Admin > System and License Management.
- Expand "Apps are set to run on the App Host".
- Click on "Click to change where apps are run" and then choose "Migrate to Console."
- During the process, all apps and their data get copied back over to the Console.

- Remove old App Host from deployment
- Log in to the Console as an admin user and navigate to Admin > System and License Management.
- Click the entry for the App Host, so it's highlighted.
- From Deployment Actions Choose Remove Host.
- When prompted, click Remove to confirm the removal of the host from the deployment.
Results
After these steps are completed, your old App Host is removed from the deployment. The app data resides on the Console. The apps are in a "STOPPED" state.
Step 2: Reassigning IP addresses on appliances
After the App Host is removed from the deployment, administrators can change the IP address of the old App Host to an unused or decommissioned IP range. Changing the IP address or hostname of the old App Host ensures that if the decommissioned host is ever powered back on, it does not cause packet collisions in the network.
Note: IP address changes are not allowed over SSH connections. An IP address change can be completed by connecting with remote KVM, IMM, XCC, or a VM's Console to prevent connection and lockout issues.
- Reassign the IP address of the old App host to a decommissioned IP address range
This procedure reassigns the IP address of the old App Host to a decommissioned IP address space to free up the existing IP address for the new App Host.
Important: Please refer to the Flash Notice on qchange_netsetup before performing this procedure.- Connect to the App Host with a remote KVM for access to the local Console keyboard and log in to the old appliance's command line as the root user.
- To reassign the old App host's IP address, type /opt/qradar/bin/qchange_netsetup to change the IP address to a decommissioned IP range.
- Setting the IP address for the new hardware
This procedure assigns the existing IP address to the new App Host to be added to the deployment with the old IP address.
- Connect with remote KVM for access to the local Console keyboard, log in to the command line interface of the new App Host as the root user.
- From the new App Host's command line, type /opt/qradar/bin/qchange_netsetup to use the same hostname and IP address as the old App Host.
Results
The IP addresses and hostnames are updated for both App Hosts. The administrator can now add the App Host to the QRadar deployment.
Step 3: Adding the new appliance to the deployment
Note: The new App Host must be at the same software version of QRadar Console.
- Log in to the QRadar Console as an administrator.
- Click the Admin tab and select the System and License Management icon.
- Click Deployment Actions > Add Host.
- If prompted to add old components from the deployment to the host, select Yes.
- Click Save and Close.
- From the Admin tab, click the Deploy Changes icon.
Results
After the host is added back to the QRadar deployment, the deploy process ensures that the required configuration is regenerated on the new appliance.
Step 4: Migrating apps to new App Host
- Log in to the Console as an admin user and navigate to Admin > System and License Management.
- Expand "Apps are set to run on the Console".
- Click on "Click to change where apps are run" and then choose "Migrate to App Host."
- During this process, all apps and their data will get copied back over to the App Host.
- Once the migration is complete, click the navigation menu (☰) > Interactive API for Developers.
- Expand gui_app_framework.
- Expand applications.
- Click application_id.
- Click POST.
- In the Parameter application_id, enter an App-ID gathered from before and enter "RUNNING" in the status parameter.
- Click on "Try It Out" and ensure you get a 200 status response.
- Repeat previous steps until all apps are in a "RUNNING" state.
- Verify that the app tabs now show up and are accessible.
Results
The apps are running on the new App Host. The migration is complete.
Related Information
Document Location
Worldwide
Was this topic helpful?
Document Information
Modified date:
01 November 2023
UID
ibm16414807