Download
Release Date
23 June 2020
Abstract
IBM Rational Synergy 7.2.2 has been made generally available and contains new features as well as fixes for client-reported and internally found defects.
Download Description
| Sections | Description |
|---|---|
|
The Change history section provides an overview on what is new in this release with a description of any new functions or enhancements when applicable. |
|
|
This section provides information related to the impact of this release to allow you to assess how your environment may be affected. |
|
|
This section provides important information to review prior to the installation of this release. |
|
|
This section provides the direct link to obtain the download package for installation in your environment. |
|
|
This section provides the installation instructions necessary to apply this release into your environment. |
|
|
The Known side effects section contains a link to the known problems (open defects) identified at the time of this release. |
| Document | Description |
|---|---|
|
Click to review the detailed system requirements information for a complete list of hardware requirements, supported operating systems, prerequisites and optional supported software, with component-level details and operating system restrictions. |
|
|
The information center provides you with user assistance for the product. You can view, browse, and search online information related to the product. You can also visit IBM Product information page to browse for additional information centers. |
|
|
Click to review a complete list of the defects (APARs) resolved in this release including a list of resolved defects for the entire version family. |
Prerequisites
|
Rational Directory Server 5.1.1.2 (Apache) or Rational Directory Server 5.2.1 (Tivoli) are recommended but see detailed system requirements for all supported versions. |
|
On UNIX and Linux, the tsort command must be in the search path. |
Installation Instructions
|
Click on the relevant links below for Installation Instructions for Windows, UNIX with Informix, or UNIX with Oracle. |
Download Package
| Access type | Description |
|---|---|
|
Passport Advantage and Passport Advantage Express clients are required to sign in to download the software package. |
|
|
IBM Software Group OEM offerings are designed for partners who develop and sell business solutions with embedded or bundled IBM middleware software. Clients with Flexible Contract Type (FCT) license purchases and IBM Business Partners must sign in to download the software package. |
How critical is this fix?
| Impact | Description |
|---|---|
|
Recommended |
This is a service release of Rational Synergy. It contains new features as well as fixes for client-reported and internally found defects. |
|
There are no known issues to report. |
|
Problems Solved
Known Side Effects
|
Review the following list of open defects: |
|
Known Issue |
Problem/Workaround
|
| As rcp protocol is not supported and synergy is not updated with secure protocols to connect remotely, we are unable to test Remote Transfer and FTP. | Not Available |
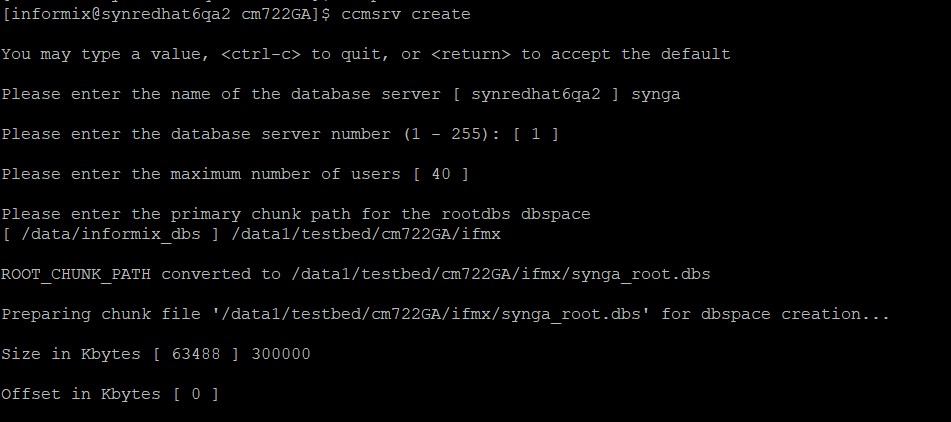
| Informix database creation fails when the default value of root.dbs is set as 63488 KB. |
Workaround for creating Informix server database while changing the default size of the chunk file.
i. Create the Informix Database with size of root.dbs as 300 MB.
ii. If required, using the ccmsrv expand command you can further increase the size of logical files. |
| Informix server will not come online with ccmsrv online -s <servername> , once made it offline ccmsrv offline -s <servername> | i. Reboot the machine. ii. Bring the informix online using ccmsrv online -s <servername>. |
Known Issues in Rational Synergy 7.2.2 on Windows platform
|
Known Issue |
Problem/Workaround
|
| As rcp protocol is not supported and synergy is not updated with secure protocols to connect remotely, we are unable to test Remote Transfer and FTP. | Not Available |
|
Help server doesn't start by default after installing Synergy.
|
Start manually from services windows “ccm7.2.2_helpsrv”. |
| Adding additional Database server is NOT supported. | Not Available |
Known Issues in Rational Synergy 7.2.2 on AIX platform
|
Known Issue |
Problem/Workaround
|
| As RCTP protocol is not supported and Synergy is not updated with secure protocols to connect remotely, Remote Transfer and FTP DCM transfer modes were not tested. | Not Available |
| Synergy session cannot start with the error "Informix: Network connection is broken". | Restart all Synergy processes using "ccm_start_daemons". Then bring the Informix server online using "ccmsrv online[ -s servername]". |
| Informix Server cannot be brought online while being taken offline, throwing error message "oninit: Fatal error in shared memory creation". | Delete all the shared memory ID segments associated with group/owner “informix”. Bring the Informix server online using the “ccmsrv online [-s servername]” command. |
Change History
|
Review the Rational Synergy 7.2.2 announcement for the following information:
End of Support
|
Replatform of the following O/S and S/W upgrades
- Windows Server 2012 (64-bit) Standard and above.
- Windows Server 2016 (64-bit) Standard and above.
- Red Hat® Enterprise Linux Server 6.10 and 7.6 (32-bit or 64-bit)
- SUSE® Linux Enterprise Server 12 SP4
- AIX 7.2 TL4
- Jetty is upgraded to version 9.4.14
- IBM Java and JRE is upgraded to 8.0
- IBM® Informix® upgrade
- For Windows and Linux - Upgraded to IBM® Informix® 12.10 FC13.
- For AIX - Upgraded to IBM Informix 12.10 FC14.
- Oracle 12c Release 2 (12.2.0.1.0) and client 12.2.0.1.0
| Synergy and Change Integrations | Eclipse | Visual Studio | Rational Doors | PowerBuilder | Rational Team Concert |
|---|---|---|---|---|---|
| Synergy 7.2.1 | Eclipse 4.2 up to 4.4 | VS 2008/10/12 and VS 2015 |
N/A | 10.5 | 3.0.1 and higher and 4.0.3 |
| Synergy 7.2.2 | Eclipse 4.7.3a (32 bit) and IBM JRE 64 bit + Eclipse 4.7 (64 bit) | VS 2015 | N/A | Deferred | Deferred |
- SUSE® Linux Enterprise Server 12 SP4
- Red Hat® Enterprise Linux 6.10 and 7.6
- Windows client 10 + cache Server
- Windows server 2012 R2 Standard
- Windows server 2016 Standard
- AIX 7.2 TL4
- How to configure Rational Synergy to use HTTPS protocol. For more information, refer subsequent section.
- List of 32-bit RPM packages for Red HAT and SUSE. For more information, refer subsequent section.
- Client cache clean utility for Cache server
- Error opening the Task Repository view in the Rational Synergy Eclipse IDE
- How to improve performance of "sync/reconcile, checkin and checkout" commands
- Create an SSL certificate
- Configure the CCM server
- Configure Clients
% cd $CCM_HOME/jre/bin
% keytool -genkey -keyalg RSA -keysize 2048 -keystore <Hostname>.keystore -alias jettykey -validity 720
- Enter keystore password: <password>
- Re-enter keystore password: <password>
- What is your first and last name?
[Unknown]: <Server Hostname> - What is the name of your organizational unit?
[Unknown]: <optional> - What is the name of your organization?
[Unknown]: <optional> - What is the name of your City or Locality?
[Unknown]: <optional> - What is the name of your State or Province?
[Unknown]: <optional> - What is the two-letter country code for this unit?
[Unknown]: <optional> - Enter key password for <jettykey>
(RETURN if same as keystore password):
Is CN=<server host name>, OU=Unknown, O=Unknown, L=Unknown, ST=Unknown,
C=Unknown correct?
[no]: y
% keytool -certreq -keystore <Hostname>.keystore -alias jettykey -file jetty.csr
- Enter keystore password: <password>
- Enter key password for <jettykey>: <password>
Send the certificate signing request (CSR) that you just generated to a certificate authority (CA) that you trust. This could be a commercial CA whose signatures most or all modern browsers will honour or a CA that is internal to your organization and whose public key is installed into all browsers on your organization's computers. The specifics of this step are outside the scope of this article.
After you submit the certificate signing request to the CA, and fulfil the CA's requirements for validating your identity and trustworthiness, the CA will send you a certificate file that bears the CA's signature.
- Import the signed certificate into the keystore that you created using following commands:
% keytool -importcert -trustcacerts -keystore <Hostname>.keystore -alias trsutedca -file ca-csr.txt - Enter keystore password: <password>
% keytool -import -keystore <Hostname>.keystore -alias jettykey -file signedcsr.txt - Enter keystore password: <password>
- Copy the keystore file to $CCM_HOME/jetty/etc/keystores directory.
% cp <Hostname>.keystore $CCM_HOME/jetty/etc/keystores - Change the passwords in the $CCM_HOME/jetty/etc/cm_https.xml file.
The file cm_https.xml contains a clear text password for the jetty keystore. Ensure that it is readable by the ccm_root user, and apply proper permissions to secure it from being read or modified by users other than ccm_root.
Note: If you want to set up multiple HTTPS servers, you can use a different keystore for each server, but all keystores must share the same key and keystore passwords.
- Change the default protocol for all servers, or create a new entry for the specific server that will use HTTPS protocol.
For example: cm.webserver.default.protocol = https OR cm.webserver.<Hostname>.protocol = https - Create a new keystore entry that references the keystore file you copied into the keystores directory in step 1 above.
For example: cm.webserver.<Hostname>.https.keystore = <Hostname>.keystore
- Start the server.
% ccm_server -start - Open a web browser and visit the new server URL address.
(https://<server>:<port>)
The web browser will/may ask you if you want to trust the certificates from the server. Answer yes and you will see the page containing the Synergy Windows client download information.
- Export the server certificate.
% su ccm_root
% cd $CCM_HOME/jre/bin
% keytool -export -keystore $CCM_HOME/jetty/etc/keystores/<Hostname>.keystore -
alias jettykey -file <Hostname>.cer - Enter keystore password: <password>
- Certificate stored in file <Hostname>.cer
- Copy the <Hostname>.cer file to each client system where the user will run the Synergy Web Mode session, and import it to the local keystore.
C:> cd %CCM_HOME%\jre\bin
C:> keytool -import -alias usir-sol2 -file <Hostname>.cer -keystore $JAVA_HOME\jre\lib\security\cacerts - Enter keystore password: changeit
Owner: CN=<Hostname>, OU=Unknown, O=Unknown, L=Unknown, ST=Unknown, C=Unknown
Issuer: CN=<Hostname>, OU=Unknown, O=Unknown, L=Unknown, ST=Unknown, C=Unknown
Serial number: 49d2466b
Valid from: 3/31/09 9:35 AM until: 6/29/09 9:35 AM
Certificate fingerprints:
MD5: F6:3F:8C:18:0B:0C:DB:22:0C:51:0B:B3:4B:41:40:27
SHA1: CE:6C:B6:99:52:4D:66:1E:B4:48:94:4D:0A:7B:88:EE:CF:F7:68:B4
Trust this certificate? [no]: y
Certificate was added to keystore
Note: The default password of the JRE keystore is “changeit”. It can be changed using the keytool -storepasswd command. The above steps need to be applied to every Synergy client installation that will connect to the server. Then Synergy sessions on those clients can be started using the https server URL.
- libXft-devel-2.3.2-2.el7.i686
- nss-softokn-freebl-3.16.2.3-14.4.el7.i686
- libsepol-2.5-6.el7.i686
- bzip2-libs-1.0.6-13.el7.i686
- libXrender-0.9.8-2.1.el7.i686
- alsa-lib-devel-1.0.28-2.el7.i686
- libICE-1.0.9-2.el7.i686
- libXinerama-1.1.3-2.1.el7.i686
- pcre-8.32-15.el7.i686
- libXext-devel-1.3.3-3.el7.i686
- libXtst-devel-1.2.2-2.1.el7.i686
- cracklib-2.9.0-11.el7.i686
- libX11-1.6.3-2.el7.i686
- libXi-devel-1.7.4-2.el7.i686
- libXp-devel-1.0.2-2.1.el7.i686
- glibc-2.17-157.el7_3.1.i686
- libselinux-2.5-6.el7.i686
- audit-libs-devel-2.4.1-5.el7.i686
- freetype-2.4.11-11.el7.i686
- libuuid-2.23.2-26.el7.i686
- libSM-devel-1.2.2-2.el7.i686
- ncurses-libs-5.9-13.20130511.el7.i686
- alsa-lib-1.0.28-2.el7.i686
- libXi-1.7.4-2.el7.i686
- libXp-1.0.2-2.1.el7.i686
- libstdc++-4.8.5-4.el7.i686
- libXext-1.3.3-3.el7.i686
- zlib-devel-1.2.7-15.el7.i686
- expat-2.1.0-8.el7.i686
- fontconfig-devel-2.10.95-7.el7.i686
- libXtst-1.2.2-2.1.el7.i686
- libdb-5.3.21-19.el7.i686
- audit-libs-2.4.1-5.el7.i686
- xz-libs-5.2.2-1.el7.i686
- glibc-devel-2.17-157.el7_3.1.i686
- libICE-devel-1.0.9-2.el7.i686
- libSM-1.2.2-2.el7.i686
- libxcb-1.11-4.el7.i686
- libXinerama-devel-1.1.3-2.1.el7.i686
- libXpm-3.5.11-3.el7.i686
- libgcc-4.8.5-4.el7.i686
- libXt-devel-1.1.4-6.1.el7.i686
- fontconfig-2.10.95-7.el7.i686
- libX11-devel-1.6.3-2.el7.i686
- libXpm-devel-3.5.11-3.el7.i686
- zlib-1.2.7-15.el7.i686
- libXt-1.1.4-6.1.el7.i686
- expat-devel-2.1.0-8.el7.i686
- libXau-1.0.8-2.1.el7.i686
- libXft-2.3.2-2.el7.i686
- pam-1.1.8-12.el7.i686
- libaio-0.3.107-10.el6.i686
- libsepol1-32bit-2.5-3.143.x86_64
- libXrender1-32bit-0.9.8-7.1.x86_64
- libICE6-32bit-1.0.8-12.1.x86_64
- libXinerama1-32bit-1.1.3-3.55.x86_64
- libpcre1-32bit-8.39-8.3.1.x86_64
- libX11-6-32bit-1.6.2-12.5.1.x86_64
- glibc-32bit-2.22-15.3.x86_64
- libselinux1-32bit-2.5-8.79.x86_64
- libaudit1-32bit-2.3.6-4.3.1.x86_64
- libfreetype6-32bit-2.6.3-7.15.1.x86_64
- libuuid1-32bit-2.29.2-7.14.x86_64
- libXi6-32bit-1.7.4-17.1.x86_64
- libstdc++6-32bit-8.2.1+r264010-1.3.3.x86_64
- libXext6-32bit-1.3.2-4.3.1.x86_64
- libexpat1-32bit-2.1.0-21.3.1.x86_64
- libXtst6-32bit-1.2.2-7.1.x86_64
- libdb-4_8-32bit-4.8.30-29.6.x86_64
- glibc-devel-32bit-2.22-15.3.x86_64
- libSM6-32bit-1.2.2-3.59.x86_64
- libgcc_s1-32bit-8.2.1+r264010-1.3.3.x86_64
- fontconfig-32bit-2.11.1-7.1.x86_64
- libXtst6-32bit-1.2.2-7.1.x86_64
- libXau6-32bit-1.0.8-4.58.x86_64
- libXft2-32bit-2.3.1-9.32.x86_64
- pam-modules-32bit-12.1-23.12.x86_64,
- pam_mount-32bit-2.14-3.68.x86_64
- libaio1-32bit-0.3.109-17.15.x86_64
- We strongly recommend using a filesystem with 32-bit inodes only.
- As Synergy is a 32-bit application, it may not be able to properly read files assigned a 64-bit inode (>4294967295) by the filesystem. This can lead to various unexpected behaviors.
- To list files with 64-bit inodes in the Rational Synergy application or databases paths run these commands (replace '/ccmdb' with the database parent directory):
# ls -liR /ccmdb | awk '{ print $1}' | egrep -x '[0-9]+' | awk '$1>4294967295{c++} END{print c}'
# ls -liR $CCM_HOME | awk '{ print $1}' | egrep -x '[0-9]+' | awk '$1>4294967295{c++} END{print c}'
- Example: For Linux
Preparing chunk file '/data1/testbed/cm722/ifmx/infdb722_root.dbs' for dbspace creation...
Size in Kbytes [ 63488 ] 300000
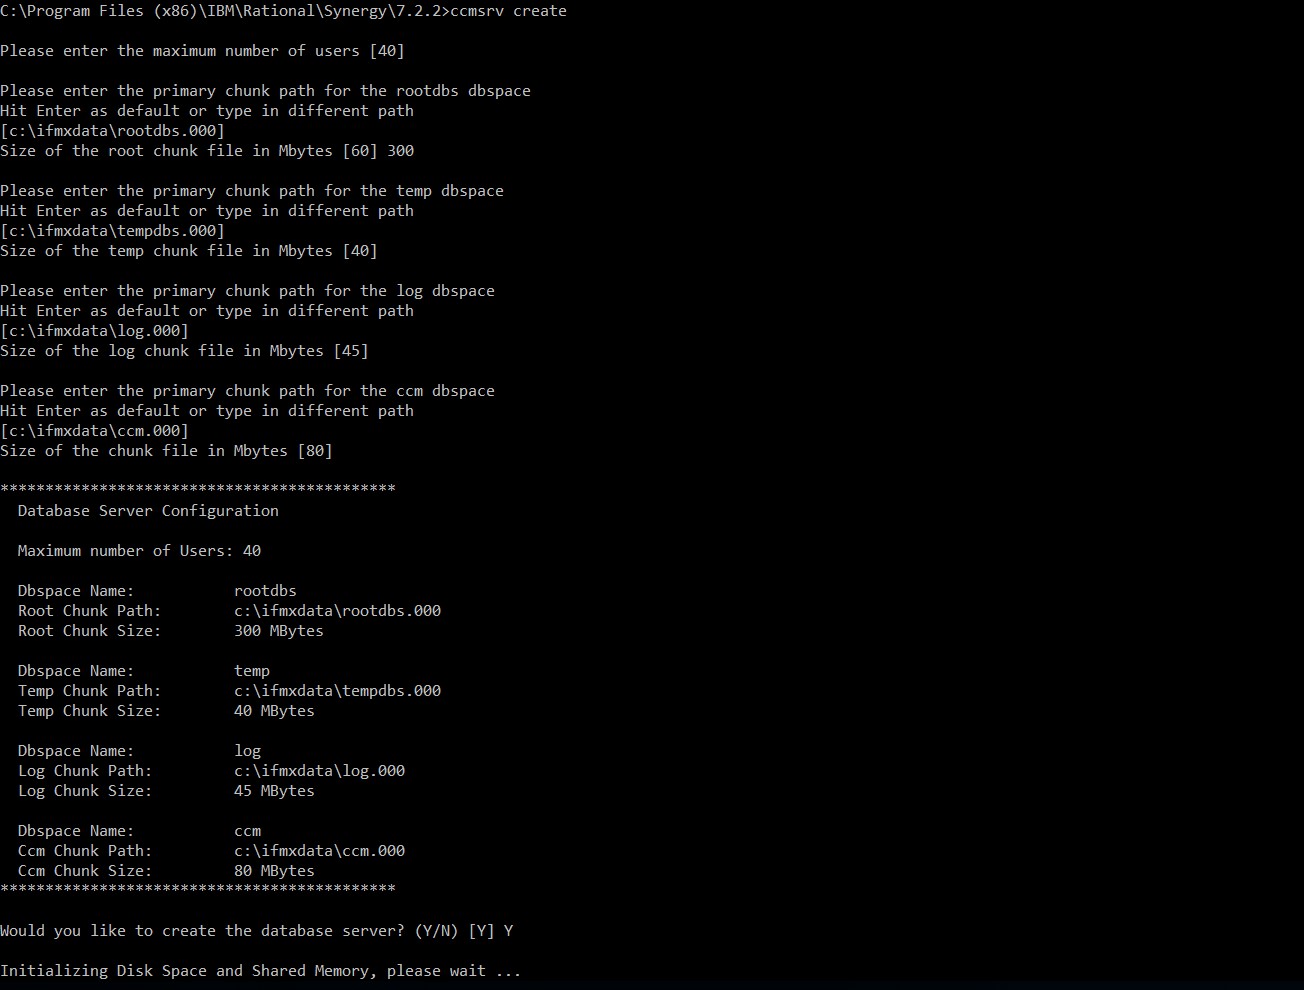
- Example: For Windows
Enter the primary chunk path for rootdbs dbspace and press [Enter] as default or type in different path [c:\ifmxdata\rootdbs.000]
Size of the root chunk file in Mbytes [60] 300
In case with ROOTSIZE less than 300 MB the server came online but the four system databases: sysmaster, sysutils, sysuser, sysadmin are not built completely. These system databases are very essential while managing large databases, taking backups and many other server functions. As per standard config file and the server to work properly need to provide the root.dbs size 300 MB. If the user wants to change the chunk path size of Informix database then, use the ccmsrv expand command.
 Problems (APARS) fixed
 Problems (APARS) fixed
Was this topic helpful?
Document Information
Modified date:
29 November 2022
UID
ibm16148443