News
Abstract
Create Performance Data from MGTCOL Object can be done at collection time or manually.
Content
You are in: IBM i Technology Updates > Performance Tools > Performance on the web > Tips and techniques > Create Performance Data from MGTCOL Object
Topics:
- Create Automatically
- Create data with larger graph interval
- Create Manually
- Collection Services - Release Versions and File Levels
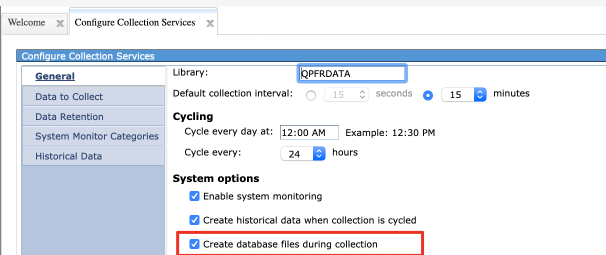
Create automatically
To create the Collection Services database files during collection at the set collection interval, check the box 'Create database files during collection' under Configure Collection Services as shown here:
Increase Collection Interval on Collection Services Configuration
Increase Graph Interval on Collection Services Created Database Files
Use Create Performance Data to average the data points for you and simultaneously increase the graph interval
By setting the interval parameter to 60 minutes (the largest available), all the data will be included for each metric saved and you can use this larger interval to display more quickly.
Create manually with GUI in Navigator for i
To create manually, use the GUI or command line. When done either of these ways, you can set the database interval to be something other than the configured collected interval.
- Use "Create Data" from the Collections panel. Click arrow by collection to get menu and select "Create Data". This performs CRTPFRDTA.

Figure 1: Create Data (CRTPFRDTA)

2. Set parameters including Sampling interval.
You can use the collected interval or set the sampling interval to something other than the collected interval.
Create manually with command line
1. Use CRTPFRDTA
2. Press pf4 for parameter options
- Select data categories for Create Data
- Select the valid options for the database files to be generated. It works best if you know what categories you can create.
Note: If you use "select all" from the Select Action menu, you may get an error for those categories that are not available, and the command fails.
Then go back to the list and page through it to deselect the ones that are not valid for this collection.
Then go back to the list and page through it to deselect the ones that are not valid for this collection.
- Once everything is done, you will see a message window for Successful Create data collection
- Select OK, you are brought back to the Collections panel:
- Collections panel with newly created *CSFile collection
Collection Services - Release Version and File Levels
Version
Note that the version shown is where the data was collected. It does not reflect the level of the database files generated. You can check this in a couple of ways:
- From the Collections interface, open Properties:
- Select Collection-> Properties
- Then select Details tab
- Look at the QAPMCONF data with the QAPMCONF perspective (available on 7.1).
- Select and Display QAPMCONF perspective
- Will show all the QAPMCONF data including database file level
File Levels
Collection Services collection file levels:
- V5R4 - Collection file level = 27
- V6R1 - Collection file level = 28
- V7R1 - Collection file level = 36
- V7R2 - Collection file level = 42
- V7R3 - Collection file level = 48
- V7R4 - Collection file level = 54
Job Watcher file levels:
- 6.1 - JW file level = 3
- 7.1 - JW file level = 6
- 7.2 - JW file level = 8
- 7.3 - JW file level = 48
- 7.4 - JW file level = 48
[{"Business Unit":{"code":"BU058","label":"IBM Infrastructure w\/TPS"},"Product":{"code":"SWG60","label":"IBM i"},"Component":"","Platform":[{"code":"PF012","label":"IBM i"}],"Version":"All Versions","Edition":"","Line of Business":{"code":"LOB57","label":"Power"}}]
Was this topic helpful?
Document Information
Modified date:
05 October 2021
UID
ibm11126107