General Page
You are in: IBM i Technology Updates > Navigator for i > Security
- Apply required IBM i HTTP PTF group.
- Verify Single-sign-on (SSO) for your IBM i is functioning for Kerberos authentication.
- Verify the HTTP Service Principal account delegation is set in Active Directory and the Account is Set to Use AES Encryption.
- Complete Planning Worksheet (Will require input from Active Directory administrator).
- Configure Navigator for i ADMIN1 for SSO (Run configureNav.sh script on IBM i using input from planning worksheet).
- Configure your web browser to use SSO
- Restart ADMIN1 and test SSO access to IBM Navigator for i
Step 1: Apply Required IBM i HTTP PTF Group
Below is the list of minimum required PTF Group levels (the latest HTTP group available is always recommended):
IBM i OS | HTTP PTF Group | Minimum Level |
| IBM i 7.6 | SF99962 | 2 |
IBM i 7.5 | SF99952 | 21 |
IBM i 7.4 | SF99662 | 42 |
IBM i 7.3 | SF99722 | 60 |
NOTE: SSO with IBM Navigator for i is NOT supported at IBM i 7.2 and earlier.
Step 2: Verify Single-Sign-On (SSO) for your IBM i is Functioning for Kerberos Authentication
NOTE: This configuration assumes that the following instructions have been completed:
How to configure EIM and NAS using IBM Navigator for i
This document provides detailed instructions on how to configure SSO/Kerberos on the IBM i.
In order for Navigator for i SSO to function the HTTP service principal user account needs to exist in Active Directory and be present in the IBM i keytab list.
From Qshell (STRQSH) on the IBM i, test the HTTP service principal to verify that everything is working correctly between the IBM i and Active Directory.
Type the following to test:
$ keytab list
Scroll up and find the HTTP service principal account name and write it down. This will be in the following format:
HTTP/fully.qualified.name.of.ibmi@ADKERBEROS.REALM
Then run the following command to test the connectivity:
$ kinit -k HTTP/fully.qualified.name.of.ibmi@ADKERBEROS.REALM
If successful it should return just a $. For example:
$ kinit -k HTTP/as400.ibm.com@IBM.COM
$
Any messages thrown indicate the error. Refer to the IBM Technical document, "Enterprise Identity Mapping (EIM) and Network Authentication Services (NAS) Error Codes and Solutions", for more information on the error issued.
If the HTTP service principal account has not yet been added to the IBM i keytab list and Active Directory system, these need to be created using the following steps:
Windows Active Directory
An HTTP service principal user account needs to be created and mapped using the following Active Directory commands (See Microsoft documentation for syntax):
- DSADD
- KTPASS
- SETSPN
IBM i
Start a session to Qshell (STRQSH). Use the following command to add the HTTP keytab entry:
keytab add HTTP/fully.qualified.name.of.ibmi@ADKERBEROS.REALM
Note: This command will interactively prompt for the newly created Active Directory service principal account password to be entered and confirmed.
Once added, perform the 'keytab list' and 'kinit - k' test again.
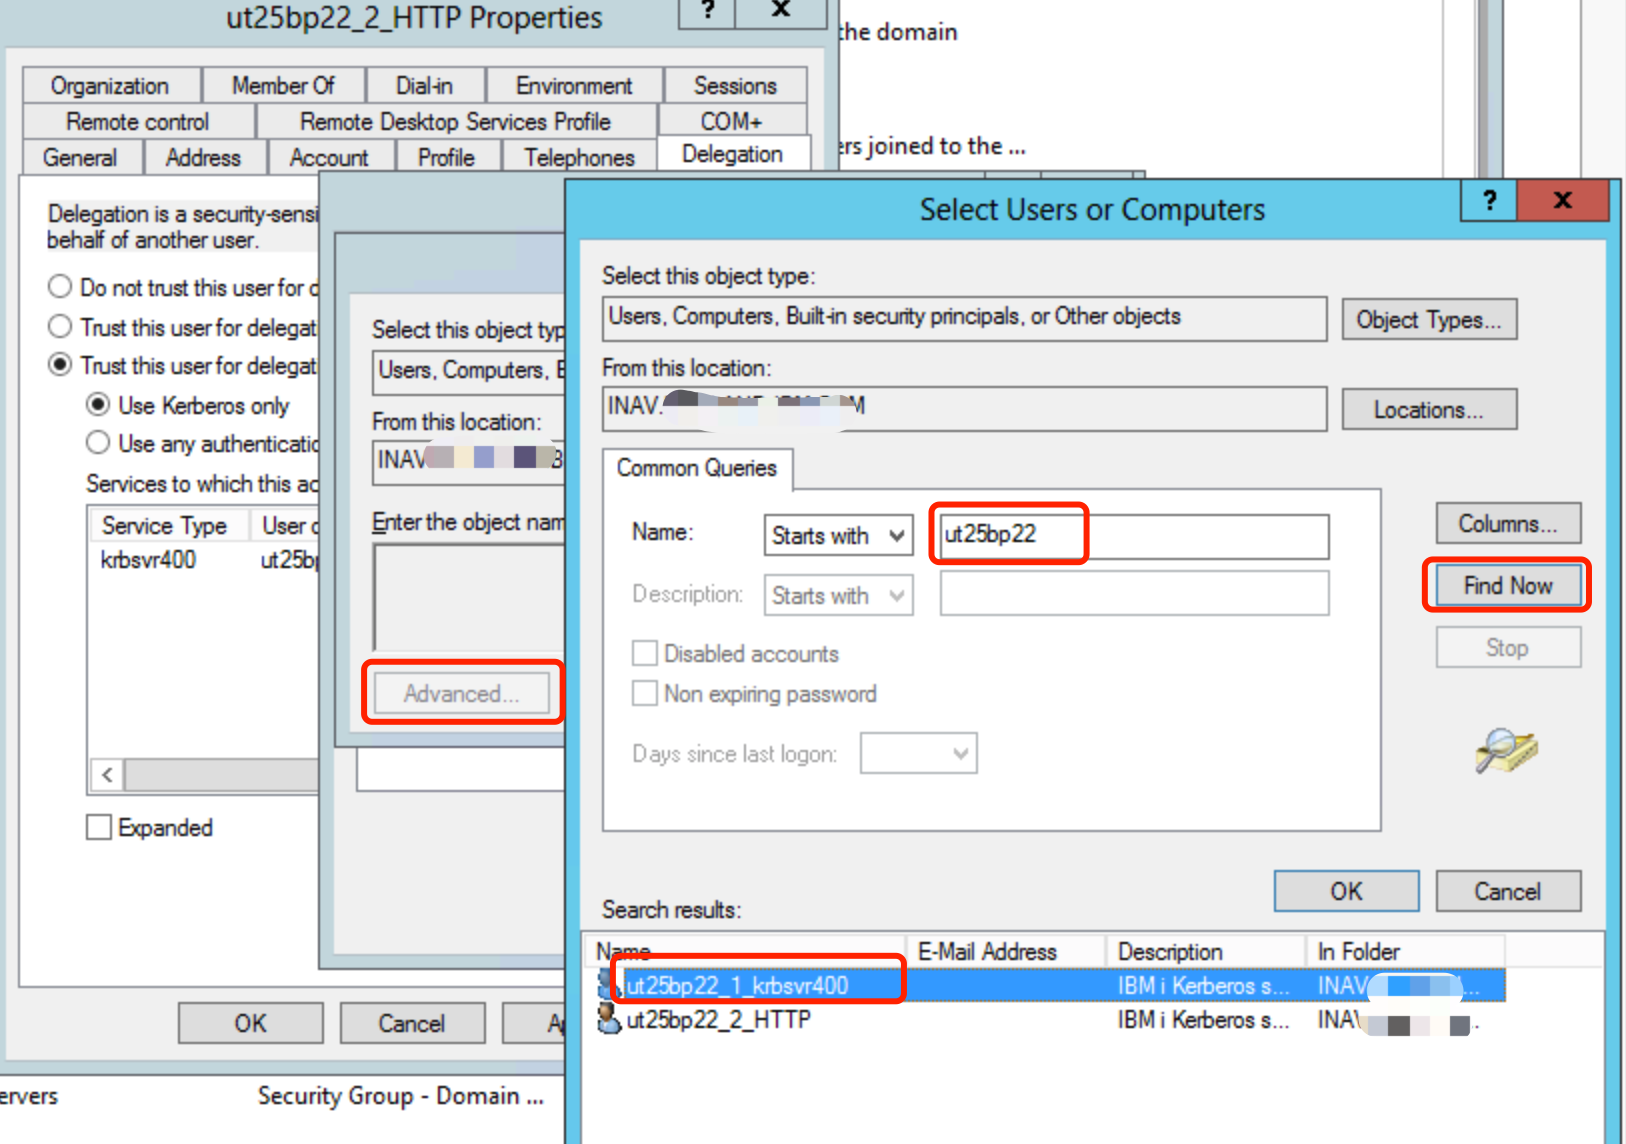
Step 3: Verify the HTTP Service Principal Account Delegation is Set in Active Directory and the Account is Set to Use AES Encryption
In Active Directory right-click the HTTP service principal and select 'Properties'. Change the 'Delegation' tab to the third radio button:
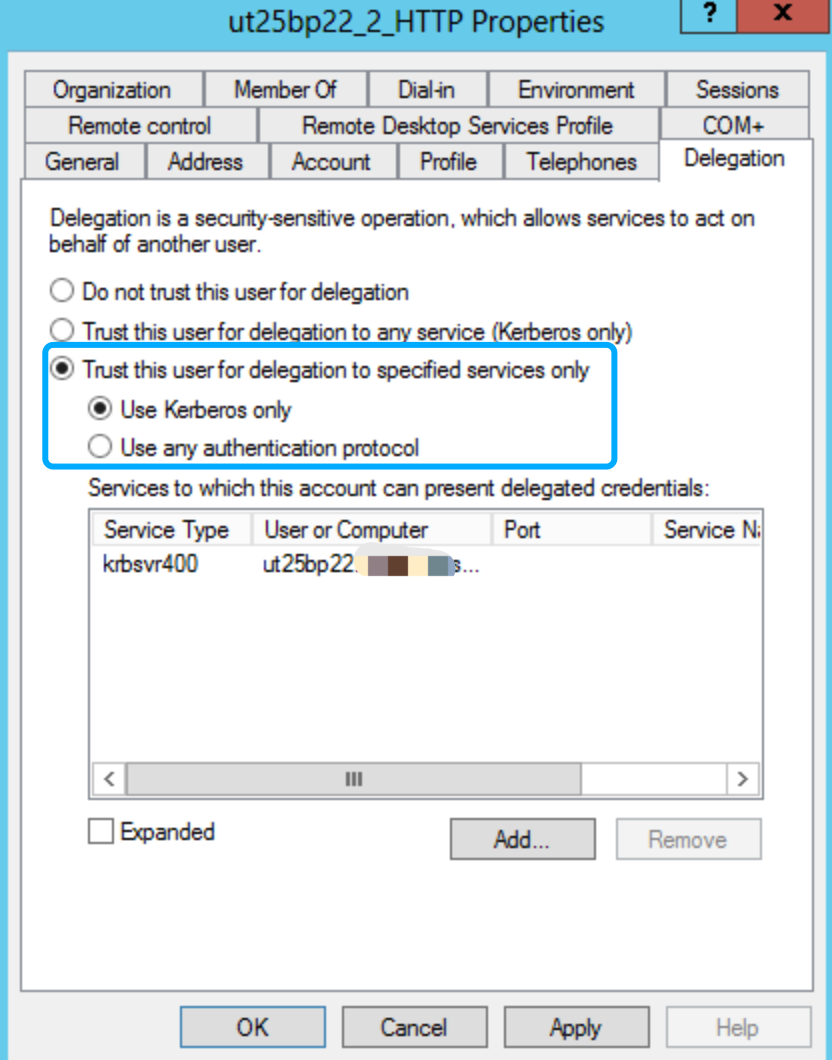
Click the Add button to add the krbsvr400 user account to present delegated credentials.

Step 4: Complete Planning Worksheet
| Questions | Answers | |
| P1 | What is the name of the Active Directory Kerberos realm? | |
| P2 | What is the fully qualified DNS name of the KDC for this Kerberos realm? Note: KDC = Key Distribution Center. This is the server that generates the Kerberos tickets. In most cases this will be the primary Microsoft Active Directory server name. | |
| P3 | What is the IBM i fully qualified system name? This can be found using the CFGTCP command and take an option 12. The fully qualified system name will be the 'Host Name' + 'Domain Name' | |
| P4 | What is the mapped HTTP service principal name for the IBM i? (NOTE: This is typically HTTP/fully.qualified.name.of.ibmi) | |
| P5 | What is the 'bindDN' information of the Active Directory HTTP service principal user account? (NOTE: This CANNOT be a service principal computer account) This is the LDAP suffix tree structure where the user account resides in Active Directory. For example, if the bindDN for the HTTP service principal is 'CN=UT25BP22_2_HTTP,CN=users,DC=IBM,DC=COM' the baseDN where the user accounts reside are generally under 'CN=users,DC=IBM,DC=COM' Though if the HTTP service principal account and the end user accounts are in different suffix tree structures then the baseDN would need to be a path that is common to both. So, if the bindDN for the service principal accounts is 'CN=UT25BP22_2_HTTP,CN=service_users,CN=users,DC=IBM,DC=COM' but the general user accounts would be something like 'CN=JohnDoe,CN=users,DC=IBM,DC=COM' the baseDN would need to be 'CN=users,DC=IBM,DC=COM' | |
| P6 | What is the password for your HTTP service principal? | |
| P7 | What version of Java is currently being used for the ADMIN1 server job? This can be found using the WRKJVMJOB IBM i command, taking an option 9 next to the ADMIN1 job (the JVM is listed in the top right corner) |
Step 5: Run the configureNav.sh script on the IBM i
This step is going to run a QShell script to update the IBM Navigator for i application's configuration with your Single Signon information.
Prior to running the script, it is recommended that you backup your security configuration by using the following command:
CPY OBJ('/QIBM/UserData/OS/AdminInst/admin1/wlp/usr/servers/admin1/resources/security/admin-cust.xml') TOOBJ('/QIBM/UserData/OS/AdminInst/admin1/wlp/usr/servers/admin1/resources/security/admin-cust.xml.back')
Use the following steps to run the configuration script:
a. On the IBM i command line run the following command to end the Navigator for i server job:
ENDTCPSVR SERVER(*IAS) INSTANCE(ADMIN1)
c. On the IBM i command line run the STRQSH command.
d. From within QShell run the following command:
/qibm/proddata/os400/navigator/configureNav.sh
e. Input the information based on your Single Signon environment, as recorded in your planning worksheet from step 4 (P# references the entry in the planning worksheet where the information can be found):
NOTE: You will be prompted interactively to enter each item one at a time. Hit ENTER after each entry.
BaseDN: --> (P5)
BindDN: --> (P5)
KDC name (hostname.domain): --> (P2)
Realm: --> (P1)
IBM i service principal hostname: (lowercase): --> (P3)
servicePrincpalNames: --> (P4)
Input the password set for the HTTP/ service principal: --> (P6) NOTE: Also note that for special characters, you may need to escape the characters when running this script. This is documented for Liberty securityUtility.
Which IBM Java version do you use? If java 8, input 'y', if later than java 8, input 'n': --> (P7) Answer y or n based on the Java version recorded in P7.
Do you want to write this information into admin-cust.xml? [y or n]: --> Type y and press ENTER to configure, or n to exit without saving.
If the configureNav.sh script has been previously run and you need to reconfigure or delete this IBM Navigator for i Single Signon configuration, run the following commands from the IBM i command line:
a. On the IBM i command line run the following command to end the Navigator for i server job:
ENDTCPSVR SERVER(*IAS) INSTANCE(ADMIN1)
c. On the IBM i command line run the STRQSH command.
d. From within QShell run the following command:
/qibm/proddata/os400/navigator/configureNav.sh
e. Input r for the following question.
The admin-cust.xml is configured. Do you want to reconfigure it or remove the SSO configuration? Input 'y' to reconfigure, 'r' to remove and 'n' to cancel
Step 6: Configure your web browser to use SSO/Kerberos
- Configure Mozilla Firefox to enable SPNEGO [Mac and Windows instructions]
The following steps are available for the latest version of Firefox:
a. Open Mozilla Firefox.
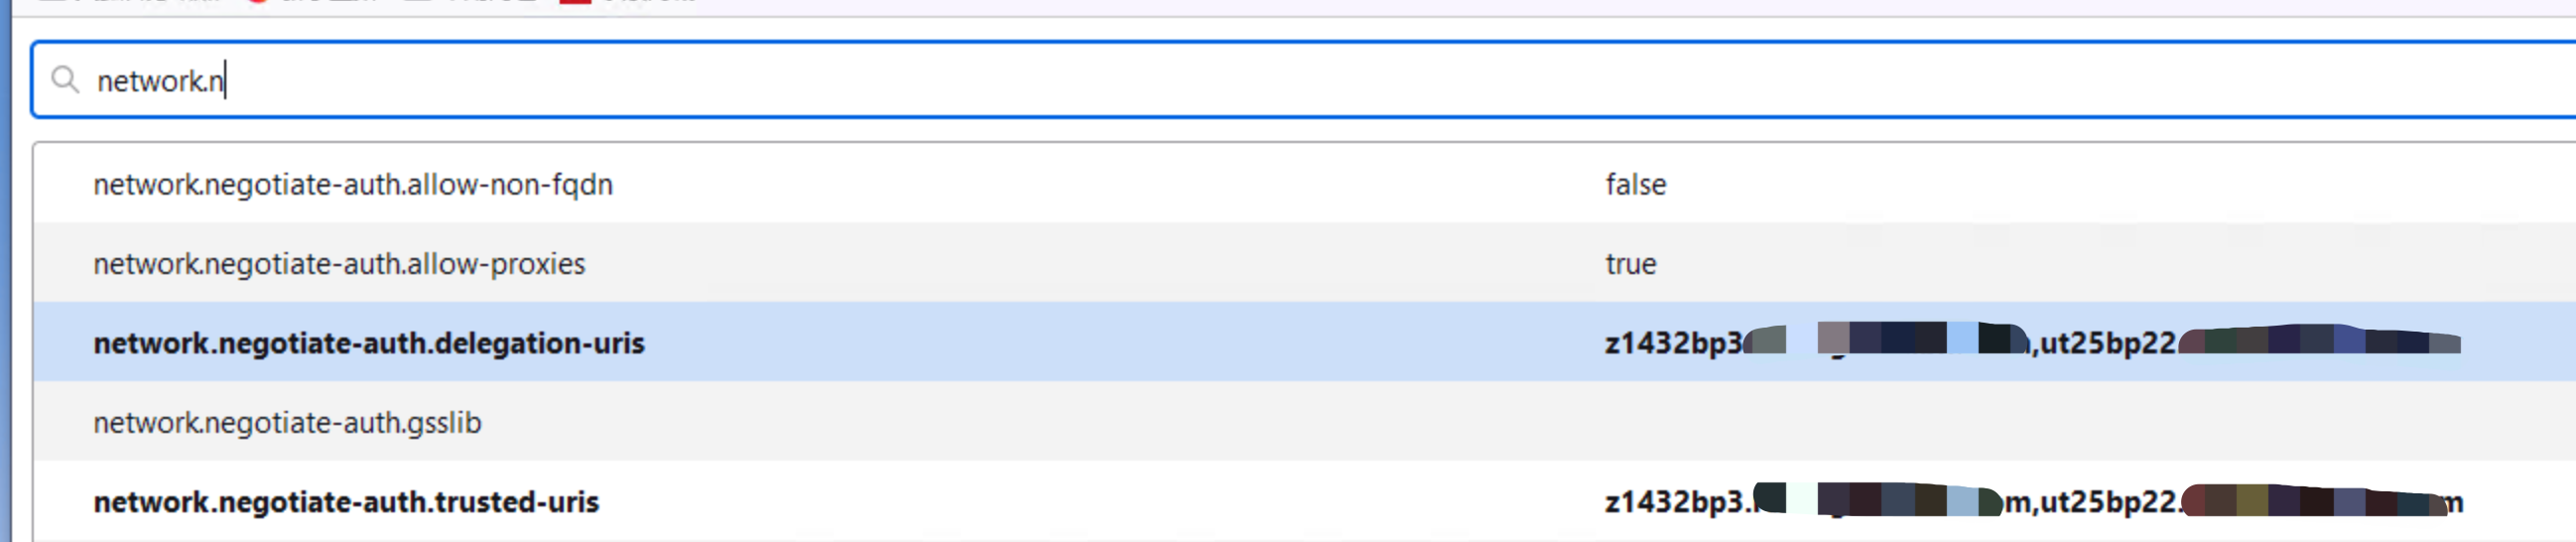
b. In the Go location on a website field, specify "about:config"
c. In the "This might void your warranty!" window, select "I'll be careful, I promise!"
d. In the Filter field, specify network.n
e. In the list of preferences, select the network.negotiate-auth.delegation-uris preference
f. Double-click to modify the value.
g. Specify the name of your IBM i system in the input field. For example, specify:
hostnameA,hostnameB,hostnameC
(for example: as400.ibm.com,as4002.ibm.com,as4003.ibm.com)
h. Use a comma to separate each hostname.
i. Select OK.
j. Select the network.negotiate-auth.trusted-uris preference in the list of preferences.
k. Double-click to modify the value.
l. Specify the hostnames from step g in the input field.
- Configure Chrome and Microsoft Edge to enable SPNEGO [Windows instructions]

For Chrome only, continue here. For Edge, skip ahead to the Microsoft Edge specific instructions.
After you complete steps one and two above, perform the following special steps for the latest version of Chrome
Chrome-specific finishing steps (shown using Windows 10 screenshots):
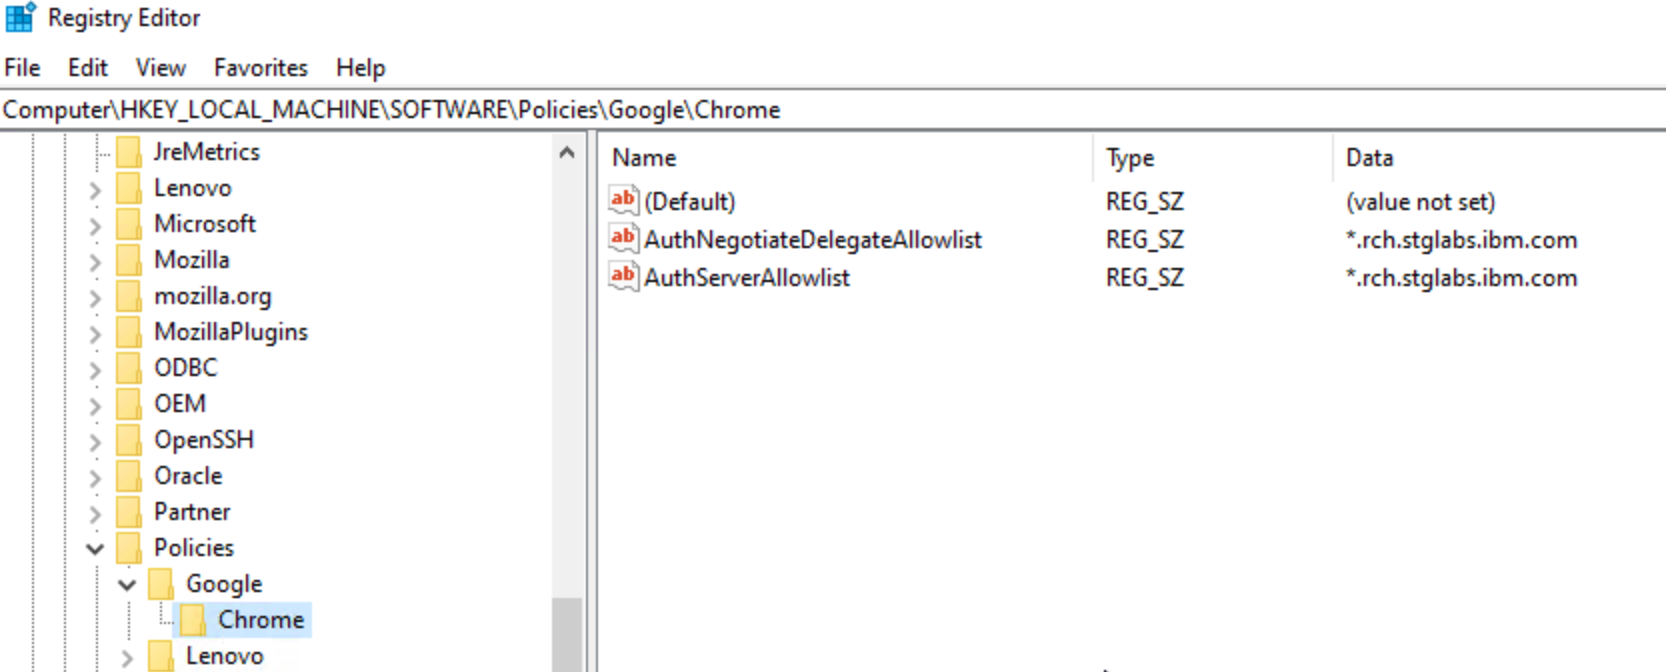
a. Open Microsoft Registry Editor by typing regedit.exe in "Run" window.
b. Google Chrome uses a few different policies to enable SPNEGO support.
- The AuthNegotiateDelegateAllowlist policy assigns servers that Google Chrome can delegate.
- The AuthServerAllowlist policy specifies which servers are allowed for integrated authentication.
c. The policies are stored in the Windows registry under HKEY_LOCAL_MACHINE\Software\Policies\Google\Chrome. If the key at the end of the path (Google or Chrome) does not exist, you can manually create it (Right-click -> New -> String Value). The Type of the policy is a String Value (REG_SZ).
d. Multiple servers are separated with commas.
e. Wildcards (*) are allowed in the names.
f. The value of the policy would be the web domain being accessed. (for example *.rch.stglabs.ibm.com)
g. Ensure both policies, AuthNegotiateDelegateAllowlist and AuthServerAllowlist are added.
You can confirm your browser policies by entering "chrome://policy" in the browser address bar and press ENTER. The browser policies in blue are currently active and being used in the current browser session.
- Configure Microsoft Edge to enable SPNEGO (version 77 and later of the Edge browser) [Windows instructions]
After you complete steps one and two in “Configure Chrome to enable SPNEGO”, perform the following special steps for Edge.
Edge-specific finishing steps (shown using Windows 10):
a. Open Microsoft Registry Editor by typing regedit.exe in "Run" window.
b. Microsoft Edge uses a few different policies to enable SPNEGO support. IBM recommends both policies are added to your browser. Adding both policies ensures the SPENGO support is enabled.
- The AuthNegotiateDelegateAllowlist policy specifies a list of servers that Microsoft Edge can delegate user credentials to.
- The AuthServerAllowlist policy configures a list of allowed authentication servers
c. The policies are stored in the Windows registry under HKEY_LOCAL_MACHINE\Software\Policies\Microsoft\Edge. If the key at the end of the path (Edge) does not exist, you can manually create it (Right-click -> New -> String Value). The Type of the policy is a String Value (REG_SZ).
d. Multiple servers are separated with commas.
e. Wildcards (*) are allowed in the names.
f. The value of the policy would be the web domain being accessed. (for example *.rch.stglabs.ibm.com).
g. Confirm both policies, AuthNegotiateDelegateAllowlist and AuthServerAllowlist are added.
Step 7: Restart ADMIN1 and test SSO access to the IBM Navigator for i
ENDTCPSVR SERVER(*IAS) INSTANCE(ADMIN1)
STRTCPSVR SERVER(*IAS) INSTANCE(ADMIN1)
Open a web browser and try accessing the IBM Navigator for i URL to verify Single Sign On (SSO) / Kerberos authentication is working properly.
SSO URL: http://fully.qualified.name.of.ibmi:2002/Navigator/
NOTE: It is common for users to have bookmarked 'http://fully.qualified.name.of.ibmi:2002/Navigator/login'. This will force a login and never use Single Signon
If the IBM Navigator for i opens up to the Dashboard view WITHOUT redirecting to the login page, this verifies that SSO/Kerberos is working properly for IBM Navigator for i.
If you want to use the username and password to log in to get the Navigator for i login page, you need to use the full URL of http://fully.qualified.name.of.ibmi:2002/Navigator/login
Mustgather: IBM Navigator for i Single Signon
https://www.ibm.com/support/pages/node/7232869
Was this topic helpful?
Document Information
Modified date:
25 November 2025
UID
ibm16593749