Question & Answer
Question
How to enable routing trace on the ISAM appliance for the Runtime or the Authorization Server components?
Cause
IBM support may ask customers to collect routing trace for a problem analysis.
Answer
STATEMENT OF INTENT
This document serves as instructions for gather and uploading a routing trace to the IBM Support Team. IBM Support recommends verifying the available space on the ISAM for Web appliance to successfully complete the data gathering.
Failure to do so may cause an outage.
This sequence should only be attempted on direct request from IBM Support.
Following are the steps to enable and collect routing trace for the Runtime and the Authorization Server. Follow the appropriate steps for each component.
1) Enable routing trace
1. Use a browser to access the ISAM Local Management Interface ( LMI )
- Connect to https://<Management Interface>/core/login
- Authenticate using an admin id
Enabling routing trace for the Runtime Component
2. Edit Tracing Configuration File
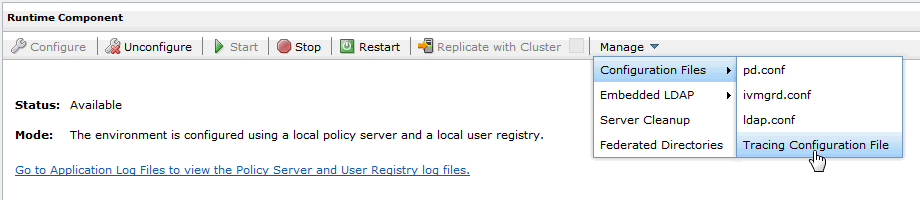
- On the LMI, from the main menu select Secure Web Settings > Manage > Runtime Component.
- In the Runtime Component panel select Manage > Configuration Files > Tracing Configuration File.
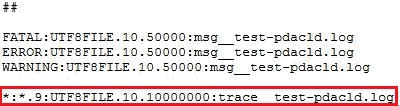
- Uncomment the last line on the configuration file.
- Edit the values of the trace setting.
In a busy web site the default values usually are not adequate to collect enough events before the oldest trace file is rolled over. To prevent crucial information being lost during the recreate of the issue modify trace settings.
Unless otherwise instructed by IBM support use following values. Notice! With the values given below the maximum required disk space is about 20 GB. For learning how to calculate maximum required disk space follow the link "Determining maximum size of a trace log" in the Related Information section at the end of this page.
*:*.9:UTF8FILE.10.10000000:trace__pdmgrd_utf8.log
10 = the maximum amount of trace files
10000000 = the maximum amount of events per trace file

- Click Save to accept the changes.
3. Deploy changes
- Select "Click here to review the changes or apply them to the system."
- Verify your pending changes and click Deploy

4. Restart the Runtime component
- In the Runtime Component panel, click Restart

Enabling routing trace for the Authorization Server
2. Edit Tracing Configuration File
- From the main menu select Secure Web Settings > Manage > Authorization Server.
- In the Authorization Server panel, select an authorization server instance of interest.
- Select Manage > Configuration > Edit Tracing Configuration File.

- Add following line at the end of the routing configuration file.
Notice! With the values given below the maximum required disk space for the routing trace files is about 20 GB.
*:*.9:UTF8FILE.10.10000000:trace__<instance name>-pdacld.log
10 = the maximum amount of trace files
10000000 = the maximum amount of events per trace file
Replace the <instance name> with the name of the Authorization Server instance.
- Click Save to accept the changes.
3. Deploy changes
4. Restart Authorization Server instance
- In the Authorization Server panel, select the Authorization Server instance as noted in the LMI message and click Restart.

2) Enable additional tracing
- IBM support may have asked to enable other tracing addition to routing trace. Enable all requested tracing before recreating the issue.
3) Recreate the issue
4) Verify and collect the routing trace
- Unless otherwise instructed, collect the support file to deliver routing traces to IBM support. From the LMI, use Manage System Settings -> Support Files. For detailed instructions how to collect the support file view the link "Creating support file" under the Related Information section.
- Optionally IBM support may ask to deliver just the specific trace/log files.
- Notice! Regardless the method how routing trace files are collected it is always good idea to verify that routing traces are actually generated.
Verifying routing trace is being generated for the Runtime Component
1. Verify routing trace file
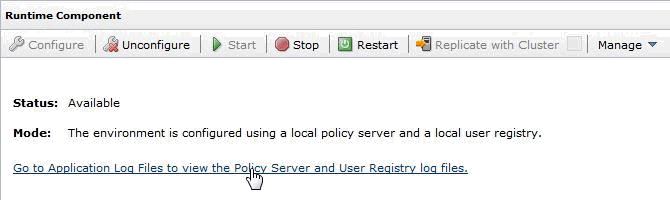
- In the Runtime Component panel, click link "Go to Application Log Files to view the Policy Server and User Registry log files."
- In the Application Log Files panel, browse isam_runtime > policy_server
- At minimum expect to find trace__pdmgrd_utf8.log file being generated.

2. Optional, Export individual file
- In case instructed by IBM support individual files can be exported and delivered for problem analysis.
- In the Application Log Files panel, select the routing trace file
- Click Export and save file to the local file system.

Verifying routing trace is being generated for the Authorization Server
1. Verify routing trace file
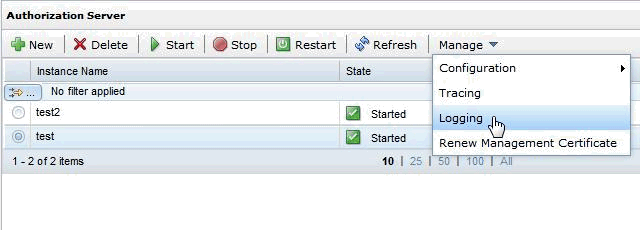
- In the Authorization Server panel, select an authorization server instance of interest.
- Select Manage > Logging
- In the "Manage Authorization Server Log Files" window, at minimum expect to find trace__<instance name>-pdacld.log file being generated.

2. Optional, Export individual file
- In case instructed by IBM support individual files can be exported and delivered for problem analysis.
- In the "Manage Authorization Server Log Files" window, select the routing trace file.
- Select Manage > Export and save file to the local file system.

5) Disable the routing trace
- To disable routing trace follow the same steps as with enabling. Comment the previously enabled trace setting on the routing trace configuration and restart the component.
6) Upload data to IBM support
- Use link "Available methods for uploading data to EcuRep" in the Related Information section to select appropriate method for uploading data to the EcuRep system.
Related Information
Product Synonym
Tivoli Access Manager;TAM;ITAM
Was this topic helpful?
Document Information
Modified date:
16 June 2018
UID
swg21971458