Types of HATS applications include: Web,
portlet, EJB, rich client, and administrative console. This chapter includes
information about HATS Web applications. For information about the
other types of applications, see the following chapters:
In addition, a HATS Web application can
be linked with a WebFacing application and both
packaged together to interoperate with each other in a single enterprise
application. For more information, see WebFacing and HATS.
HATS applications are created from HATS projects
using the HATS Toolkit. When you create a new HATS project, a set
of folders is created to help you organize your HATS application files. An example of a default project is shown below.
The highest level folder has the same name as the name you give to
your project when you create it. In that folder are other high-level
folders that contain objects defined in your HATS project. Some folders do not appear until you create certain objects.
Figure 2. HATS Web project view
Depending on how you set up your HATS project, some or all of these
folders appear in the HATS
Projects view. You can also specify which folders appear in your HATS Projects view as well
as hide file extensions. For more information,
see Using HATS preferences.
Note:
Different folders appear
for different types of HATS projects. For example, the directory tree
for a HATS EJB project has no Screen Customizations, Screen Captures or Web Content folders.
You can create subfolders within these high-level folders to help
organize your project. For instance, as you create screen captures
for your project, you might want to create folders under the Screen Captures folder to organize and
group the captured screens. To create a folder, right-click on one
of the high-level folders in the tree and click New
HATS > Folder. To move a file into a different folder, right-click
on the file and select Move, or you
can use the drag-and-drop method.
Note:
There is a limitation
for subfolders. The transformation and the template files must
be in subfolders of the same level. In order to use a transformation
that resides at a certain level of subfolders, such as \transformations\Callup\,
then the template that will be coupled with this transformation must
be at the same level of subfolders, like \templates\Callup\.
HATS projects can be shared in a team environment by going to the Navigator View of your HATS perspective.
Right-click the project and select Team
> Share Project. Select the repository type from the list and
click Next. Rational® SDP supports
several repositories. For more information, refer to the Rational SDP documentation
and search on repository.
Note:
When using a version control system with your HATS projects,
set the system to ignore the resourceUpdate.sts file. This
file is automatically generated when testing a project within the
toolkit. The file should not be under version control and can safely
be ignored or deleted before placing a HATS project under version
control.
To exclude the file from version control, open Window -> Preferences -> Team -> Ignored Resources and
click Add Pattern to add a new pattern.
Enter resourceUpdate.sts and click OK.
Make sure the new pattern is selected in the list of ignored patterns
and click OK to save the settings.
HATS Web projects, created
in HATS Toolkit, are extensions of Web projects in the Rational SDP workbench.
For more information, click Help > Help
contents from the Rational SDP menu bar, expand Developing, and select Developing Web applications.
Organizing HATS Web applications
By default, all HATS Web applications are stored
in one enterprise archive file, such as HATS_EAR8.
When you export your applications
and deploy them on WebSphere® Application
Server, the HATS .ear file contains a Web archive (.war) file with
the resources to run each application, as well as one copy of the HATS runtime
executable code. If you prefer, you can organize your applications
differently, either each in its own .ear file, or in some other combination.
Consider the effect of the following on your server when deciding
how to arrange your Web applications:
Disk space
If you create each application in its
own .ear file, it has its own copy of the HATS runtime code. The runtime
code is approximately 25 MB; multiply that by
the number of applications you have to see how
much disk space is consumed on your runtime system for all
of your applications.
Deployment
If you redeploy a HATS .ear file, you are redeploying
all the applications in that .ear file, even if some of the applications
are unchanged.
Logging and tracing
Logging and tracing are controlled at the level of the .ear
file, not at the individual HATS application level. If each HATS application is in its own .ear file, you can control
its log and trace settings independently of
any other applications. If you have several HATS applications in one .ear file, log
and trace settings apply to all HATS applications in
the .ear file. Messages for all HATS applications in
the .ear file are inserted into the same log file, and trace information
for all HATS applications is inserted into the same trace file.
You can add an additional
optional keyword, traceLogDirectory, to the runtime.properties file.
This enables you to specify a particular directory for the output
files. The file is located in the was_dir/installedApps/ear_name directory for a HATS enterprise application.
License tracking
License tracking is also controlled at the level of the .ear
file, not at the individual HATS application level. If each HATS application
is in its own .ear file, license tracking is done independently of
other applications. If you have several HATS applications in one
.ear file, license tracking is performed for all HATS applications
in the .ear file. Information about license usage is kept for all HATS applications
in the .ear file, and is inserted into the same license usage file.
Moving HATS Web projects to a different .ear file
Which .ear file your project files
go into is determined when you create the project. After you create
the project, you can move it from one .ear to another, using the following
steps:
To add the project to an .ear file:
Click the Navigator tab of the HATS Toolkit to
display the .ear files.
Expand the .ear file to which you want to add
the project. Expand the META-INF folder
and locate the application.xml file.
Start the Rational SDP application.xml editor by double-clicking
the application.xml file.
In the application.xml editor Design view, in
the Overview group, select Application,
and click Add.
In the Add Item dialog, select Module and
click OK.
Select the project you want to add to the .ear file and click Finish.
Close the Rational SDP application.xml editor.
To remove the project from an .ear file:
Click the Navigator tab of the HATS Toolkit to
display the .ear files.
Expand the .ear file from which you want to remove the project.
Expand the META-INF folder and locate the application.xml
file.
Start the Rational SDP application.xml editor by double-clicking
the application.xml file.
In the application.xml editor Design view, in the Overview
group, select the project you want to remove from the .ear file, and
click Remove.
Close the Rational SDP application.xml editor.
Backing up your HATS projects
As with any software development activity, it is good practice
to back up your HATS projects to ensure against data loss or corruption.
In addition to creating backups during your own development cycle,
you should also create backups prior to installing HATS maintenance.
This allows you to revert to the previously installed maintenance
level if necessary. To create a backup for your HATS project, use
the Rational SDP export archive file function. For more information, see Exporting a Web project.
To restore a HATS project from a backup, use the import archive file function. For more information, see Importing a Web project.
Exporting and importing HATS Web projects
Exporting a Web project
You can export your HATS Web projects to save and
use as backups or to move to another HATS Toolkit system. To perform the
export, use the following method:
Archive file
This function has multiple benefits. It allows you to export multiple
projects and the associated .ear all at once. In addition, you do
not have to create a project on the destination HATS Toolkit before you
import the archive file. To export the project
as an archive file perform the following steps:
From the menu bar select File > Export to
open the Export wizard.
Select General
> Archive File and click Next.
Select both the project and its associated EAR project.
Specify a file name and location for the file in
which to save the project.
In the Options section,
select the desired file format and compression options. To export
the whole project, select Create directory
structure for files.
Click Finish.
Importing a Web project
To import a project in an archive
file (or a project interchange file from an older release of Rational SDP) into HATS Toolkit:
From the menu bar click File > Import to
open the Import wizard.
Select General
> Existing Projects into Workspace and click Next.
Select the Select archive
file option and click Browse to
browse for the archive file.
In the Projects section,
select the project (or projects) you want to import.
Click Finish.
After importing, if you get the following error:
Project 'xxxxx' is missing required source folder: 'Java Source'

The project cannot be built until build path errors are resolved
To
fix this error perform these steps:
Select the project in the HATS Projects view.
From the Rational SDP toolbar, select File
> New > Other.
On the "Select a wizard" page, expand General, select Folder,
and click Next.
Ensure that your project is selected as the parent folder.
Enter Java Source as the folder name.
Click Finish.
For information about
how to migrate a HATS project from a previous release of HATS, see HATS migration.
Deploying HATS Web applications
The terms HATS Web application, WebSphere application,
and Java™ EE
application can be used interchangeably to refer to a Web application
created from a HATS project. It is a HATS Web application because
it was developed in the HATS Toolkit. It is a WebSphere application because it will be installed
and run on WebSphere Application Server. It is a Java EE application because it conforms to the Java EE standards.
To deploy your HATS Web application in a runtime environment
you must:
Enable the HATS runtime.
Export your project as a Java EE application.
Install your application in a runtime environment.
Make any changes necessary in the runtime environment.
The following sections describe how to perform each of these
tasks.
Note:
HATS Web applications can also be deployed
to the Apache Geronimo web application server with the Tomcat web
container, to the Oracle WebLogic Server, and to the IBM Bluemix Server.
For information unique to developing and deploying HATS web applications
for these servers, see:
Regardless of where you obtain the HATS package (HATS
CD, Web, or packaged with another product), you install the same version
of the HATS Toolkit. This is a limited-use version that you can
use to evaluate HATS. To fully enable the runtimes for production
in accordance with your licensed proof of entitlement, you must specify
your license settings using the License Settings wizard included in
the HATS Toolkit. For more information see the section, Enabling HATS runtime and license settings,
in HATS Getting Started.
Exporting your project as a Java EE application
To deploy your HATS Web application to a WebSphere Application Server
runtime environment, you must first package it into a Java EE application. To do
this, you export your project as an EAR file.
To export the project, follow these steps:
Highlight (single-click) the name of your project
in the HATS Projects view.
Click the Export HATS Project icon
on the main tool bar, or right-click the project name and select Export Project.
Note:
If you have not specified your license settings, you will
see a message that the runtime for this project is not enabled. Although
this application can be deployed, users are restricted to two connections.
HATS
Web applications can be tested in a local test environment and deployed
to a runtime (non-development) environment, but in either environment,
these applications support only two host connections without specifying
license settings. For information about specifying license settings,
see Enabling HATS runtime and
license settings in HATS
Getting Started.
If
licenses have been purchased, click Enable
Runtime to runtime enable your application. Otherwise, click Continue to continue the export process.
In the Export window, choose an Enterprise Application project
from the drop-down list or type the name of an Enterprise Application
project in the EAR project field.
Enter a destination location in the Destination field
or click the Browse button to select
the destination of the exported .ear file.
If you want to export the project's source files along with the
executable files, select the Export source
files box. If you include the source files, another developer
can extract them from your .ear file. This can make collaboration
or service easier, but you must decide whether it creates a security
risk.
If you have exported this project to this location before, the
export process asks whether you want to overwrite the existing files.
This is intended to protect you from overwriting files that you might
want to keep, perhaps to archive a previous version of your project.
If you want to overwrite previous files without being asked for confirmation,
select the Overwrite existing file box.
Click Finish. The project is exported as a Java EE application,
represented by an Enterprise Archive file with extension .ear, with
the directory and file name you specified.
Installing your application in a runtime environment
After exporting the HATS project as a Java EE application and transferring the application's .ear file to the
production system, install it by launching the WebSphere administrative console and
browse to the location of the .ear file. For more information about
installing applications on WebSphere Application
Server refer to the WebSphere Application
Server library at http://www.ibm.com/software/webservers/appserv/was/library/ and
select the link to the Knowledge Center for your version of WebSphere Application Server.
In the contents under your WebSphere Application
Server product, refer to the chapter about deploying applications.
After the application has been installed, test it
by bringing up the URL in a Web browser on another system. Then you
can publish the URL to your users. As an example, the URL might look
like http://hostname/hatsappname/ where hostname is
the IP host name and domain where WebSphere Application
Server is installed and hatsappname is the name of your
HATS application.
If your HATS applications are deployed on WebSphere Application Server with Java 2 security enabled, and they do not start, see Java 2 security for more information.
HATS
supports multiple browser instances from the same workstation accessing
the same HATS application. However, these multiple browser instances
must not share the same HTTP session id.
The session between the browser accessing the
HATS application and the WebSphere Application
Server is assigned an HTTP session ID. The HTTP session ID enables
subsequent requests from the same browser to return to the same HATS
application. Subsequent requests use the same Telnet (3270 or 5250)
session that exists between the HATS application on the server and
the host.
Different browsers implement the HTTP
session ID differently. Microsoft Internet
Explorer expects all browser sessions in the same process to share
the same HTTP session ID. When you launch a new browser window using
the same shortcut, a new browser session starts and shares the same
process and the same HTTP session ID.
One way to open a new Internet Explorer process with
a unique HTTP session ID, in Windows XP
for example, if Internet Explorer is in your start list, is to select Start > Internet Explorer. Selecting Start > All Programs > Internet Explorer also
starts a new Internet Explorer process with a unique HTTP session
ID.
Notes:
The Ctrl-N function of Internet Explorer does not start a new
process, because it opens a new window that has the same process ID
and the same HTTP session ID as the window from which it originated.
For Internet Explorer 8, you can use File > New Session to open a new browser
with a unique session ID.
Note:
In
Internet Explorer, you can find the HTTP session ID for a browser
window by selecting View > Source from
the menu bar, or right-clicking in the Internet Explorer browser window
and selecting View Source to view the
source tagging for the page. Scroll down to the HATS Form tag in the
source window, which is similar to the following:
When you access a HATS application that only displays a
default transformation of the screen and doesn't run macros when it
starts, the SESSIONID has a value of "INVALID." The SESSIONID value
is assigned when you send something to the host, such as pressing
the Enter key, and you get a response.
You
can verify whether a new process is being started by using Task Manager
in Windows. Start Task Manager,
and click the 'Image Name' column heading on the Processes tab to
sort the information by image name. Scroll down to see how many 'iexplore.exe'
processes are in the list. Try starting some new Internet Explorer
windows using the Start > Internet Explorer shortcut.
If a new process is started, a new iexplore.exe process is added to
the display. Otherwise, an existing process is in control of the new
browser window.
HATS requires the application's display-name, as defined in
the application's web.xml file, to match the Web application's context
path used in the browser URL. If the display-name value is changed
to be different than the context path of the application, you might
encounter a java.lang.nullPointerException error or a javax.servlet.ServletException
error when running the HATS application. For example, a HATS project
named MyHatsProject defaults to a display-name of MyHatsProject. This
project, when deployed as a Web application, must be reached with
a URL similar to http://myServer/MyHatsProject/ to operate properly.
Changing the display-name to something other than MyHatsProject causes
the application to be inoperable.
Changes necessary in the runtime environment
Configuring class loader policy
When you deploy your HATS Web applications, or when
running the applications in the local test environment, the WAR class
loader policy must be configured on a per Java EE application basis for
either of the following situations:
Your application includes business logic. Your business logic
might cause a ClassNotFoundException to occur.
Your application includes custom components or custom widgets.
The components or widgets might cause a ClassNotFoundException to
occur.
HATS automatically configures the class loader policy
for these applications.
Configuring HATS applications in a clustered environment
If you deploy HATS Web applications in a vertically clustered environment,
each application server instance will create its own files for logging,
tracing, and license tracking. This is accomplished
by decorating the names of the output files with the fully
qualified name of the application server instance. For example,
the default pattern for the logging file is messages.txt, but the
actual file name will be something like messages_myCell_myNode_myAppServerInstance_1.txt.
By default, all of the server instances read the same runtime.properties
file for their settings. To properly control runtime settings you
must configure each instance to have its own runtime properties file.
This enables you to control tracing for each instance independently,
and prevents runtime settings from changing spontaneously.
Follow these steps to configure each of your vertically clustered
HATS application instances to have its own runtime.properties file:
Make a copy of the runtime.properties file for each application
server instance in the vertical cluster.
Locate the runtime.properties file for your HATS application.
This file should reside in the installedApps\app_name.ear directory
under the directory where you installed WebSphere Application Server.
For each instance, make a copy of the runtime.properties file,
with a unique name, in the same directory. For example, you might
name the files Clone1runtime.properties, Clone2runtime.properties,
and so on. You can use any valid file name, but the name should help
the administrator identify the application server instance with which
this file is associated.
At this point, for n server instances you have n unique
runtime properties files.
If you have more than one HATS .ear file in your
vertically clustered environment, repeat this step in each .ear file
directory.
Add a new configuration setting to identify the runtime.properties
file that is used by each instance. For example,
for WebSphere Application
Server V6.x:
Select Application Servers in the Servers item in the left navigation pane
of the WebSphere Application
Server administrative console.
Select the server instance from the list of application servers.
Select Java and
Process Management from the Configuration tab
for the server.
Select Process Definition
> Java Virtual Machine > Custom
Properties.
In the Custom Properties window, click New.
In the Name field, enter hats.runtime.properties.
In the Value field, enter the name
of the properties file that you created for this server, for example,
Clone2runtime.properties. Do not specify directory names or slashes
in this value.
The Description field does not
require a value.
Click Apply.
Repeat this procedure for each server instance.
After adding the new custom property and ensuring
that each server instance has its own, uniquely named, copy of the
runtime.properties file, you must restart each application to begin
using the new files.
The HATS administrative console can be used to control the settings of
the cluster members. Use the Getting Started folder
in the Navigation panel of the Administration Web page to select the Management Scope. After you have chosen
the cluster, choosing to view the Trace
Settings will prompt you for the particular cluster member you
want to control.
Note:
There are special considerations
for the use of clustering and user lists. For more information, see Clustering and user lists
Configuring HATS applications to use a proxy server
If users access your HATS application through a proxy server, you
must configure both the proxy server and a context parameter in the
HATS application.
To configure the proxy server:
On the proxy server, locate the httpd.conf file.
Using a text editor such as Notepad, add the following two lines
to the file:
Where application_name is the name of
your HATS application, yyyy is the fully-qualified
IP address of the application server where the HATS application is
installed, and port is the port number.
To configure the context parameter in the HATS application:
Edit the web.xml file of the HATS application (located in the
Web Content\WEB-INF folder in the Navigator view).
Where myproxyserver.com is the url of
the proxy server, port is the port number, and application_name is the name of your HATS application.
Configuring connection and Web Configuring files outside the HATS application (ear/war)
For the development and production of HATS, the user uses different connection setting
properties (main.hco) or WEL config properties(hatswelcfg.xml).
With this feature, the user can configure the main.hco and hatswelcfg.xml
outside the HATS application. It replaces the content of the connection file or config
file according to their production or development requirements.
The content replacement occurs only once while deploying the ear to the server.
To perform this configuration, the user must keep the files with required content outside
the HATS project and provide that path as System Environment Variable with the name
HATS_CONFIG_ENV.
Configuration steps to follow:
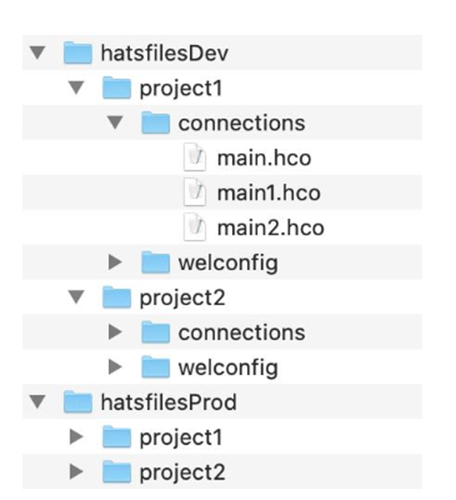
Keep the main.hco/hatswelcfg.xml file outside the HATS
project in the System environment variable path.
While handling multiple projects on the same machine, the folder
must be created with the project name and add the files.
Figure 1. File structure
Provide the System Environment
variable as HATS_CONFIG_ENV and modify the path according to the user's
requirement, whether production or development.
Note:
Changes in Operating System (OS) Environment Variables requires
System Restart.
Changes in Environment Variables at the Server level or the Java
level require Server Restart.
To replace the connection file, provide the path as
ENVPATH\HatsProjName\connections.��
Follow similar steps for configuring the hatswelcfg.xml.
Provide a path as
follows:
ENVPATH\HatsProjName\welconfig
Now, try to deploy the ear in the server. It should pick the
contents of files specified in the system environment path and the content gets
replaced while deploying to the server.
Users can also replace the content of background connections by
keeping those files in the system env path with a proper file name. The content
in this file will replace the existing content in background connections.
Once the content is replaced, a new file called
projectName.properties will be generated and keeps track of the last
modified date of main.hco file or hatswelcfg.xml
file.
The path of this properties file will be: ENVPATH\PojectName\projectName.properties
To modify the files present inside the HATS application for the
second time, the user must ensure that main.hco/hatswelcfg.xml in
the environment variable path are modified. After modifying the files, HATS
application must be restarted in the runtime for considering the changed files.
Note:
To work this feature properly, Files must be present in the above-mentioned file
structure (refer to figure 1).
Developing HATS applications for the Apache Geronimo Server
You can develop, test, and deploy HATS web applications targeted
for the Apache Geronimo web application server with the Tomcat web
container. For information about which releases of Apache Geronimo
are supported, see "System Requirements for Host Access Transformation
Services" at http://www.ibm.com/support/docview.wss?uid=swg27011794.
For detailed information about Apache Geronimo, including documentation
and downloads, see the Welcome to Apache Geronimo site at http://geronimo.apache.org .
Installing and configuring for Geronimo servers
This section describes a summary of how to install Apache Geronimo
and configure Rational Software
Delivery Platform (Rational SDP) to enable creating HATS web applications
targeted for Apache Geronimo servers:
Download and install the Apache Geronimo server with the Tomcat
web container:
Install the server by extracting the .zip or .tar files.
Run the server from a command line window by changing the directory
to geronimo_home/bin and entering the command: geronimo
run.
The Geronimo Eclipse Plugin (GEP) provides integration between
Eclipse, its Web Tools Platform (WTP) project, and Geronimo that enables
you to utilize WTP features to develop, test, and deploy applications
for the Apache Geronimo server using Rational SDP.
GEP v2.2 includes server adapters for v1.1.x, v2.0.x, v2.1.x,
and v2.2 Apache Geronimo servers.
Configure Geronimo as a target server in Rational SDP for HATS web
applications:
On the Rational SDP menu bar, click Window
> Preferences.
In the left panel, expand Server.
Click Runtime Environments.
In the Server Runtime Environments panel, click Add.
In the New Server Runtime Environment dialog, expand the Apache folder.
Select the appropriate version of the Apache
Geronimo server.
Optional. Select the Create a new local
server box to create a new Geronimo server on your workspace Servers tab. Doing this step enables you
to test your Geronimo application within the Rational SDP local test
environment using the Run on Server, Debug on Server, and Profile
on Server functions.
Click Next to go to the panel where
you point to your local Geronimo server. In the Application server installation Directory field
enter the root folder where you extracted the Geronimo server files.
For example, if you extracted your Geronimo server zip to a folder
named C:\geronimo-tomcat6-javaee5-2.1.7, enter this value
in the installation directory field.
Click Finish.
Click OK to close the Preferences
panel.
After following these steps, you can create HATS applications within Rational SDP targeted
for Apache Geronimo servers.
Considerations and limitations for Geronimo servers
There are some different considerations between developing,
testing, and running HATS web applications on Apache Geronimo server
versus WebSphere Application
Server. For example, only one HATS web application is supported per
.ear file running on an Apache Geronimo server.
This section describes a summary of how to install Oracle WebLogic
Server and configure Rational Software
Delivery Platform (Rational SDP) to enable creating HATS web applications
targeted for Oracle WebLogic Server:
Select the Contact all update sites
during install to find required software check box.
Select Work With > Oracle Enterprise
Pack for Eclipse Repository.
Expand the results and select the Oracle
WebLogic Server Tools check box.
Click Next.
Follow the instructions in the wizard to complete the installation.
Install the Oracle WebLogic Server tools in
RAD 9.7:
On the Rational SDP menu bar, click Help
> Eclipse Marketplace.
In the Find textbox, search for WebLogic.
Install the Oracle WebLogic Server Tools.
Click Confirm on the Confirm Selected
Features panel.
Read and accept the terms of the licensing agreement and click Finish.
After the installation completes, click Yes when
you are asked if to restart.
Configure WebLogic as a target server in Rational SDP for HATS web
applications:
On the Rational SDP menu bar, click Window
> Preferences.
In the left panel, expand Server.
Click Runtime Environments.
In the Server Runtime Environments panel, click Add.
In the New Server Runtime Environment dialog, expand the Oracle folder.
Select the appropriate version of the Oracle
WebLogic Server.
Optional. Select the Create a new local
server box to create a new WebLogic server on your workspace Servers tab. Doing this step enables you
to test your WebLogic application within the Rational SDP local test
environment using the Run on Server, Debug on Server, and Profile
on Server functions.
Note:
If you perform this step, you
must modify the default Publishing mode so that your projects will
deploy correctly when using the Run on Server, Debug on Server, and
Profile on Server functions.
Find the instance of the WebLogic Server that was created in the Servers view.
Right-click on the WebLogic Server and click Properties.
In the left panel, expand WebLogic.
Click Publishing.
In the Publishing mode section, click Publish
as an exploded archive.
Click OK to close the Properties
panel.
Click Next to go to the panel where
you point to your local WebLogic server. In the WebLogic
home field enter the root folder where you installed the WebLogic
server. For example, if your WebLogic installation uses the root folder
named C:\Oracle\Middleware, enter C:\Oracle\Middleware\wlserver_12.1 in
the WebLogic home field. If you installed
the JDK that was included with the WebLogic server installer then
the JAVA home field should be filled
in automatically with a value such as C:\Oracle\Middleware\jdk160_29.
If you did not install the included JDK then you must enter into the JAVA home field the appropriate location
of the JAVA runtime being used.
Click Finish.
Click OK to close the Preferences
panel.
After following these steps, you can create HATS applications within Rational SDP targeted
for Oracle WebLogic Server.
Considerations and limitations for WebLogic servers
There are some different considerations between developing, testing,
and running HATS web applications on Oracle WebLogic Server versus WebSphere Application Server.
For example, only one HATS web application is supported per .ear file
running on an Oracle WebLogic Server.
This section describes how to configure Rational Software Delivery
Platform (Rational SDP) to enable creating HATS web applications targeted
for IBM Bluemix server.
Configure IBM Bluemix server as a target server in Rational SDP
for HATS web applications:
On the Rational SDP menu bar, click Window
> Preferences.
In the left panel, expand Server.
Click Runtime Environments.
In the Server Runtime Environments panel, click Add.
In the New Server Runtime Environment dialog, expand the IBM folder.
Select IBM Bluemix Runtime.
Optional: Select the Create a new local
server box to create a new Bluemix server on your workspace Servers
tab. Doing this step enables you to test your Bluemix application
within the Rational SDP local test environment using the Run on Server,
Debug on Server, and Profile on Server functions.
Click Next to go to the panel where
you enter your Bluemix account details. Enter your Bluemix account
email address and password and validate the account.
Click Next to go to the panel where
you get Organizations and Spaces. Select the space you want.
Click Finish, and then click OK to close the Preferences panel.
After following these steps, you can create HATS applications within Rational SDP targeted
for IBM Bluemix Server.
Considerations and limitations for IBM Bluemix Server
There are some different considerations between developing, testing,
and running HATS web applications on IBM Bluemix Server versus WebSphere
Application Server.
One HATS web application is supported per .ear file running on
IBM Bluemix Server.
The HATS administrative console is not supported.
Display Terminal is not supported (trace.HOD.DISPLAYTERMINAL).
IBM Bluemix does not support the IBM WebSphere JAX-WS Web service
runtime using Rational SDP.
To view log files using Rational SDP Remote Systems View:
In the Rational SDP Servers view, double click IBM Bluemix Server.
By default, the Overview tab is
open. Go to the Applications and Services tab.
Select your HATS application under Applications.
Click the Remote Systems View link
at the bottom-right corner. The Remote Systems View opens for Bluemix
Server. Navigate till you see your HATS application.
Navigate to the path given above for the log files.
Notes:
While adding Bluemix Runtime in Rational SDP, you might see
the following error:
java.lang.ClassNotFoundException:
Cannot find the specified class com.ibm.websphere.ssl.protocol.SSLSocketFactory
The
workaround for the SSLSocketFactory error message is to look for the com.ibm.ws.ast.st.core.prefs file
available in x:\workspace\.metadata\.plugins\org.eclipse.core.runtime\.settings,
where x:\workspace is the directory of your workspace,
and replace isUseIBMSSLSocketFactory=true value with 'false'.
Then, restart the workbench.
Exceptions in Bluemix console while deploying HATS ear in Bluemix
Server:
FFDC1015I: An FFDC Incident has been created:
"com.ibm.wsspi.adaptable.module.UnableToAdaptException:
com.ibm.ws.javaee.ddmodel.DDParser$ParseException:
CWWKC2262E: The server is unable to process the 7 version and the
http://xmlns.jcp.org/xml/ns/javaee namespace in the /META-INF/application.xml
deployment descriptor on line 2.
com.ibm.ws.app.manager.ear.internal.EARDeployedAppInfoFactoryImpl 132"
at ffdc_15.09.11_05.03.09.0.lo .....
By Default HATS applications
are created using J2EE 7 version for Bluemix server, so you can set
the following environment variable in your HATS Bluemix application
in order to include a major subset of the Java EE 7 feature set. You
can then add or remove additional features as needed. While deploying
HATS application in Bluemix server you can configure this environment
variable.
Developing HATS applications for Web Sphere Application Server
Liberty Porfile
You can create HATS applications within Rational SDP targeted for
WebSphere Application Server Liberty Profile by following the steps
below:
On the Rational SDP menu bar, click Window > Preferences.
In the left panel, expand Server.
Click Runtime Environments.
In the Server Runtime Environments panel, click Add.
In the New Server Runtime Environment dialog, expand the IBM folder.
Select WebSphere Application Server
Liberty Profile.
Optional: You can test your Liberty Profile application within
the Rational SDP local test environment using the Run on Server, Debug
on Server, and Profile on Server functions. Select the Create a new local server box to create
a new Liberty Profile server on your workspace Servers tab.
Click Next to go to the panel where
you point to your local Liberty Profile server. Click the Choose an existing installation radio button
and enter the location where you have WebSphere Application Server
Liberty Profile installed in the Path field.
Note:
If you do not have installed a Liberty Profile server installed,
you can install one directly from the New
Server Runtime Environment dialog box. The steps are listed below.
Click the Install from an archive or
repository radio button.
Click Next to go to the Install
Runtime Environment panel.
Enter a path such as C:\Liberty in the Enter
the destination path field.
Click the Download and install a new
runtime environment from ibm.com radio button and select IBM WebSphere Liberty Repository in the
drop down menu.
Select one of the WAS Liberty servers listed that include the
runtime features, such as WAS Liberty V8.5.5.7 Runtime, and click Next.
Choose any additional bundles you want on the Install Additional
Content panel and click Next.
Accept the terms of the licensing agreement and click Finish.
Click Finish.
Click OK to close the Preferences
panel.
Considerations and limitations for WebSphere Application Server
Liberty Profile
When using Debug on server to test your application, a display
issue might occur on the terminal window. You might receive the following
error message:
ERROR HPS5018 An unexpected exception has occurred.
  Frame unable to display: java.awt.HeadlessException.
If this error occurs in the console, you can fix this problem by
following these steps.
In the HATS Projects view, open the Servers tab.
Right-click on the WebSphere Application Server Liberty Profile
server listed and click on New > Server Environment File > jvm.options.
Add the value to the file:
-Djava.awt.headless=false
Save and close the jvm.options file.
Restart the server to activate the changes.
Liberty Web Profile-8:
Issue:
HATS REST API deployed in liberty web profile - 8 having JAX-RS 2.1 feature which results in
incorrect json output or the variable which must be ignored is also added to json
response.
Reason:
Liberty JAX-RS 2.1 uses JSON-B to serialize and de-serialize JSON to objects, but JAX-RS 2.0
uses Jackson.
Resolution:
In HATS REST API generated Input_Properties and Output_Properties java files.
Change @JsonIgnore to @JsonbTransient and @jsonproperty to @jsonbproperty of JSON-B
library.
If the user writes any custom code, annotations used must be JSON-B annotations.
HATS REST API generated Input_Properties and Output_Properties java files are in
"Project_Name\Java Source\restfulserviceclasses".
Developing HATS applications for the JBoss EAP Server
You can develop, test, and deploy HATS web applications targeted
for the JBoss Enterprise application server. For information about
which releases of JBoss EAP are supported, see "System Requirements
for Host Access Transformation Services" at http://www.ibm.com/support/docview.wss?uid=swg27011794.
For detailed information about Jboss EAP, including documentation
and downloads, see the Red Hat JBoss Enterprise Application Platform
Overview site at https://developers.redhat.com/products/eap/overview .
Installing and configuring JBoss EAP
Configure JBoss EAP as a target server in Rational SDP for HATS
web applications:
On the Rational SDP menu bar, click Window
> Preferences.
In the left panel, expand Server.
Click Runtime Environments.
In the Server Runtime Environments panel, click Add.
In the New Server Runtime Environment dialog, expand the Red Hat JBoss Middleware folder for JBoss
EAP.
Select the appropriate version of the JBoss
Enterprise Application server.
Optional. Select the Create a new local
server box to create a JBoss server on your workspace Servers tab. Doing this step enables you
to test your JBoss application within the Rational SDP local test environment
using the Run on Server, Debug on Server, and Profile on Server functions.
Click Next to go to the panel where
you point to your local JBoss server. In the Application server installation Directory field
enter the root folder where JBoss server is installed. For example,
if JBoss server is installed in a folder named C:\EAP-7.1.0,
enter this value in the installation directory field.
Click Finish.
Click OK to close the Preferences
panel.
After following these steps, you can create HATS applications within Rational SDP targeted
for JBoss servers.
Considerations and limitations for JBoss servers
There are some different considerations between developing, testing,
and running HATS web applications on JBoss server versus WebSphere Application Server.
For example, only one HATS web application is supported per .ear file
running on a JBoss server.
You can develop HATS Web applications that can be accessed by mobile
devices such as cellular phones, data collection terminals, and personal
digital assistants (PDAs). The process is the same as developing any
HATS Web application with some considerations due to the capabilities
of the mobile device and its Web browser, for example screen size
and interaction limitations.
To create a project for your application for mobile devices, launch
the Create a Project wizard using one of the following actions:
Select HATS > New > Project from
the menu bar.
Select File > New > HATS Project from
the menu bar.
Click the Create HATS Project icon
on the toolbar.
In the Create a Project wizard, on the HATS Project panel:
Enter a name for the mobile device project.
Optionally, enter a description.
Accept the default location.
Select Web to indicate this is
a Web project.
Note:
If
the Web deployment option is disabled, this indicates that no server
runtimes are defined. To define server runtimes, go to Window > Preferences > Server > Installed Runtimes and
add at least one runtime definition.
For the Target server field, select one of the supported WebSphere Application Servers.
For the Enterprise application project field, enter the name of
the EAR project to use for testing in the local test environment.
Click Next and continue creating
your project as normal.
Considerations and limitations for mobile devices
When you create a HATS project and select Optimize
options for mobile devices, HATS initializes the project with
options that work best for mobile devices. Some options, for example,
printing, keyboard, asynchronous update, and other options, are not
supported and therefore disabled. Keep in mind the following considerations
and limitations as you develop your application for mobile devices.
There is not an automated option that allows you to convert
a HATS project that is not optimized for mobile devices to one that
is optimized for mobile devices, or vice-versa.
The option to specify a project theme is not provided. Instead,
options are automatically initialized to work best for mobile devices.
Only templates that are optimized for mobile devices are provided
for use in the project.
Note:
If you do not want to have horizontal scrolling using the Modern
template, add the overflow: auto; style to .roundedcornermodule in
the Modern.jsp template file. For example, change .roundedcornermodule
{margin: 0px;} to .roundedcornermodule { margin: 0px; overflow:
auto; }. This forces the page to keep its original size and
keep within the visual screen on the device. Note that in some cases
this might result in data on the page being truncated, and therefore
the design of customized pages and widget choices should take the
screen size into account.
A second rendering set, named compact,
is created in the project. This rendering set is specified as the
default rendering set. It also has the Use
compact rendering option selected which reduces the amount of
HTML and blank space in default rendering, which in turn may display
a different structure of the original host screen.
The HATS preference, Include a Free
Layout Table, that takes effect when you create a new blank transformation,
has as additional modifier, Except when
the project is optimized for mobile devices. This modifier is
selected by default. Therefore, blank transformations added to your
mobile project will not include a free layout table by default.
Field Exit, Field+, and Field- can be used by using the Enable cursor positioning option on input fields option
in combination with the Host Keypad or Host Key buttons.
The Field widget provides
a Separated layout option to render
output using inline span tags, instead of using a table, to differentiate
between fields. The goal of using this option is to reduce the amount
of HTML and blank space. This is the default for mobile projects.
HATS provides Columns
placement support for subfile and table widgets. This is useful
when displaying table data on a mobile device by allowing the arrangement
and exclusion of columns from the display, as well as by allowing
expandable details sections so the table can fit into a smaller space.
The
details section, when expanded, is displayed directly below the row
containing the primary columns of data. Once a particular row of
interest is identified by the user, the details of that row, when
expanded, are displayed in a format that flows down the screen rather
than to the right. This enables small displays to view the needed
details of an arbitrary number of columns without resorting to horizontal
scrolling.
The figures below show a subfile as displayed on a host
screen, followed by the primary view of the subfile and a details
view of the subfile using the default Columns placement support.
Figure 3. Subfile on a host screen
Figure 4. Primary view of the subfile using default Columns placement support
Figure 5. Details view of a subfile row using default Columns placement support
In addition to saving screen real estate, you can configure
the widget to keep the detail columns on the server until requested
rather than sending them using HTTP to the user's browser. This
allows for a reduction in some cases of the amount of data transferred
because unwanted detail data is never sent over HTTP to the end device.
Only the details that are specifically requested by the user are retrieved
on-demand and sent to the browser.
Note:
Subfiles configured
to use the field component to recognize the data portion of the subfile
cannot effectively use primary and detail column capability due to
the fact that such subfiles cannot distinguish columns, but only rows.
In addition to the Columns placement subfile
and table widget settings described in Widget settings, the
following settings can be used to further customize the appearance
of the controls used for this option. These settings do not appear
in the HATS Toolkit GUI. Instead, you must add these settings to the
source for the widget. The source below shows examples of these settings
using a Subfile widget as an example.
Determines the graphical representation used for the control
that shows the details. Specify button, link, or image.
The default is link.
expandValue
If expandRepresentation is either button or link, this value is used as text on the
button or link. If no value is supplied, a plus sign (+) is used by default. An empty string
value"" is not accepted and defaults to a plus sign (+).
If expandRepresentation is image, this value is the path to and the
name of the image file to use. The path is searched relative to the
Web Content directory of the project. For example, if you want to
specify the twisty1.gif in the Web Content/common/images directory,
you set expandValue as shown below:
This setting provides alternate text for the image. It is used
only when expandRepresentation is set
to image and the browser cannot display
the specified image, for example, the Menu
> View > Show Pictures option of Internet Explorer Mobile is
not selected.
collapseRepresentation
Determines the graphical representation used for the control
that hides the details. Specify button, link, or image.
The default is link.
collapseValue
If collapseRepresentation is either button or link, this value is used as text on the
button or link. If no value is supplied, a minus sign (-) is used by default. An empty
string value"" is not accepted and defaults to a minus
sign (-).
If collapseRepresentation
is image, this value is the path to
and the name of the image file to use. The path is searched relative
to the Web Content directory of the project. For example, if you
want to specify the twisty1.gif in the Web Content/common/images directory,
you set collapseValue as shown below:
This setting provides alternate text for the image. It is used
only when collapseRepresentation is
set to image and the browser cannot
display the specified image, for example, the Menu
> View > Show Pictures option of Internet Explorer Mobile is
not selected.
expandHeaderValue
This setting provides the header text for the column for the
details controls. A value specified as "" creates a header
with no text.
These are class and style overrides for the controls for this
option. If not specified, the standard values for widgets apply.
Standard HTML styles can be used, and classes are applied in order.
The setting, Enable cursor positioning
option on input fields, available for widgets used to render
input fields, provides users a method of switching from data input
mode to cursor positioning mode for input fields. When in data input
mode, the user can enter data into the input field. When in cursor
positioning mode, the user can tab to or otherwise position the cursor
on any character in the input field. This setting is useful for devices
that do not have other cursor positioning capabilities.
In addition
to the Enable cursor positioning option
on input fields widget settings described in Widget settings,
the following settings can be used to further customize the appearance
of the controls used for this option. These settings do not appear
in the HATS Toolkit GUI. Instead, you must add these setting to the
source for the widget. The source below shows examples of these settings
using a Field widget as an example.
Determines the graphical representation used for the control
shown next to the input field when in the data mode. Specify button, link,
or image. The default is link.
dataModeCEPValue
If dataModeCEPRepresentation is either button or link, this value is used as text on the
button or link. If no value is supplied, an asterisk character (*) is used by default. An empty string
value"" is not accepted and defaults to an asterisk character
(*).
If dataModeCEPRepresentation
is image, this value is the path to
and the name of the image file to use. The path is searched relative
to the Web Content directory of the project. For example, if you
want to specify the sbarleftblk.gif in the Web Content/common/images
directory, you set dataModeCEPValue as shown below:
This setting provides alternate text for the image. It is used
only when dataModeCEPRepresentation is set to image and
the browser cannot display the specified image, for example, the Menu > View > Show Pictures option of Internet
Explorer Mobile is not selected.
dataModeIconClass, dataModeIconStyle
These are style and class overrides for the data mode representation
icon. If not specified, the standard values for widgets apply. Standard
HTML styles can be used, and classes are applied in order.
cursorModeCEPRepresentation
Determines the graphical representation used for the control
shown next to the input field when in the cursor mode. Specify button, link,
or image. The default is link.
cursorModeCEPValue
If cursorModeCEPRepresentation is either button or link, this value is used as text on the
button or link. If no value is supplied, an asterisk character (*) is used by default. An empty string
value"" is not accepted and defaults to an asterisk character
(*).
If cursorModeCEPRepresentation
is image, this value is the path to
and the name of the image file to use. The path is searched relative
to the Web Content directory of the project. For example, if you
want to specify the sbarrightblk.gif in the Web Content/common/images
directory, you set cursorModeCEPValue as shown below:
This setting provides alternate text for the image. It is used
only when cursorModeCEPRepresentation is
set to image and the browser cannot
display the specified image, for example, the Menu
> View > Show Pictures option of Internet Explorer Mobile is
not selected.
cursorCEPRepresentationStyle
This style is used to highlight the currently selected cursor
position. The default is border-bottom:
1px solid green;. but an empty string "" is valid.
cursorModeCEPStyle
This is the style used around the input field while in cursor
mode. The default style is border: 1px
solid #999999; height: 1.75em;. It is not recommended to change
this unless necessary.
These are class and style overrides for decorating elements
in the cursor mode area. If not specified, the standard values for
widgets apply. Standard HTML styles can be used, and classes are applied
in order.
dataModeIconClass, dataModeIconStyle
These are class and style overrides for decorating elements
in the data mode area. If not specified, the standard values for
widgets apply. Standard HTML styles can be used, and classes are applied
in order.
There are some instances during a wireless connection where
the connection to the router or HTTP server is lost. If this occurs,
the Web page may be locked, and HATS cannot resend any information.
The following settings are available to resolve this issue. The settings
are available in the RuntimeSettings class in the Project Settings
source view (the application.hap file).
usePageUID
Specifies whether to enable a pageUID being put on the screen.
This allows the runtime to track the page to see if it has already
been sent. If this value is false, the pageSubmitTimeout value is
not read. The default value is false.
pageSubmitTimeout
Specifies how long to wait, in milliseconds, before unlocking
the Web page for use by the user. A value of -1, or empty, results
in this function being inactive. The default value is -1.
incorrectPageUIDEvent
Specifies what to do when
the PageUID on the user's Web page HTTP request does not
match the PageUID that is stored in the runtime for that sessionid
and application instance. It has 2 options: REFRESHCOMMAND or
ERROREVENT. The default is REFRESHCOMMAND.
The source below shows examples of these settings.
AJAX polling from a browser running on an iPhone or iPod touch
device stops when you switch from the browser to another application.
As a result, when you switch from a browser accessing HATS to another
application on the device, HATS disconnects the browser session after
the Time to wait for disconnect (seconds) interval
has passed. You may wish to increase this interval or disable the
auto-disconnect function for HATS applications accessed from
iPhone or iPod touch devices. For more information see Using the client pull (AJAX) method.
In addition to options that HATS automatically disables, the following
functions are not supported and should not be implemented in HATS
applications for mobile devices:
HATS Web projects cannot be migrated or automatically converted
into HATS Web projects for mobile devices.
Rich client applications.
Portal applications (Standard or IBM®).
Interoperability with WebFacing.
Bidirectional language support.
Accessibility features.
Any device with screen sizes smaller than 320x240.
Keyboard host key support.
As a result, using a keyboard
works as a normal Web keyboard, host keys are not sent, instead the
F1 key brings up the browser help, and the Enter key is not mapped
to the host Enter key.
Also, without keyboard support,
the HATS JavaScript cannot
determine that the user has entered data on the HATS Web page. As
a result, auto-refresh support overwrites any data that the
user has entered into the GUI view of the HATS application if a new
host screen is asynchronously received from the host application.
Field specific help, right justify, capitalizes, or other attributes.
Any other data entry limitations inherent to the device hardware
or software.
HATS administrative console page access by a mobile
device.
The disconnectOnClose connection parameter.
Screen combinations.
Calendar widget with Windows Mobile.
Tabbed folder support.
Spreadsheet support.
Dojo widgets.
Considerations and limitations for iPad devices
Your HATS application may appear or behave differently
on iPad devices compared to other mobile devices because of differences
such as screen size and web browser. Because the iPad device includes
a large screen relative to some other mobile devices, it works better
with applications that are not created with options optimized for
mobile devices. When creating a HATS web project for an iPad device,
do not select the Optimize options for mobile
devices option.
Considerations and limitations for Android devices
Your HATS application may appear or behave differently
on Android devices compared to other mobile devices because of differences
such as screen size and web browser. If the screen size of your Android
device is small, you might consider creating a HATS mobile project
rather than a HATS web project for use with your device. This might
provide a better user experience for a smaller screen. For more information,
see Developing HATS applications for mobile devices.