HATS offers security for your applications. Using Secure Sockets
Layer (SSL), HATS provides a secure connection between your HATS application and the Telnet server it connects
to.
HATS also supports Secure Shell (SSH) for VT connections.
Web Express Logon
(WEL) gives you a mechanism to authenticate users (that
run HATS Web applications and portlets) and provides them with
single signon capability.
Using Kerberos services tickets
can automate sign-on for rich client applications that use
5250 Telnet sessions and run on Windows domain
clients.
By supporting Java™ 2
security, HATS helps you provide protection for system resources and
APIs within your WebSphere® Application
Server system.
For information about the effects of WebSphere Application Server security
on the use of the HATS administrative console see Using HATS administrative console.
For Web applications, SSL security between the
user's browser and the HATS application requires an HTTPS connection. This
requires that both HTTP server and WebSphere Application
Server be configured to support HTTPS. The HTTP server certificate
is stored in the browser certificate store for the browser-HTTP server
connection.
The HATS SSL configuration discussed in the remainder
of this section is used to configure SSL between the HATS application
and the Telnet server (which must be configured with an SSL port).
This HATS SSL configuration is supported for HATS Web, rich client,
and EJB applications, and for HATS portlets.
Note:
SSL is
not supported for 5250W connections between HATS and the WebFacing
server.
To enable SSL between the HATS application and the
Telnet server, select the Enable SSL check
box on the Security tab of the connection
editor. For more information see Security. By
enabling SSL for a connection, you request that data flowing over
the connection be encrypted to secure the connection.
Selecting the Use JSSE check
box enables the use of TLS v1.0, TLS v1.1, or TLS v1.2 using the Java
Secure Socket Extension (JSSE) security library, instead of SSLite,
for the connection between HATS and the HOST system. If not selected
(default option), SSLite library is used, and TLS v1.1 and TLS v1.2
are not available for the connection.
Note:
The IETF Internet-Draft, TLS-based Telnet Security, defines
the protocol for doing the SSL handshake over a TLS-based Telnet connection.
If the Telnet server you are connecting to supports this protocol,
you must add the SSLTelnetNegotiated property to the advanced connection
settings of your connection definition. The advanced connection settings
are found on the Advanced tab of the
connection editor, see Configure optional, advanced connection settings. Set the value
of the property to true.
HATS uses Host On-Demand technology to provide connection
support from HATS applications to 3270 and 5250 applications using
Telnet protocols. HATS uses the SSL support provided by Host On-Demand technology for securing these connections. Using
a secure connection over SSL encrypts data flowing over the connection
and thus protects it against observation by a third party.
For a connection to be secured, both the HATS application and
the Telnet server it is connected to must support SSL. To secure the
connection, the Telnet server must provide a certificate, which is
used in encrypting the data.
When connection establishment is attempted, HATS receives
the certificate from the Telnet server and determines whether to accept
or reject the connection. HATS searches its built-in keystore file
for a signer certificate that matches the Telnet server's personal
certificate. The HATS keystore file contains a set of well-known certificates including Verisign,
Thawte, and RSA. If the Telnet server is using a valid well-known certificate,
it will be accepted because it will match one of the well-known certificates
that are provided with HATS. In this case, there is no need to create
a keystore file containing the certificate - the needed signer certificate
is already in the HATS built-in keystore file.
If the Telnet server is not using
a well-known certificate, a keystore file containing
a valid signer certificate must be created and configured
to HATS. This certificate can be obtained by opening the Telnet
server's keystore file, extracting the certificate
as a binary .der file, and using the Certificate
Management tool (also known as the IBM® Key Management tool), importing the
.der file into the keystore file you use with HATS.
For example, if the Telnet server platform supports the IBM Key Management
tool, to extract the certificate file from the Telnet server's keystore file,
take the following steps:
Start the IBM Key
Management tool.
Click Key Database File and
select Open. For information about opening IBM CMS
keystore files, see Using IBM CMS keystore
files.
Select the Key database type for
the Telnet server's keystore file and then Browse to the directory containing the
file.
Click OK.
Under Key database content, select Signer Certificates from the drop-down
list.
Select the certificate you want to extract and click Extract.
For Data type select Binary DER data. If the certificate is
in ASCII format, select Base64-encoded
ASCII data.
Give the certificate file a name and location and click OK.
To create a keystore file to use
with HATS that includes the certificate file you extracted from
the Telnet server's keystore file, take the following steps:
Copy the certificate extracted from the Telnet server's keystore file
to your HATS development system.
Click Start > All Programs > IBM Rational® SDP package group > IBM Rational HATS V9.5 > Certificate Management (where IBM Rational SDP package group is the name
of the Rational SDP package group you have installed.
Click Key Database File and select New.
For the Key database type,
select PKCS12 orJKS (if
you are using JSSE). Give the file a name with an extension of .p12
or .jks (if you are using JSSE) and a location, and click OK.
Type in a password, confirm it, and click OK. For the JKS file, the password must
contain at least 6 characters.
Under Key database content, select Signer Certificates from the drop-down
list and click Add.
For Data type select Binary DER data. If the certificate is
in ASCII format, select Base64-encoded
ASCII data.
Browse to find and select the certificate
you extracted from the Telnet server's keystore file and click OK.
If a certificate is required by HATS, you can use
options on the Security tab of the
connection editor to configure how HATS finds the keystore file
containing the certificate. Use the Import button
to import the keystore file into your project. Or, use the Use PKCS12 keystore at a specific path option
to specify that the keystore file will not be contained within your
project but will exist elsewhere on the target runtime system. This
option is useful if you want to update the keystore file without
having to redeploy the HATS application. If you import the keystore file, HATS copies
it to the root of the EAR project (for Web projects), to
the \Web Content\WEB-INF directory (for portlet projects), or
to the runtime extension plug-in (for rich client projects).
If imported, the keystore file becomes a part of the HATS project,
and it is packaged with the rest of the project files when you export the project. For more information see Security.
Notes:
Multiple certificates can be added to a single keystore file.
Multiple HATS projects can use the same keystore file, either
by importing the same keystore file in the EAR project (for Web applications)
or in the runtime extension plug-in (for rich client applications),
or by referencing the same keystore file in the Use
PKCS12 keystore at a specific path option.
Each connection within a single HATS project can reference the
same or different keystore files.
To configure Secure Shell (SSH) for a VT connection:
In the HATS Projects view, expand the Connections folder and
double-click the entry for the VT connection.
In the connection editor, click the Advanced tab.
Under Configure optional, advanced connection settings, click Add.
In the Add Parameter dialog, from the drop-down list for
the Name field, select the SecurityProtocol parameter,
set the Value field to SESSION_PROTOCOL_SSH, and click OK.
Click Add.
In the Add Parameter dialog, from the drop-down list for
the Name field, select the userID parameter,
set the Value field to your user id, and click OK.
Click Add.
In the Add Parameter dialog, from the drop-down list for
the Name field, select the userPassword parameter,
set the Value field to your password, and click OK.
Using Web Express Logon
(WEL)
Overview
Web Express Logon
(WEL) allows your users to access host applications using only their
network security credentials. It provides a means for a HATS application
to accept user network credential information, previously authenticated
by a network security layer, and use it to generate host credentials
to be used instead of requiring a HATS user to navigate host logon
screens.
WEL works in conjunction with your company's network security application
to maintain company security while allowing users to log on to host
systems without having to re-enter their user IDs and passwords. It
includes the following benefits:
Ease of use: Users can log on to their network
security application and access host applications without having to
re-enter their IDs and passwords.
Reduced password-related support calls:
Users are less likely to call the company support line because of
forgotten or misplaced passwords.
Increased productivity: Users can log on
only once in an environment that has multiple methodologies for defining
user IDs, passwords, and authentications.
A variant called Certificate Express Logon is also supported which allows
authentication by using X.509 certificates rather
than by network security applications.
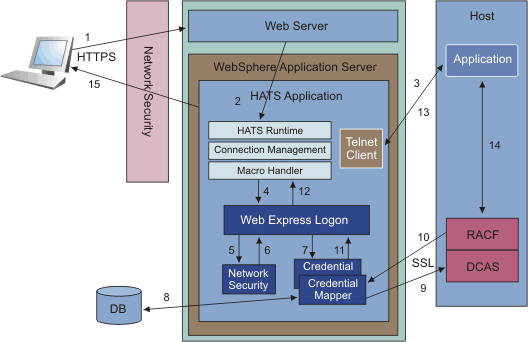
Architecture
The following figure shows the WEL architecture using DCAS and RACF® as the example host credential
mapper.
Figure 77. WEL architecture
The user submits a request to connect to a HATS application through
a Network Security Application (NSA).
The NSA authenticates the
user using either an X.509 certificate or a user ID and password.
After authentication the NSA authorizes access to the requested application
based on policy information associated with the user. The NSA then
passes the user’s network credentials (network ID) through the
Web server to the WebSphere Application
Sever.
IBM Tivoli® Access Manager is an example
of an NSA.
WebSphere Application
Server routes the request to HATS.
The HATS runtime starts a Telnet connection to the host.
The HATS macro handler runs the WEL logon macro. See How to create a WEL logon macro. WEL receives a Java function
call from the macro requesting that host credentials (host user ID
and password or passticket) be returned.
WEL calls the appropriate Network Security plug-in to retrieve
the user’s network ID from where it was saved by the NSA.
You
must configure to HATS the Network Security plug-in that corresponds
with the NSA being used. See Network Security plug-in.
The Network Security plug-in returns the user’s network
ID.
WEL calls the appropriate Credential Mapper plug-in to
convert the user’s network ID and host application ID to host
credentials (host user ID and password or passticket).
You must
configure to HATS the Credential Mapper plug-ins that correspond
with the credential mappers being used. See Credential Mapper plug-ins.
The Credential Mapper plug-in calls a function (in this
case, a JDBC-accessible database such as IBM DB2®) to
map the user’s network ID to a host user ID.
The Credential
Mapper plug-ins provided with HATS are designed to use a JDBC-accessible
database. Another possibility is to use an LDAP directory. However,
if you use LDAP, you must create your own custom plug-in. For
more information see the chapter, Creating plug-ins
for Web Express Logon,
in the HATS Web Application Programmer's Guide.
The Credential Mapper plug-in calls the back-end
credential mapper (in this case DCAS and RACF) with the host user ID and host application
ID and requests a passticket.
RACF generates and returns
a passticket.
The Credential Mapper plug-in returns the host user ID
and passticket to WEL.
WEL returns the host user ID and passticket to the macro.
The macro inserts the host user ID and passticket onto the host
logon screen.
The host application verifies the host user ID and passticket
and allows the connection.
The host application screen is presented to the user.
Planning for implementation
There are certain things you need to consider while you are planning
your setup and configuration to use WEL in your HATS project. Following
is a list of what information you'll need to obtain:
What is your host type?
What network security layer your users will enter through?
What host applications will your users access using WEL?
What host authentication is needed for those applications?
Where the host authentication credentials will be stored and how
to access them?
Whether built-in Credential Mapper plug-ins are sufficient
to do the job, or whether a custom plug-in needs to be written.
Implementation
Once you have obtained the information to begin setting up WEL,
you will need to take the following steps:
Configure your network security application, if you are using
one.
Configure connections in your HATS project for WEL.
When
you select the Use Web Express Logon check box on
the Security tab of the Connection editor and then click the Configure ... button, the
Web Express Logon
editor is opened. This editor has the following three tabs:
Network Security Plugin
Credential Mapper Plugins
Source
Configure WEL by:
Identifying the network security plug-in to be used, and
specifying any initialization parameters.
Identifying the Credential Mapper plug-ins to be used in
the EAR project, the criteria for selecting each one, and the initialization
parameters for each one. Order them optimally based on their selection
criteria.
Create and populate any back-end credential sources (such as DCAS).
Configure any required keystore files needed to connect to back-end
credential sources like DCAS. A Certificate Management tool (also known as the IBM Key
Management tool) is provided, see Create SSL keystore file (DCAS only) for
more information.
Record macros that include prompts for user ID and password to
trigger WEL processing.
Trigger these macros at appropriate times in the HATS project
(connection's logon macro being one example).
How to create a WEL logon macro
Perform the following steps to create a WEL logon macro:
From HATS Projects view, select
the project connection from the Connection folder
From the HATS toolbar, click the Open HATS Host Terminal icon to start a
session.
Click on the Record Macro icon
Navigate to the screen that contains the user ID input field.
Select Add Prompt Action icon from
the toolbar, and the Add Prompt Action wizard
appears. Fill in the fields. For more information, see Add Prompt Action.
Select Use Web Express Logon in the Add Prompt Action dialog. Select the prompt
type of User ID and enter the Application
ID in the Application ID field.
Navigate to the Password input
field.
Select Add Prompt Action icon,
select Use Web Express Logon with Prompt type
of Password and enter it in the Application
ID.
When you have completed the login process, click the Stop Macro icon and the Save Macro.
After the macro has been recorded and saved, you must configure
HATS to invoke the macro. There are several methods
which you can use:
Define the WEL logon macro as the connect macro for the connection.
Perform the following steps to configure WEL as the connect macro:
Select the connection from the HATS Projects view.
Open the Macros tab.
Select the WEL macro using the Connect
macro drop-down list.
Invoke the WEL logon macro with the Play
Macro option on the Connect event:
In the Project Settings view, select the Events tab.
Under Application Events, click Connect.
On the Overview panel for the Connect event, click the Actions tab.
On the Actions panel, click Add.
On the Select an Action page, select Play
macro and click Next.
On the Define Action Properties page, select the WEL logon macro
from the drop-down list and click Finish.
Invoke the WEL logon macro with a Play
Macro option on a screen customization. For more information,
see Play macro.
Create an Integration Object from the macro.
Network Security plug-in
The following Network Security plug-ins can be selected
for WEL. You can only have one security plug-in per .ear file.
Select from the drop-down list beside Plugin
type to display the following list:
None (used when no network security package is being used, as
with Certificate Express Logon)
The WebSphere Portal Network Security Plugin will only appear if you are working with a HATS portlet project.
Credential Mapper plug-ins
The following built-in Credential Mapper plug-ins can be selected for WEL. Click the Add button, select Add
built-in Credential Mapper plugin, and then select from the following
list:
DCAS/RACF/JDBC Credential Mapper
Note:
DCAS and RACF are used
with the zOS operating system to obtain passtickets. A JDBC-accessible
repository is required to map the user’s network ID to the user’s
host ID.
Certificate-based DCAS/RACF Credential Mapper
Note:
DCAS and RACF are used
with the zOS operating system to obtain passtickets. This plug-in
does not require a JDBC-accessible repository because a certificate
is passed directly to DCAS, and a host ID and passticket pair is returned.
JDBC Vault Credential Mapper
Note:
Any JDBC/ODBC compliant repository, such as DB2, Oracle, even an Excel spreadsheet on Windows can be used. This repository
is used to store host user IDs and passwords.
This plug-in is included to test WEL macros. It is only
for testing in the HATS Toolkit because it uses hard coded host user
IDs and passwords that you provide.
You also have the choice of adding a custom Credential
Mapper plug-in by selecting Add custom
Credential Mapper plugin and entering the name of the fully qualified
plug-in in the text box. For information about creating a custom
plug-in, see the chapter, Creating plug-ins
for Web Express Logon,
in the HATS Web Application Programmer's Guide.
Once you have selected your Credential Mapper plug-in, the details, such as class, name, description and author, are filled in the Details section.
The Initialization section displays a set of parameters configured for the
plug-in you selected. By clicking the Add button,
you can specify additional parameters for your plug-in. You
can also select Remove to remove selected
parameters. Only parameters which are not required can be removed.
Credential Mapper selection
Table 9 describes which
Credential Mapper requests will be handled by this plug-in.
Table 9. Authentication types and descriptions
Authentication type
Description
AuthType_All
Identifies the credentials
to be used for all authentication types
AuthType_3270
Identifies the credentials to be used with 3270
emulation
AuthType_5250
Identifies the credentials to be used with 5250
emulation
AuthType_VTHost
Identifies the credentials to be used with VT
emulation
If multiple credential mappers are defined, you can
use a host mask as a secondary selection criteria to identify the
most appropriate credential mapper to use. Table 10 shows examples of how to specify a host mask.
Table 10. Host masks and values matched
Host mask
Value matched
*.raleigh.ibm.com
Matches all addresses that end with .raleigh.ibm.com
ralvm*
Matches all addresses that start with ralvm
*
Matches all
*xyz*
Matches any host address that contains xyz
Initialization parameters
For solutions that use z/OS® and
DCAS, add the DCAS plug-in parameters. Adding these parameters
allows the CMP to map a network ID to a host ID and
then get a passticket from the DCAS application running on the host.
A passticket is a credential that is similar to a password, however
a passticket expires after a certain amount of time and is used only
one time. DCAS requires a Security Access Facility (SAF)-compliant
server product, such as an IBM Resource
Access Control Facility (RACF)
security server, that supports passticket generation.
Note:
Java Secure
Socket Extension (JSSE) is used by the HATS DCAS/RACF/JDBC and
Certificate-based DCAS/RACF credential mapper plug-ins
for secure connections to the DCAS server. For information about migrating
this support from versions before HATS V7 see Web Express Logon
(WEL).
DCAS parameters for DCAS/RACF/JDBC Credential Mapper plug-in
Required DCAS parameters: Some
combination of the following parameters is required to allow the credential
mapper plug-in to connect to the DCAS server securely:
CMPI_DCAS_TRUSTSTORE
This parameter contains the name of the keystore file to be used
to look up the HATS DCAS client certificate and the DCAS server certificate.
If CMPI_DCAS_USE_DEFAULT_TRUSTSTORE is set to true,
the JSSE default keystore file is used instead of the keystore file
specified by this parameter.
CMPI_DCAS_TRUSTSTORE_PASSWORD
This
parameter contains the password of the keystore file specified
by CMPI_DCAS_TRUSTSTORE.
CMPI_DCAS_TRUSTSTORE_TYPE
This
parameter contains the type of the keystore file specified by
CMPI_DCAS_TRUSTSTORE. Valid values are pkcs12, jceks, and jks.
CMPI_DCAS_USE_DEFAULT_TRUSTSTORE
This parameter indicates whether the JSSE default keystore file
should be used to look up the HATS DCAS client certificate and the
DCAS server certificate. The default is false.
If specified as true, this keystore file
is used instead of the keystore file specified by the CMPI_DCAS_TRUSTSTORE
parameter.
Note:
The search order to locate
the JSSE default keystore file is:
the location specified by the javax.net.ssl.trustStore system
property, then
<java-home>/lib/security/jssecacerts, then
<java-home>/lib/security/cacerts
The following parameters are designed to work with your JDBC database
credential mapper. Using this type of network-accessible database
provides you with a flexible and secure means of associating user's
network IDs to their host IDs. By storing all the relevant access
information, you can configure access to an existing database or point
to a newly created database. The level of security for the database
varies according to database vendor.
CMPI_DCAS_DB_ADDRESS
This is a URL string that provides the address of the database.
CMPI_DCAS_DB_NET_DRIVER
This string contains the name of the class that acts as the
network database driver. An example of this string is COM.ibm.db2.jdbc.net.DB2Driver.
The location of this class is assumed to be in the existing class
path.
CMPI_DCAS_DB_USERID
This is the ID of the user account to use when accessing the
database.
CMPI_DCAS_DB_CASE_SENSITIVE
This parameter specifies whether the DCAS plug-in converts
the application ID and network ID of the user to lowercase characters
and then uses the lcase() method to make SQL queries to the HCM database.
This parameter should be set to true when using SQL applications that
do not support the lcase() method.
CMPI_DCAS_DB_PASSWORD
This is the password of the user account to use when accessing
the database.
CMPI_DCAS_DB_TABLE
This entry identifies the table to use for the needed query.
The following four parameter values should match the column names
in your credential mapper database and should clearly indicate the
contents of the columns. With some databases, such as IBM DB2, the
four column headings in the database must be in all upper case, for
example, NETWORKID, HOSTADDRESS, APPLICATIONID, and HOSTID.
CMPI_DCAS_DB_NETID_COL_NAME
This entry identifies the name of the column that contains the
network ID value (NETWORKID).
CMPI_DCAS_DB_HOSTADDR_COL_NAME
This entry identifies the name of the column that contains the
host address value (HOSTADDRESS).
CMPI_DCAS_DB_HOSTAPP_COL_NAME
This entry identifies the name of the column that contains the
host application value (APPLICATIONID).
Note:
Application
ID is only used for 3270 host types.
CMPI_DCAS_DB_HOSTID_COL_NAME
This entry identifies the name of the column that contains the
user's host identification value (HOSTID).
Based on the information provided by the parameters above, you
can make an SQL query of the database to get the host ID. This query
uses the network ID, the host address, and the host application as
keys for the query. The result is identified in the Host Identification
column. Assuming that the query is successful, a call is made to the
DCAS server to request the passticket.
Optional DCAS parameters: The following DCAS
parameters are optional:
CMPI_DCAS_DB_PRESERVE_WHITESPACE
This parameter indicates whether to trim white space from the
credential request parameters or not. If true, the white space is
not trimmed. The default is false.
CMPI_DCAS_HOST_ADDRESS
The default DCAS host address is determined based on the destination
host specified for the HATS connection.
CMPI_DCAS_HOST_PORT
The DCAS host address is determined based on the destination
host specified in the request. The default port address of 8990 is
used, but you may override it using this parameter.
CMPI_DCAS_NO_FIPS
If set to true, this parameter indicates that the FIPS security
provider should not be used. The default security provider will be
used instead. The default is false.
CMPI_DCAS_REQUEST_TIMEOUT
This parameter specifies the passticket request timeout in milliseconds.
It should be less than the macro timeout value. The default is 50000.
CMPI_DCAS_TRACE_LEVEL
This parameter specifies the trace level for the DCAS plug-in.
The trace messages are logged to the HATS trace file. Trace level
values include the following settings:
0 = None: No tracing. This is the default.
1 = Minimum: Trace APIs and parameters,
return values, and errors.
2 = Normal: Trace Minimum plus internal
APIs and parameters and informational messages.
3 = Maximum: Trace Normal plus Java exceptions.
CMPI_DCAS_USE_NETID_AS_HOSTID
If set to true, the database lookup for the host ID is skipped.
Use this if the network ID is also the RACF ID.
The default is false.
CMPI_DCAS_VERIFY_SERVER_NAME
This parameter indicates if the server host name in the certificate
must be verified in addition to the certificate validation. The default
is false.
DCAS parameters for Certificate-based DCAS/RACF Credential
Mapper plug-in
Required DCAS parameters: Some
combination of the following parameters is required to allow the credential
mapper plug-in to connect to the DCAS server securely:
CMPI_DCAS_TRUSTSTORE
This parameter contains the name of the keystore file to be used
to look up the HATS DCAS client certificate and the DCAS server certificate.
If CMPI_DCAS_USE_DEFAULT_TRUSTSTORE is set to true,
the JSSE default keystore file is used instead of the keystore file
specified by this parameter.
CMPI_DCAS_TRUSTSTORE_PASSWORD
This
parameter contains the password of the keystore file specified
by CMPI_DCAS_TRUSTSTORE.
CMPI_DCAS_TRUSTSTORE_TYPE
This
parameter contains the type of the keystore file specified by
CMPI_DCAS_TRUSTSTORE. Valid values are pkcs12, jceks, and jks.
CMPI_DCAS_USE_DEFAULT_TRUSTSTORE
This parameter indicates whether the JSSE default keystore file
should be used to look up the HATS DCAS client certificate and the
DCAS server certificate. The default is false.
If specified as true, this keystore file
is used instead of the keystore file specified by the CMPI_DCAS_TRUSTSTORE
parameter.
Note:
The search order to locate the JSSE default keystore file
is:
the location specified by the javax.net.ssl.trustStore system
property, then
<java-home>/lib/security/jssecacerts, then
<java-home>/lib/security/cacerts
Optional DCAS parameters: The following DCAS
parameters are optional:
CMPI_DCAS_HOST_ADDRESS
The default DCAS host address is the destination host specified
for the HATS connection.
CMPI_DCAS_HOST_PORT
The default port address of 8990 is used, but you may override
it using this parameter.
CMPI_DCAS_NO_FIPS
If set to true, this parameter indicates that the FIPS security
provider should not be used. The default security provider will be
used instead. The default is false.
CMPI_DCAS_REQUEST_TIMEOUT
This parameter specifies the passticket request timeout in milliseconds.
It should be less than the macro timeout value. The default is 50000.
CMPI_DCAS_TRACE_LEVEL
This parameter specifies the trace level for the DCAS plug-in.
The trace messages are logged to the HATS trace file. Trace level
values include the following settings:
0 = None: No tracing. This is the default.
1 = Minimum: Trace APIs and parameters,
return values, and errors.
2 = Normal: Trace Minimum plus internal
APIs and parameters and informational messages.
3 = Maximum: Trace Normal plus Java exceptions.
CMPI_DCAS_VERIFY_SERVER_NAME
This parameter indicates if the server host name in the certificate
must be verified in addition to the certificate validation. The default
is false.
Vault parameters for JDBC Vault Credential Mapper plug-in
Add Vault parameters for CMPIVaultPlugin. For environments that
use JDBC-based Vault host security, add the Vault plug-in parameters.
This model is identical to the database mechanism used to associate
network IDs and host IDs in the DCAS passticket environment. The only
difference is that Vault-style authentication requires the CMPI_VAULT_DB_HOSTPW
parameter
Required Vault parameters: The following
Vault parameters are required:
CMPI_VAULT_DB_ADDRESS
This is a URL string that provides the address of the database.
An example of this string is jdbc:db2://dtagw:6789/CMTEST.
CMPI_VAULT_DB_NET_DRIVER
This string contains the name of the class that acts as the
network database driver. An example of this string is COM.ibm.db2.jdbc.net.DB2Driver.
The location of this class is assumed to be in the existing class
path.
CMPI_VAULT_DB_USERID
This is the ID of the user account to use when accessing the
database.
CMPI_VAULT_DB_CASE_SENSITIVE
This parameter specifies whether the Vault plug-in converts
the application ID and network ID of the user to lowercase characters
and then uses the lcase() method to make SQL queries to the HCM database.
This parameter should be set to true when using SQL applications that
do not support the lcase() method.
CMPI_VAULT_DB_PASSWORD
This is the password of the user account to use when accessing
the database.
CMPI_VAULT_DB_TABLE
This entry identifies the table to use for the needed query.
The following five parameter values exactly match the column names
in your credential mapper database.
CMPI_VAULT_DB_NETID_COL_NAME
This entry identifies the name of the column that contains the
network ID value (NETWORKID).
CMPI_VAULT_DB_HOSTADDR_COL_NAME
This entry identifies the name of the column that contains the
host address value (HOSTADDRESS).
CMPI_VAULT_DB_HOSTAPP_COL_NAME
This entry identifies the name of the column that contains the
host application value (APPLICATIONID).
Note:
Application
ID is only used for 3270 host types.
CMPI_VAULT_DB_HOSTID_COL_NAME
This entry identifies the name of the column that contains the
user's host identification value (HOSTID).
CMPI_VAULT_DB_HOSTPW_COL_NAME
This entry identifies the name of the column that contains the
user's host password (PASSWORD).
Based on the information provided by the parameters above, you
can make an SQL query of the database to get the host ID. This query
uses the network ID, the host address, and the host application as
keys for the query. The result is identified in the Host Identification
column. Assuming that the query is successful, the user ID and password
are returned.
Optional Vault parameters: The following
Vault parameters are optional:
CMPI_VAULT_TRACE_LEVEL
This parameter specifies the trace level for the Vault plug-in.
The trace messages are logged to the HATS trace file. Trace level
values include the following settings:
0 = None: No tracing. This is the default.
1 = Minimum: Trace APIs and parameters,
return values, and errors.
2 = Normal: Trace Minimum plus internal
APIs and parameters and informational messages.
3 = Maximum: Trace Normal plus Java exceptions.
CMPI_VAULT_DB_PRESERVE_WHITESPACE
This parameter indicates whether to trim white spaces from the
credential request parameters or not. If true, the white spaces are
not trimmed. The default is false.
Vault parameters for the WebSphere Portal Credential Vault Credential mapper
Note:
This initialization parameter
will only appear if you are working with a HATS portlet project.
SLOT_ID
This is the vault slot ID that will retrieve a passive user-password
credential from a vault slot.
SLOT_TYPE
This parameter indicates the type of credential slot you want
to access. Valid values are:
0 = Private Slot
1 = Shared Slot
2 = Administrative Slot: This is the default
value.
In order to communicate with a DCAS server, an SSL
connection must be established using client authentication. This requires
you to specify a keystore file. The supported keystore file
types are PKCS12, JKS, or JCEKS (PKCS12 is not supported on Solaris).
To create a keystore file to specify in the CMPI_DCAS_TRUSTSTORE
parameter, use the Certificate Management tool (also
known as the IBM Key Management
tool). This keystore file must contain the HATS DCAS client's
certificate and the DCAS server's certificate (public key) information.
Notes:
If you set the CMPI_DCAS_USE_DEFAULT_TRUSTSTORE parameter to true, the JSSE default keystore file
is used instead of the keystore file specified by the CMPI_DCAS_TRUSTSTORE
parameter, and must contain the HATS DCAS client's certificate and
the DCAS server's certificate (public key) information.
The HATS DCAS client's certificate must also be added/imported
to the DCAS server's keystore file for SSL client authentication.
If you already have an older certificate that was
created using the IBM Key
Management tool, you can import it. Personal server certificates
that were created with an old system cannot be exported from
the old and imported into the new. There is however a way in which you can do this:
Import the existing .kdb file into a new keystore file (PKCS12,
JKS, or JCEKS).
Export the certificate (such as, the DCAS personal server certificate)
to a .p12 format certificate.
Import the certificate (.p12 format) into a new keystore file
(PKCS12, JKS, or JCEKS).
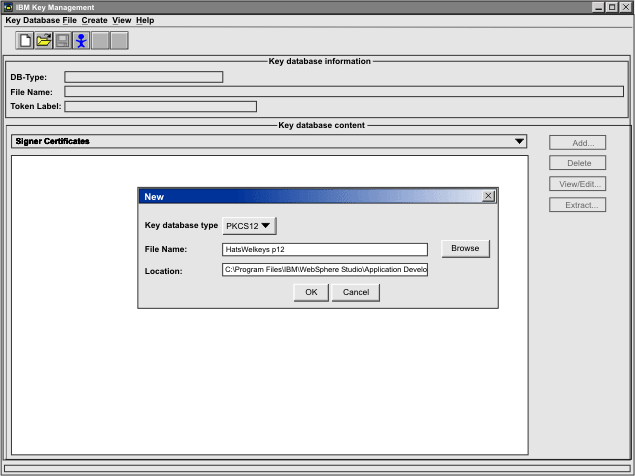
Figure 78. HATS Certificate Management
To create a new keystore file named HatsWelkeys.p12 that
will be specified in the CMPI_DCAS_TRUSTSTORE parameter,
take the following steps:
Note:
These instructions
show how to create a PKCS12 keystore file. If the target platform
for your HATS application is Solaris, instead of using Key database
type of PKCS12 below, use either JCEKS or JKS instead.
Click Start > All Programs > IBM Rational SDP package group > IBM Rational HATS 9.5 > Certificate Management (where IBM Rational SDP package group is the name
of the Rational SDP package group you have installed).
Click Key
Database File and select New.
For the Key database type, select PKCS12.
Enter File Name and Location or accept default values.
Click OK.
Enter a password, confirm it, and click OK.
Add the DCAS server's certificate to the keystore file. Be
sure that the Key database content is
displaying the Signer Certificates.
If it is not, select the pull-down menu and change it. Then select Add.
Select Binary DER data for the Data type. If the server certificate is
in ASCII format, select Base64-encoded ASCII
data.
Enter the file name in the Certificate file name field.
Enter the path name in the Location field.
Click OK.
Enter a label for the certificate and click OK.
Add the DCAS client's certificate to the keystore file.
Change the Key database content to Personal Certificates and click Export/Import.
On the Export/Import Key panel, select Import Key.
Select PKCS12 for the key file
type.
Enter the client certificate's .p12 file name in the File Name field and the path name in the Location field.
Note:
You
may have to browse to the keystore file (.p12/pkcs12) containing
the certificate to import and enter the user id and
password to open the file. It is best to make sure the keystore file
contains only certificates that you want to import. You can also import
certificates from a .kdb file. In this case, it will allow individual
certificates to be selected.
Click OK and enter
the password to open the source key database.
You can use Kerberos services tickets to automate sign-on
for rich client applications that use 5250 Telnet sessions and run
on Windows domain clients.
To do so, edit the connection file (the .hco file) for the 5250 Telnet
connection in your rich client application. Click the Security tab, and select the option to Use Kerberos services ticket to automate sign-on
(Windows domain clients
only).
Java 2 security provides
a policy-based access control mechanism that checks for permission
before allowing an application access to certain protected system
resources, such as file I/O, sockets, and environment properties.
Java 2 security is supported
by the application server. It is disabled by default but is enabled
automatically when you configure WebSphere security
to enable global security. Although Java 2
security is enabled when you enable WebSphere global security, you can disable it. You
can configure Java 2 security
and global security independently of each other. Disabling global
security does not disable Java 2
security automatically. You need to explicitly disable it.
HATS supports Java 2
security when running on WebSphere Application Server on any supported server software platform.
For more on HATS supported server software, see "System Requirements
for Host Access Transformation Services" at http://www.ibm.com/support/docview.wss?uid=swg27011794.
HATS does not support Java 2
security in the following environments:
The Run on Server (ROS) function in HATS Toolkit.
WebSphere Portal on
any platform except Windows.
Policy file
The HATS Toolkit includes a Java 2
security policy file that gives deployed HATS applications the required
permissions to operate when Java 2
security is enabled. Although basic HATS operations have been tested
with Java 2 security enabled,
you might need to modify the policy file for some HATS applications
to operate with Java 2 security
enabled. For example, the business logic in your application accesses
system resources, or a keyring file or another file exists in a path
not already covered by the policy file.
You can find the policy file for a HATS application
in the Navigator view of the HATS perspective.
Expand the EAR project for the HATS application, and open the META-INF
folder to find the was.policy file. HATS copies the default policy
file into every new project you create. If you want to modify the
default policy file, it is located under the installed HATS plug-in
in the following directory:
where shared_install_directory is
the shared resources directory where you installed
the HATS offering using IBM Installation
Manager, and nnn is the version and build
level of HATS.
Using IBM Certificate
Management for HATS applications
Certificate Management, provided by the IBM Key Management tool, allows you to create and
manage certificates required for Secure Sockets Layer (SSL) connections.
For HATS, SSL is used between the following:
A HATS application and the Telnet server for secure connections.
The Digital Certificate Access Server (DCAS) and the client for
Web Express Logon
(WEL) in a HATS application to retrieve host credentials.
Creating a key database file
Before you begin configuring SSL for HATS applications, you must
create a key database file, also referred to as a keystore file or
truststore file.
To create a new key database file:
Click Start > All Programs
> IBM Rational SDP package
group > IBM Rational HATS
9.5> Certificate Management (where IBM Rational SDP package
group is the name of the Rational SDP package group you have installed).
This launches the IBM Key
Management tool.
Click Key Database File > New.
Select PKCS12, JKS, or JCEKS key
database file for the key database type.
Note:
PKCS12 is
required for secure connections between HATS applications and the
Telnet server.
Enter a file name. HATS does not require a particular file name.
Enter a directory name for the Location. HATS does not require
a particular directory for creation of the key database file, but
the key database file will need to be copied into an Enterprise Archive
file (.ear file) in order to deploy an application that uses it.
Click OK.
Enter a password, confirm it, and click OK.
To open an existing key database file:
Click Key Database File > Open.
Select the key database type.
Click Browse to browse for the
key database file.
Select the key database file and click Open.
Click OK.
Enter the current password and click OK.
After you have created or opened the key database file, you can:
Request a certificate from a predefined well-known certificate
authority (CA). This procedure requires less configuration because
the key database files are pre-configured with the CA signer
certificates required to identify the CAs from whom the server certificate
is issued. See Requesting and storing certificates from Certificate Authorities.
Request a certificate from an unknown certificate authority. This
procedure requires more configuration because you must also obtain
and store the CA's signer certificate in the key database file. In
addition, you must make the signer certificate available to the SSL
partners from which you want to obtain host credentials. See Requesting and storing certificates from Certificate Authorities.
Create a self-signed certificate. This procedure does not require
a certificate authority and can be used immediately after installing
the server. However, the self-signed certificate must be made available
to the SSL partners. This procedure can also be used for testing until
a certificate is obtained from a certificate authority. See Using a self-signed certificate.
Exchange certificates with SSL partners. In some configurations,
certificates in the server's key database file must be made available
to any SSL partners, such as the Telnet or DCAS server, to enable
SSL communications. See Exchanging certificates.
Note:
Whenever you change the key database file used
by a running HATS application, you must stop and restart the HATS
application.
Requesting and storing certificates from Certificate Authorities
When you create a key database file, it is pre-configured
with the CA signer (trusted root) certificates of well-known CAs required
to identify the CA from whom the server certificate is issued. CAs
whose signer certificates are not predefined in a key database file
are referred to as unknown CAs. The following well-known CA
signer certificates are automatically stored in a newly created key
database file and marked as trusted root certificates.
Thawte Personal Premium CA
Thawte Personal Freemail CA
Thawte Personal Basic CA
Thawte Premium Server CA
Thawte Server CA
RSA secure server CA (also obtained from VeriSign)
VeriSign class 4 public primary CA
VeriSign class 3 public primary CA
VeriSign class 2 public primary CA
The following sections provide an overview of the steps used to
request and store certificates from well-known and unknown
CAs:
Creating the certificate request
Sending the certificate request
Storing the certificate
Creating the certificate request
To create the public/private keys and certificate request:
On the IBM Key Management
window, under Key database content,
select Personal Certificate Requests from
the drop-down list.
Click New.
Enter the key label to identify the key and certificate within
the database.
Select the number corresponding to the key size you want to use.
Choosing a larger key size results in stronger security, but requires
more processing on the client and the server to establish a connection.
Enter the common name (TCP/IP host name) of the server that owns
the certificate, for example, myserver.mycompany.com.
Enter an organization name.
Optionally enter an organization unit, and other location information.
Choose a country code.
Enter a certificate request file name, or use the default file
name.
When you click OK, your information
is processed and several files are produced or updated in the directory
where you created the certificate request. If you backup your key
database, backup these files also. Do not attempt to edit these files,
as the key database file or the certificate request can be corrupted.
Sending the certificate request
Follow the CA's procedures to submit the certificate request.
The following list provides the URLs of two well-known CAs:
Depending on the CA you choose, you can either e-mail the certificate
request generated by Certificate Management or incorporate the certificate
request into the form or file provided by the CA.
While you are waiting for the CA to process your certificate request,
you can enable SSL security for testing by creating and storing a
self-signed certificate using the procedure described in Using a self-signed certificate.
Storing the certificate
If you receive the applied-for certificate from an unknown
CA, contact the CA to obtain the CA's signer (root) certificate. You
must store the unknown CA’s signer certificate in the key database
file before you store the applied-for certificate. The CA signer certificate
is used to validate the applied-for certificate.
To store the unknown CA's signer certificate, make a backup copy
of the unknown CA's signer certificate, then perform the following
steps:
On the IBM Key Management
window, under Key database content,
select Signer Certificates from the
drop-down list.
Click Add.
Select data type of BASE64 encoded ASCII
data (armored 64 format).
Enter the certificate file name.
Enter the location, or path, of the certificate.
Click OK. The file is marked as
"trusted" and is stored.
To store the applied-for certificate received from either
a well-known or unknown CA, make a backup copy of the certificate,
then perform the following steps:
Choose Personal Certificates from
the drop-down list then click Receive to
receive the certificate request. The Receive Certificate from a File
window appears.
The data type must be BASE64-encoded
ASCII data (armored 64 format).
Enter the certificate file name.
Enter the location (path name) of the certificate.
Click OK. The certificate you just
stored is displayed as the first item.
If you want to view the key information, highlight the certificate
and click View/Edit.
The certificate name should appear under the Personal Certificate
drop-down list and the certificate request should disappear from under
the Personal Certificate Requests drop-down list.
Copy the key database file to the Enterprise Archive (.ear file)
for deployment. If the Enterprise Archive is running, stop and restart
it.
Using a self-signed certificate
Use the following procedures to create and use a self-signed certificate:
On the IBM Key Management
window, under Key database content,
select Personal Certificates from the
drop-down list.
Click New Self-signed.
Enter the key label to identify the key and certificate within
the database.
Select X509 V3 as the certificate
version.
Select the number corresponding to the key size you want to use.
Choosing a larger key size results in stronger security, but requires
more processing on the client and the server to establish a connection.
Enter the common name (TCP/IP host name) of the server that owns
the certificate, for example, myserver.mycompany.com.
Enter an organization name.
Optionally enter an organization unit, and other location information.
Select a country code.
Enter the number of days the self-signed certificate is to be
valid.
Click OK.
Copy the key database file to the Enterprise Archive (.ear file)
for deployment. If the Enterprise Archive is running, stop and restart
it.
Exchanging certificates
In some configurations, certificates must also be made available
to SSL partners, for example the DCAS server. If your server uses
a certificate from an unknown CA, the unknown CA's signer (root) certificate
must be made available to SSL partners. If your server uses a self-signed
certificate, a copy of the self-signed certificate must be made available
to SSL partners.
If your server uses a certificate issued by an unknown CA:
Under Key database content, select Signer Certificates from the drop-down
list.
Highlight the signer (root) certificate of the CA that issued
the certificate for your server.
Click Extract.
If your server uses a self-signed certificate:
Under Key database content, select Personal Certificates from the drop-down
list.
Highlight the certificate used by your server.
Click Extract Certificate.
On the Extract Certificate to a File window, choose either Base64-encoded ASCII data or Binary DER data. Base64-encoded
ASCII data is usually used if the certificate will be securely
transferred through e-mail. The certificate file name and location
can be any you choose.
Click OK to extract the certificate
file.
Securely transfer the certificate file to the SSL partner, for
example the DCAS server, and add the certificate to the its key database
file.
Certificate Management tool considerations
DOS window
When the Certificate Management tool is invoked,
a DOS window appears and is displayed the entire time the tool is running. The window is finally closed once
you exit from the tool. The reason why the DOS
window is displayed is because the default run property for the Certification
Management tool is Normal Window.
To minimize the DOS window when the tool is
invoked, take the following steps:
Go to Start > All Programs > IBM Rational SDP package
group > IBM Rational HATS 9.5 (where IBM Rational SDP package
group is the name of the Rational SDP package group you have installed.
Right click Certificate Management and
select Properties.
Configure the Run property to be Minimized.
Click OK.
Run as administrator
On Windows Vista,
the Certificate Management tool does not start
if you attempt to use the Run as administrator option
to start the program. This occurs in two ways:
You right-click on the Certificate Management icon, and select Run as administrator.
You specify Run as administrator on
the advanced settings for the Certificate Management icon properties,
and double-click the icon to run the program.
You can run Certificate Management without using the Run as administrator option.
Using IBM CMS keystore
files
To use an IBM CMS keystore
file, you must register the appropriate provider class by adding it
to the provider list. To do this, perform the following steps: