Before you use the Enterprise PL/I ANAGRA2 sample, allocate
data sets for the source file and generated files, copy the sample
file into a partitioned data set, create a property group that specifies
compiler and link options for the data sets, and create a z/OS® project for the sample.
The Enterprise PL/I ANAGRA2 sample is in the
rdz\\AZUTC005\src folder of the Developer for z/OS installation
path, for example, C:\Program Files\IBM\SDP\rdz\\AZUTC005\src. The
sample includes the following files:
File name
Description
ANAGRA2.pli
A sample PL/I program that compares two strings and determines whether they are
anagrams.
ANAGRA2.inc
A PL/I include file that contains the input and output interface for program
ANAGRA2.
AZUTC005.pli
An Enterprise PL/I ZUnit test case that was generated from the
ANAGRA2.pli sample program. This test case program is statically linked with
ANAGRA2.pli, which is the program to be tested.
AZUTC005.pli contains three separate tests to validate whether
ANAGRA2.pli detects valid anagrams. In AZUTC005.pli, test
ENTRY3 exposes a bug or limitation in ANAGRA2.pli. When you work through the
sample scenario, you generate your own copy of this program. This sample is provided to help you
compare your results to the expected results.
AZUTC005.azucfg
A ZUnit test runner configuration file that defines the test cases to be run and the test
runner options. When you work through the sample scenario, you generate your own copy of this file.
This sample is provided to help you compare your results to the expected results.
AZUTC005.azures
A ZUnit test runner results file that contains sample test results. When you work through
the sample scenario, you generate your own copy of this file. This sample is provided to help you
compare your results to the expected results.
When you work through the sample scenario, you generate additional files that are used
to demonstrate ZUnit functions.
Procedure
To set up the sample:
Copy the ANAGRA2.pli sample file into the
<HLQ>.ZUNIT.PLI data set.
Copy the ANAGRA2.inc sample file into the
<HLQ>.ZUNIT.PLI.INCLUDE data set.
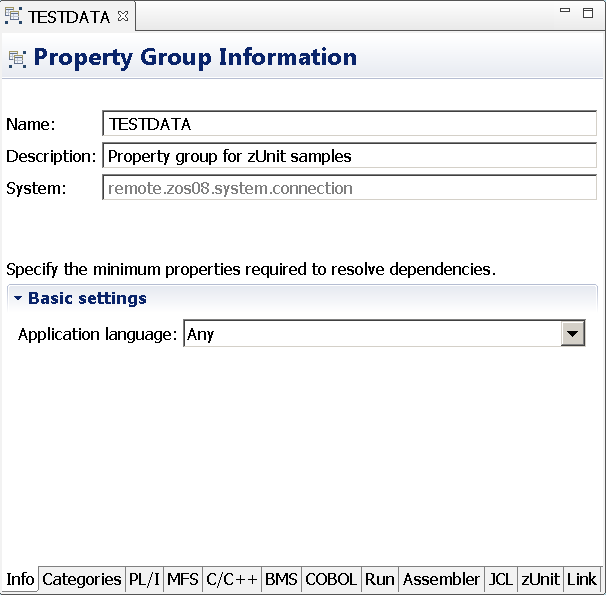
In the Property Group Manager, select the remote system
that contains the ZUnit data sets and create a property group that specifies the following
categories and properties.
Category > Page
Property
Value
Info
Name
TESTDATA
Description
Property group for ZUnit sample programs
JCL
JCL job card
Specify any JCL statements required for the z/OS
system. You might need to add a JCLLIB statement to call ELAXF* remote build procedures. For more
information, see ELAXF* remote build procedures.
Link > Procedures and Steps
Link options
DYNAM(DLL) NOREUS
Link libraries
CEE.SCEELKED <HLQ>.ZUNIT.PLI.LOAD
Use specified link instructions
Select this check box and specify:
INCLUDE AZUTSTRX
Load module location
<HLQ>.ZUNIT.PLI.LOAD
Additional JCL
//******* ADDITIONAL JCL FOR LINK HERE ******
//LINK.SYSDEFSD DD DUMMY
//LINK.AZUTSTRX DD DISP=SHR,
// DSN=&FELPRFX..SFELSAMP(AZUTSTRX)
Link > JCL substitution
User variables: Variable name
FELPRFX
User variables: Variable value:
Specify the data set prefix for the *.*.SFELSAMP partitioned data set.
Contact your systems administrator for the data set name.
Select this check box and specify this data set qualifier for compiler errors:
<HLQ>.ERRPLI
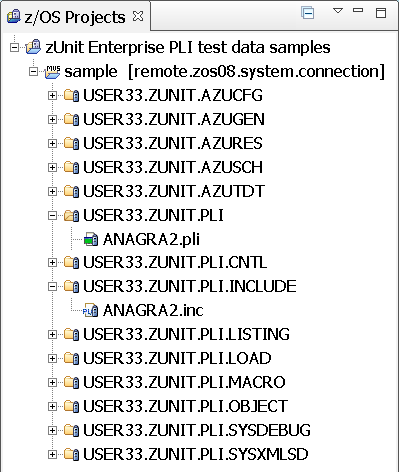
In the z/OS Projects view:
Create a z/OS project named ZUnit
Enterprise PLI test data samples.
Create an MVS™ subproject named
sample.
Associate the TESTDATA property group with the sample subproject.
Add the data sets that you allocated to the subproject.
Tip: By using the New z/OS Project wizard, you can complete all of
these actions at the same time. The wizard guides you through the process of creating the project,
creating the subproject, associating the property group with the subproject, and adding remote
resources to the subproject. To start the wizard, select New > z/OS Project from the pop-up menu of the z/OS Projects view.
In Preferences > z/OS Automated Unit Testing Framework (ZUnit), select Test runner (AZUTSTRN). Click
Apply and then close the setting.
Results
The following resources are added to your workspace:Figure 1. Property
group. Property group editor with a property group created for the Enterprise PL/I test
data samples.
Figure 2. z/OS Projects view. z/OS
Projects view with Enterprise PL/I ZUnit test data sample data sets loaded.