The job of an error-parser is to recognize warnings, errors and other important messages in the compiler or build tool output and create "problem marker" objects for them. Eclipse will display problem markers as an error or warning icon in the Project Explorer and Problems views as well as the editor.
IBM Rational Developer for Power Systems Software may not be able to recognize build errors if you are using a build tool or compiler that it does not currently support. If this is the case you may want to consider writing your own error-parser plug-in which will allow better integration with your build tool.
The first step is to set up an environment for writing plug-ins. This is explained in the section on Extending With Plug-ins. Once your environment is set up please continue with the following tutorial which explains how to create an error-parser.
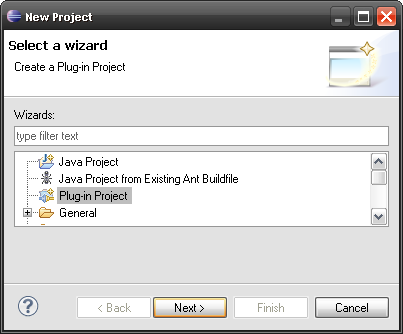
Select File > New > Project, this will open the New Project wizard selection dialog. In this dialog select Plug-in Project and click Next.
Give your project a name, plug-in names usually follow a similar naming convention to java packages.
Under the Target Platform section make sure that Eclipse version 3.4 is selected. This is the eclipse version that IBM Rational Developer for Power Systems Software is currently based on and higher version will not work.
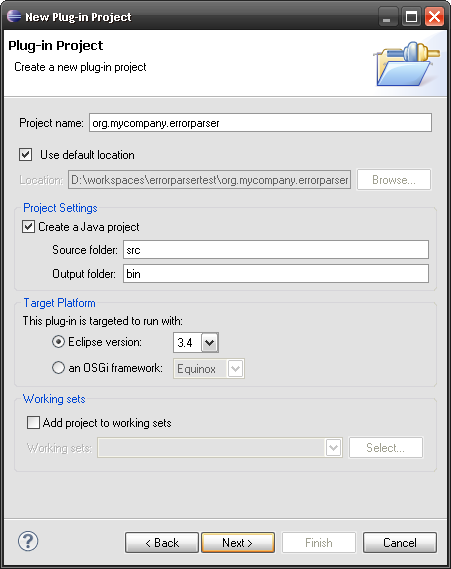
Click Next to proceed to the second page of the wizard.
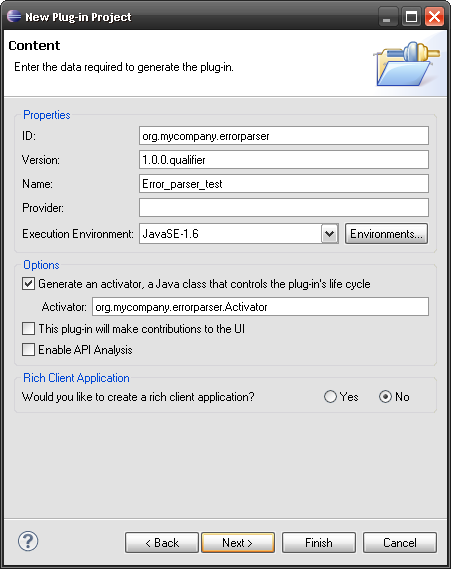
On the second page of the wizard uncheck the checkbox that says "this plug-in will make contributions to the UI". For this tutorial will will not be developing any user interface components.
Consider leaving the checkbox that says "generate an activator" checked. This will generate an activator class which is used to respond to plug-in life-cycle events. For this tutorial we will not actually need to respond to these events, however most non-trivial plug-ins usually do need to respond to these events so it is better to generate the class now even if it isn't needed at this point.
Click Finish.
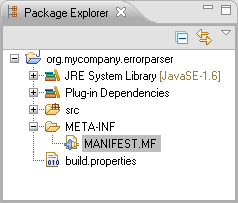
In the Package Explorer go to the newly created project, open the META-INF folder and double-click on the MANIFEST.MF file.
This will open the Plug-in Manifest Editor which is used to configure the plug-in's metadata. At the bottom of the editor click on the Dependencies tab.
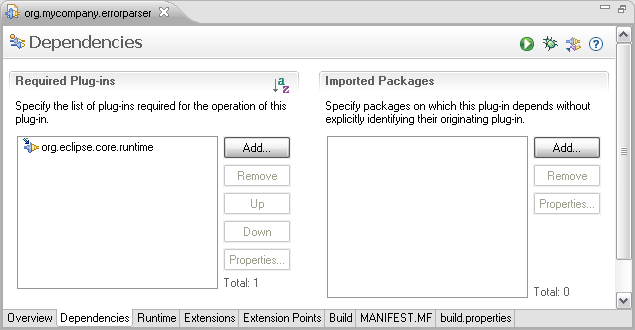
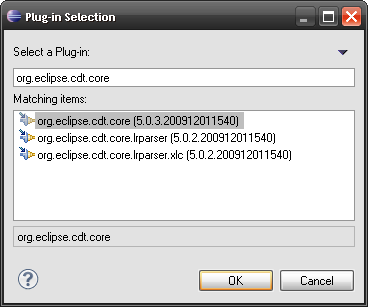
You will need to add two plug-in dependencies in order to have access to the APIs necessary to write an error-parser. Start by clicking the Add button under Required Plug-ins, this will open the Plug-in Selection dialog. Type org.eclipse.cdt.core into the filter box, select that plug-in and click OK. Now repeat the process one more time and add the org.eclipse.core.resources plug-in.
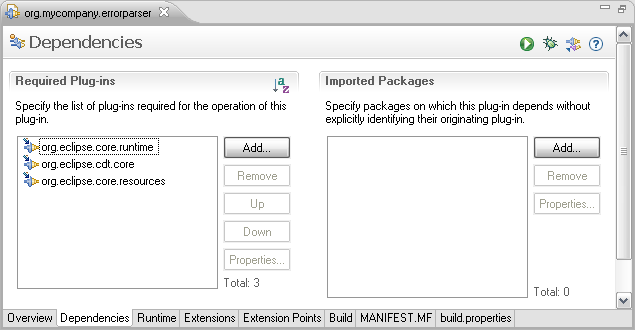
The required plug-ins should now like like the following. Save your changes.
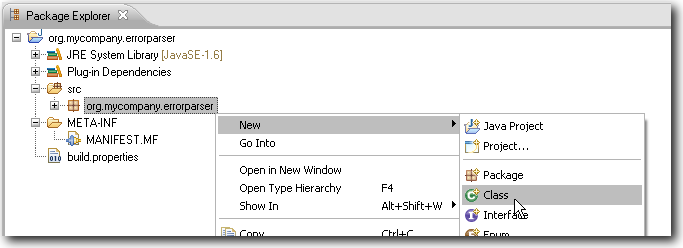
Now it is time to create a Java class that will contain the code for the error-parser. Expand the src folder in the Package Explorer. There will be a Java package that has been automatically created for you. Right click on the package and select New > Class.
This will open the New Java Class Wizard. Give the class a name, for example "MyErrorParser".
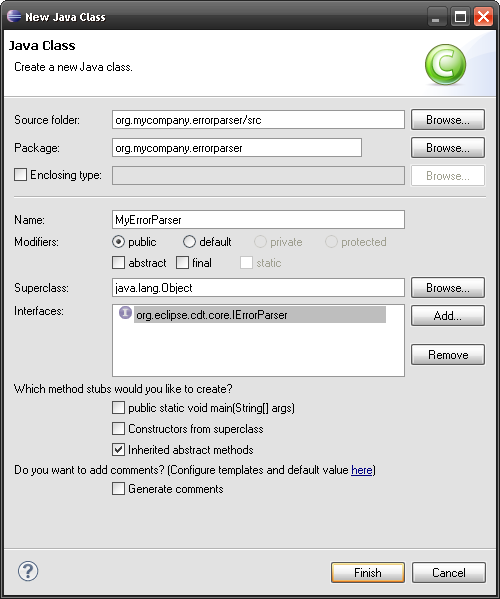
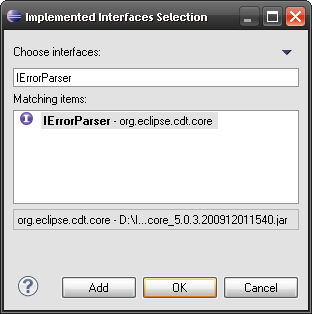
Click the Add button next to the interfaces section, this will open the Implemented Interfaces Selection Dialog. Type "IErrorParser" into the filter box and choose the IErrorParser interface.
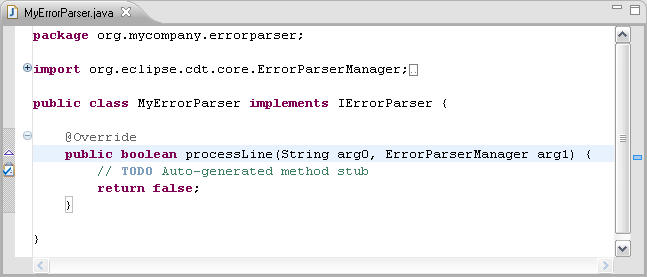
Click Finish, this will create a new class for your error-parser with a stub implementation of the processLine() method.
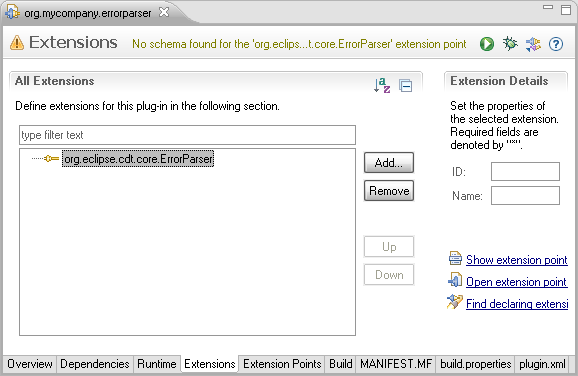
Before writing any code lets make sure our new error-parser is recognized by IBM Rational Developer for Power Systems Software. Open up the Plug-in manifest editor again and click the Extensions tab at the bottom.

Click the Add button to open the New Extension dialog. Pick the org.eclipse.cdt.core.ErrorParser extension point and click Finish.

The org.eclipse.cdt.core.ErrorParser extension should now appear under the All Extensions section.
Click on the plugin.xml tab at the bottom to open the plugin.xml file in the editor. Edit the file so that the body of the file looks similar to the following.
<plugin>
   <extension
         id="org.mycompany.errorparser.MyErrorParser"
         name="Test Error Parser"
         point="org.eclipse.cdt.core.ErrorParser">
      <errorparser
          class="org.mycompany.errorparser.MyErrorParser">
      </errorparser>
   </extension>
</plugin>
The class attribute of the <errorparser> element must contain the fully qualified name of a class that implements the IErrorParser interface.
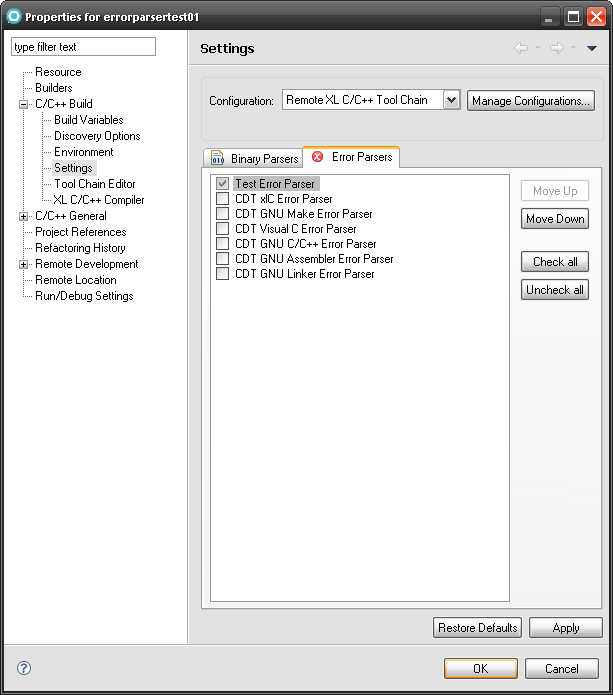
Its a good idea at this point to test that IBM Rational Developer for Power Systems Software is recognizing the new error-parser. Launch IBM Rational Developer for Power Systems Software using the run configuration that was created in the section on Extending With Plug-ins. In IBM Rational Developer for Power Systems Software switch to the Remote C/C++ perspective. If you do not already have a project in the workspace then create one.
Right click on a project and open the project properties. Navigate to C/C++ Build > Settings. Under the Error Parsers tab you should see your new error-parser listed. Click the checkbox next to it to enable it and move it to the top so that it takes precedence over the other error-parsers. It may also be a good idea to disable all the other error-parsers while you are developing. Click OK.
Now its time to actually start writing the code for the error-parser.
Whenever a build happens the output of the build command is fed into the error-parser one line at a time in sequence. The processLine() method will be called once for each line of output and it will be passed two arguments, a String that contains the line of output and a reference to the ErrorParserManager. The manager object has some convenience methods that help with creating problem marker objects.
The normal pattern is to attempt to recognize each line as a compiler warning or error message. A good way of doing this is to match the line against a regular expression, and to use capturing regions to extract the parts of the line that are of interest such as the file name, line number and error message.
How you write the error-parser really depends on the build tool and compiler you are using. An example implementation that recognizes error messages from IBM's XLC compiler is given below.
package org.mycompany.errorparser;

import java.util.regex.Matcher;
import java.util.regex.Pattern;
import org.eclipse.cdt.core.ErrorParserManager;
import org.eclipse.cdt.core.IErrorParser;
import org.eclipse.cdt.core.IMarkerGenerator;
import org.eclipse.core.resources.IResource;


public class MyErrorParser implements IErrorParser {

    static String regexp = "\"((?:\\w|\\.)+)\", line (\\d+)\\.\\d+: (.*)";
    static Pattern errorPattern = Pattern.compile(regexp);

    public boolean processLine(String line, ErrorParserManager manager) {
        Matcher matcher = errorPattern.matcher(line);
        if(!matcher.matches())
            return false;

        String fileName = matcher.group(1);
        int lineNumber  = Integer.parseInt(matcher.group(2));
        String message  = matcher.group(3);

        IResource resource = manager.findFileName(fileName);
        if(resource == null)
            resource = manager.findFilePath(fileName);
        if(resource == null)
            resource = manager.getProject(); // file not found in workspace, attach problem to project

        // create a problem marker that will show up in the problems view
        int severity = IMarkerGenerator.SEVERITY_ERROR_RESOURCE;
        manager.generateMarker(resource, lineNumber, message, severity, null);
        return true;
    }
}
First the line is matched against the regular expression, if it does not match false is returned. This tells the ErrorParserManager that this error-parser did not recognize the line. When this happens the ErrorParserManager will feed the line to the next error-parser in sequence.
If the line does match then it is the job of the error parser to create a "problem marker" which eclipse will display to the user. In this example capturing groups are used to extract the relevant information from the line. Please see the javadocs for the java.util.regex.Pattern class for a detailed description of regular expressions and capturing groups. Or, if you do not wish to use regular expressions, the String class contains several useful methods for parsing Strings, as well as the java.util.StringTokenizer class.
The next step is to find an IResource that matches the file name in the error message. An IResource object represents a file or a directory in the eclipse workspace. (For more information see the javadocs for the org.eclipse.core.resources.IResource interface). The ErrorParserManager has some useful methods for converting file names into IResource objects. If an IResouce cannot be found that matches the file name then we can just default to using the project itself.
Once this information is computed the generateMarker() method is used to create the problem marker object. The org.eclipse.cdt.core.IMargerGenerator interface contains constants for the different severity levels. In this example the error-parser only generates markers with a severity of error, however a real error-parser will likely also generate warning and info markers as well.
When actually developing your custom error-parser you will likely find that running IBM Rational Developer for Power Systems Software in the eclipse debugger can be very convenient. The eclipse debugger is capable of "hot-swapping" class files. This means that you can make changes to the error-parser code and you do not need to restart the debugger for those change to take effect. When you make a change and then save the file eclipse will automatically recompile the code and load the the new version of the class file into the running instance of IBM Rational Developer for Power Systems Software.
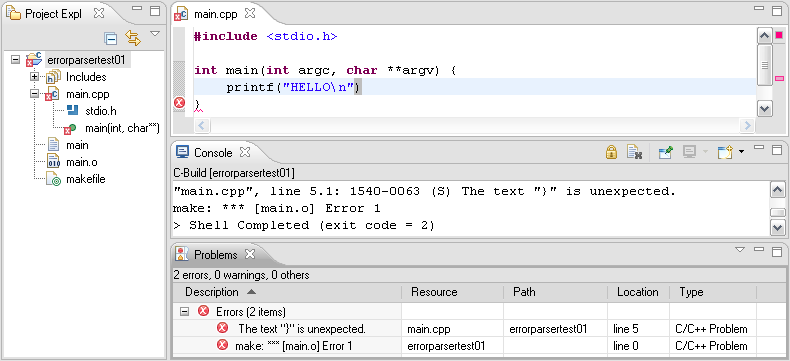
If your error-parser is correctly generating problem markers then you will see them appear in the Project Explorer, the Problems View and in the editor itself.
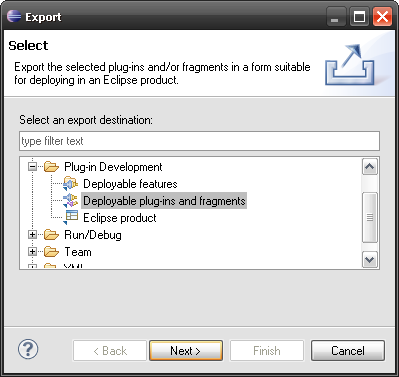
Once you are satisfied that your error-parser is complete it is time to build and distribute the plug-in. This process is actually very simple. Right click on the project and select Export. Then in the Export wizard select Plug-in Development > Deployable plug-ins and fragments and click Next.
On the second page of the wizard simply select the plug-in, select an export destination and click Finish.
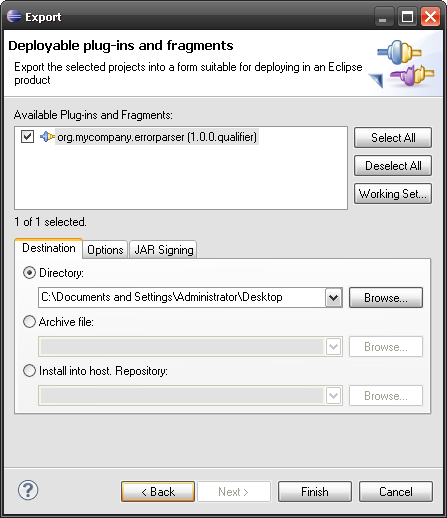
In the location you have selected you will now find a folder named plugins, and in that folder you will find a jar file that contains the plugin. Simply copy this file into the plugins folder under the SDPShared folder of your IBM Rational Developer for Power Systems Software installation and launch it as you normally would. The last step is to enable the error-parser in the project properties.
IBM Rational Developer for Power Systems Software will now recognize the output of your custom build tool.