IBM MQ 9.0 was EOS 30th September 2021.Click EOS notice for more details
Installing and testing the resource adapter in GlassFish Server
To install the IBM® MQ
resource adapter in GlassFish Server on a Windows
operating system, you must first create and start a domain. You can then deploy and configure the
resource adapter, and deploy and run the installation verification test (IVT) application.
About this task
Important: These instructions are for GlassFish Server version 4.
This task assumes that you have a running GlassFish Server application server, and that you are
familiar with standard administration tasks for it. This task also assumes that you have an IBM MQ installation on your local system and that you are
familiar with standard administration tasks.
Note: In order to complete the following task steps, you must have a functioning IBM MQ installation, with the following objects configured:
A queue manager called QM, that is started on port 1414, that uses channel SYSTEM.DEF.SVRCONN,
and that connects using Client transport.
A queue called Q1.
Procedure
Start the GlassFish Server asadmin shell program.
Open the Windows command line and navigate to the
GlassFish/bin directory, where GlassFish is the directory where GlassFish Server version 4 is installed.
Enter the command asadmin in the command line.
The asadmin command opens a shell program in the command line that
enables you to create a new domain.
GlassFish Server version 4 is started on your system.
Create, and then start a domain.
Use the create-domain command, specifying the port and domain name, to
create a new domain. Enter the following command on the command line:
create-domain --adminport portdomain_name
where port is the port number, and domain_name
is the name you want the domain to use.
Note: The create-domain command has many
optional parameters associated with it. However, for this task you need the
--adminport parameter only. For more information, see the product documentation for
GlassFish Server version 4.
If the port that you specified is in use, the following message
appears:
Port for domain_nameport is in use
If the domain name you specified is in use, you receive a message telling you that your specified
name is already in use, as well as a list of all domain names that are currently unavailable.
When prompted to input a user name and password, enter the credentials to be used to log on to
the application server through a web browser.
If the command completes successfully, a message summarizing the domain creation is
displayed on the command line, including the message Command create-domain executed
successfully.
You have successfully created a domain.
Start your domain by entering the following command into the command line:
start-domain domain_name
where domain_name is the domain name you previously specified.
Use a web browser to access GlassFish application server.
In the address bar of a web browser enter the following command:
localhost:port
where port
is the port that you specified earlier when creating your domain.
The GlassFish Console is displayed.
When the GlassFish Console has loaded, and you are prompted for a user name and password, enter
the credentials that you specified in step 2b.
Upload the resource adapter to GlassFish Server 4.
On the toolbar Common Tasks select the
Applications menu item to display the Applications
page.
Click the Deploy button, to open the Deploy Applications or
Modules page.
Click the Browse button to and then navigate to the location of the
wmq.jmsra.rar file. Select the file and click OK.
Create a connection pool.
On the toolbar, under Resources, select the
Connectors menu item.
Then select Connector Connection Pools menu item, to open the
Connector Connection Pools page.
Click New to open the New Connector Connection Pool (Step 1 of
2) page.
On New Connector Connection Pool (Step 1 of 2) page, input the pool name
as jms/ivt/IVTCF-Connection-Pool into the Pool Name field.
In the Resource Adapter field select
wmq.jmsra.
In the Connection Definition field enter
javax.jms.ConnectionFactory.
Select Next, then select Finish.
Create the connector resources.
On the toolbar, under the Connectors menu, select the
Connector Resource option, to open the Connector
Resources page.
Select New, to open the New Connector Resource
page.
In the JNDI Name field, enter IVTCF.
In the Pool Name field, enter
jms/ivt/IVTCF-Connection-Pool.
Leave all other fields empty.
For each of the following property/value pairs, click Add Property, and
enter the property name and the value as shown in the following example:
name: host; value: localhost
name: port; value 1414
name: channel; value: SYSTEM.DEF.SVRCONN
name: queueManager; value: QM
name: transportType; value: CLIENT
Note: Make sure that you use the correct values for your own configuration settings, which might be
different from the ones shown in this example.
In the toolbar, under Connectors, select the Admin Object
Resources menu item, to open the Admin Object Resources
page.
In the Admin Object Resources page, click New to
open the New Admin Object Resource page.
In the JNDI Name field, enter IVTQueue.
In the Resource Adapter field, enter
wmq.jmsra.
In the Resource Type field, enter
javax.jms.Queue.
Leave the Class Name field as it is.
For each of the following property/value pairs, click Add Property, and
enter the property name and the value as shown in the following example:
name: name; value: IVTQueue
name: baseQueueManagerName; value QM
name: baseQueueName; value: Q1
Note: Make sure that you use the correct values for your own configuration settings, which might be
different from the ones shown in this example.
Click OK.
Select the Enabled checkbox, then click
Enable.
Deploy the EAR file wmq.jmsra.ivt.ear into GlassFish Server.
Click the Applications option in the toolbar to display the
Applications page.
Click Deploy to add the IVT application.
In the Location field navigate to, and select, the
wmq.jmsra.ivt.ear.
In the Virtual Servers field, select server, and
then click OK.
Launch the IVT program.
Click the Applications option in the toolbar to display the
Applications page.
Click on wmq.jmsra.ivt in the Deployed Applications table.
Click the Launch button, in the Modules and Components table.
Select the http: link.
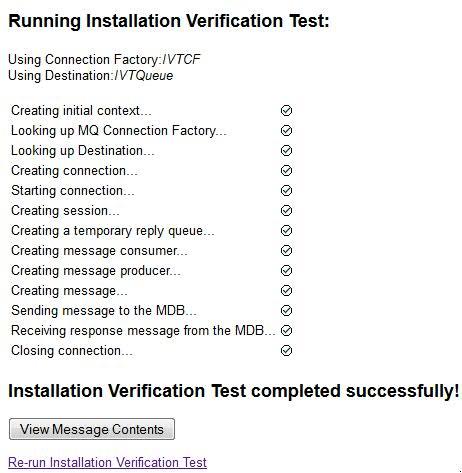
Click Run IVT.
You have launched the IVT program, and if you are successful, the following output is displayed:Figure 1. Successful IVT output
![[Windows]](ngwin.gif)