To enable DEM on HTTP Sever, you must first deploy the DEM plug-in in Unified Agent, and
then install and configure the DEM plug-in for HTTP Server.
Before you begin
Make sure that the UA plug-in for DEM is deployed in Unified Agent.
About this task
To deploy the DEM plug-in for HTTP Server, download
the plug-in package and then do configurations.
Procedure
- Review the part numbers and download appMgtDataCollectors_2019.4.0.2.tar.gz from IBM Passport Advantage. For more information, see Part numbers.
- Extract the package to get the ibmapm_dem_ihs_datacollector.tgz
package file by running the following command:
tar xzf appMgtDataCollectors_2019.4.0.2.tar.gz
cd appMgtDataCollectors_2019.4.0.2
tar xzf app_mgmt_runtime_dc_2019.4.0.2.tar.gz
cd app_mgmt_runtime_dc_2019.4.0.2
- Extract ibmapm_dem_ihs_datacollector.tgz and find the files
mod_wrt_2.2.so, mod_wrt_2.4.so and
ihs_dc_enable.sh.
- Add the following commands to the Docker file.
- For IBM HTTP Server
8.5.5:
COPY mod_wrt_2.2.so /opt/IBM/modules/mod_wrt.so
COPY ihs_dc_enable.sh /opt/IBM/script/ihs_dc_enable.sh
RUN /opt/IBM/script/ihs_dc_enable.sh  -c ${HTTPD_CONF_PATH}/httpd.conf
- For IBM HTTP Server
9.0:
COPY mod_wrt_2.4.so /opt/IBM/modules/mod_wrt.so
COPY ihs_dc_enable.sh /opt/IBM/script/ihs_dc_enable.sh
RUN /opt/IBM/script/ihs_dc_enable.sh  -c ${HTTPD_CONF_PATH}/httpd.conf
- For Apache HTTP Server
2.2:
COPY mod_wrt_2.2.so /opt/IBM/modules/mod_wrt.so
COPY ihs_dc_enable.sh /opt/IBM/script/ihs_dc_enable.sh
RUN /opt/IBM/script/ihs_dc_enable.sh  -c ${HTTPD_CONF_PATH}/httpd.conf
- For Apache HTTP Server
2.4:
COPY mod_wrt_2.4.so /opt/IBM/modules/mod_wrt.so
COPY ihs_dc_enable.sh /opt/IBM/script/ihs_dc_enable.sh
RUN /opt/IBM/script/ihs_dc_enable.sh  -c ${HTTPD_CONF_PATH}/httpd.conf
- For Oracle HTTP Server
11g:
COPY mod_wrt_2.2.so /opt/IBM/modules/mod_wrt.so
COPY ihs_dc_enable.sh /opt/IBM/script/ihs_dc_enable.sh
RUN /opt/IBM/script/ihs_dc_enable.sh  -c ${HTTPD_CONF_PATH}/httpd.conf
- For Oracle HTTP Server
12c:
COPY mod_wrt_2.4.so /opt/IBM/modules/mod_wrt.so
COPY ihs_dc_enable.sh /opt/IBM/script/ihs_dc_enable.sh
RUN /opt/IBM/script/ihs_dc_enable.sh  -c ${HTTPD_CONF_PATH}/httpd.conf
Where
${HTTPD_CONF_PATH} is the
httpd.conf file path.
Note:
DEM module depends on libstdc++.so.6.0.18 or a higher version. Normally
libstdc++.so.6 can be automatically located by
ihs_dc_enable.sh during docker build. If the automatic positioning fails, check
and install libstdc++.so.6.0.18 or a higher version.
If the
ihs_dc_enable.sh script still fails after
libstdc++.so.6 is installed, specify the
libstdc++.so.6
file path in the Dockerfile, and then run the docker build again.
Example:
RUN /opt/IBM/script/ihs_dc_enable.sh -c ${HTTPD_CONF_PATH}/httpd.conf -l /usr/lib/x86_64-linux-gnu/libstdc++.so.6
- Create a ConfigMap file (env-config.yaml) like
the
following:
apiVersion: v1
kind: ConfigMap
metadata:
  name: env-config
data:
  IBM_APM_DEM_AGENT_ENDPOINT: "uadem.${UA_NAMESPACE}.svc.cluster.local:15001"
  IBM_APM_DEM_ENABLED: "true"
Where
${UA_NAMESPACE} is the namespace where the
Unified Agent is installed.
- Create the Kubernetes ConfigMap resource by using the following
command:
kubectl apply -f env-config.yaml
- Add the following lines to the deployment yaml
file.
- volumeMounts:
  - mountPath: /etc/config
    name: config-volume
...
volumes:
- configMap:
    defaultMode: 420
    name: env-config
    name: config-volume
For
example,
apiVersion: extensions/v1beta1
kind: Deployment
metadata:
  annotations:
    deployment.kubernetes.io/revision: "2"
  creationTimestamp: 2018-05-05T13:00:27Z
  generation: 1
  labels:
    app: ihs-app-selector
  name: ihs-app-deployment
  namespace: test


spec:
  replicas: 1
  selector:
    matchLabels:
      app: ihs-app-selector
  strategy:
    rollingUpdate:
      maxSurge: 1
      maxUnavailable: 0
  template:
    metadata:
      creationTimestamp: null
      labels:
        app: ihs-app-selector
    spec:
      securityContext:
        runAsNonRoot: true
        runAsUser: 1000
        fsGroup: 1000
      containers:
      - volumeMounts:
        - mountPath: /etc/config
          name: config-volume
        image: mycluster.icp:8500/test/ihs:svt
        imagePullPolicy: Always
        name: ihs-app
        resources: {}
        terminationMessagePath: /dev/termination-log
        terminationMessagePolicy: File
      volumes:
      - configMap:
          defaultMode: 420
          name: env-config
        name: config-volume
      dnsPolicy: ClusterFirst
      restartPolicy: Always
      securityContext: {}
      terminationGracePeriodSeconds: 30
What to do next
Launch a web request, and then do the following steps to verify
whether DEM is successfully enabled on HTTP server:
- In the Cloud App Management console, click the Resources tab.
- Find Kubernetes Service from the All resource
types list and click to open it.
- Browse the Resource list, click the resource name that you have enabled HTTP Server monitoring,
and open the resource dashboard.
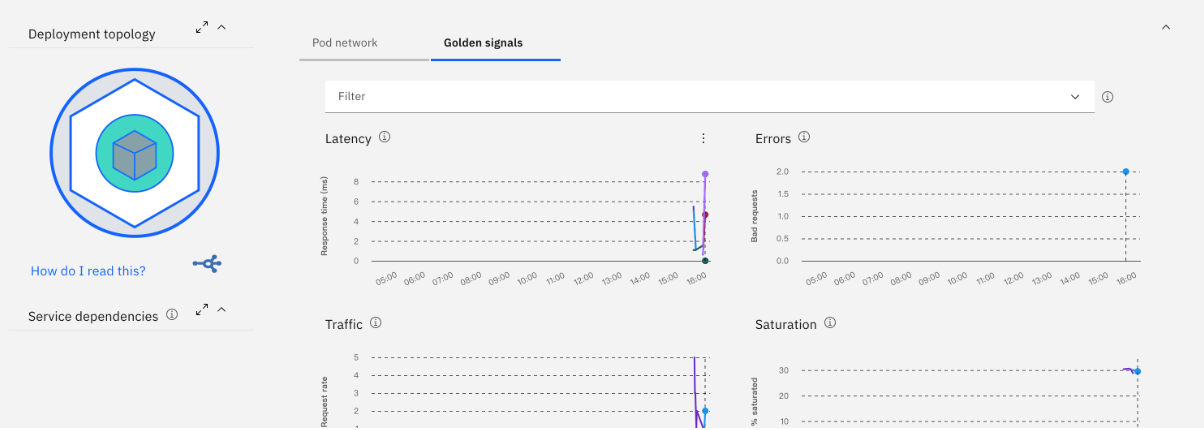
- Metrics are displayed in Golden Signal.

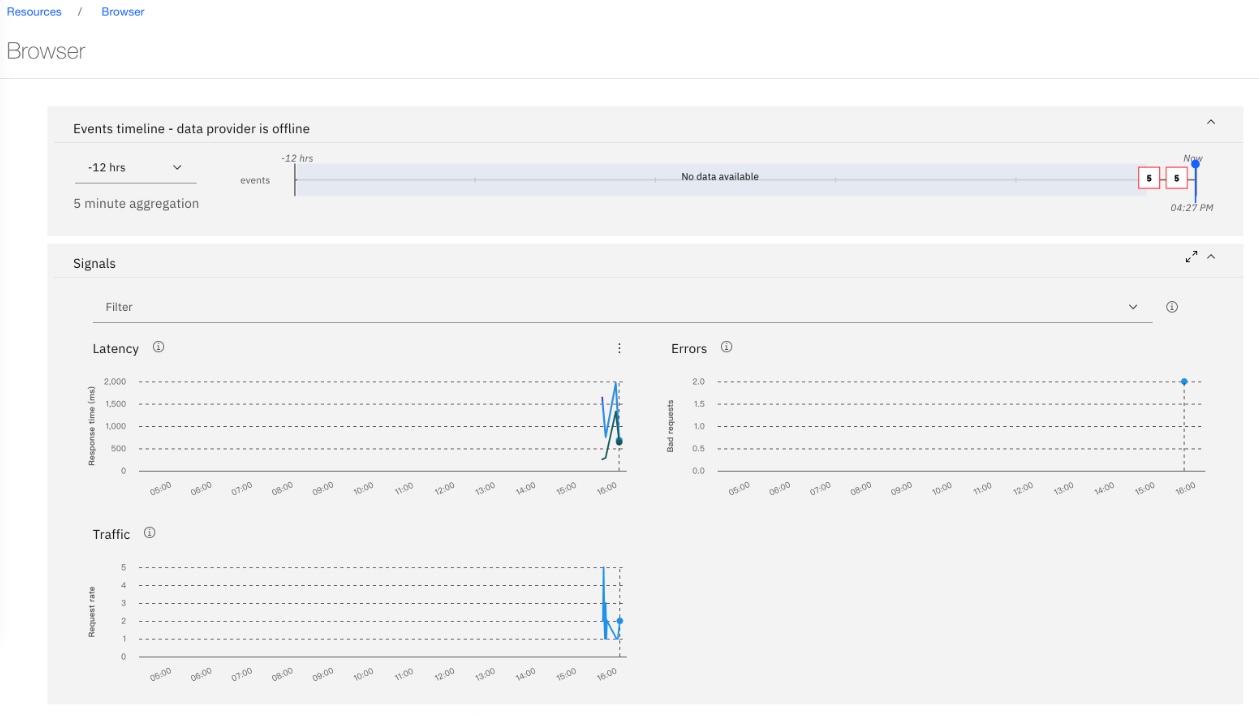
- Click to drill down browser to check whether you can get detailed browser data.

Known limitation: If multiple services are connected to the Browser in
topology, no browser data can be displayed.

 Known limitation: If multiple services are connected to the Browser in topology, no browser data can be displayed.