Workload Specification editor
The Workload Specification editor is used to view and update workload specifications.
The Workload Specification editor opens automatically after you crate a workload specification. To open the editor at a later time, go to the Workload Specifications view and double-click a workload; or go to the CICSplex Explorer view, expand Workload Management to display a list of workloads, and then use the Open Workload Specification command from the context menu of a workload.
- Routers
- Shows the CICS® system groups and the routing regions that are associated with the workload specification.
- Rules
- Shows the workload definitions, which are known as routing rules, that are associated with the workload specification.
- Targets
- The Targets section for the default rule shows the target systems, or system groups, the routing algorithm, and the primary search criteria for the default rule.
- Transactions
- Shows the transaction groups that are installed in the workload specification.
- Affinities
- The Affinities section for the default rule shows the affinities that are in place for the default workload.
- Abends
- The Abends section for the default rule shows the abend thresholds for a transaction that is associated with the default transaction group.
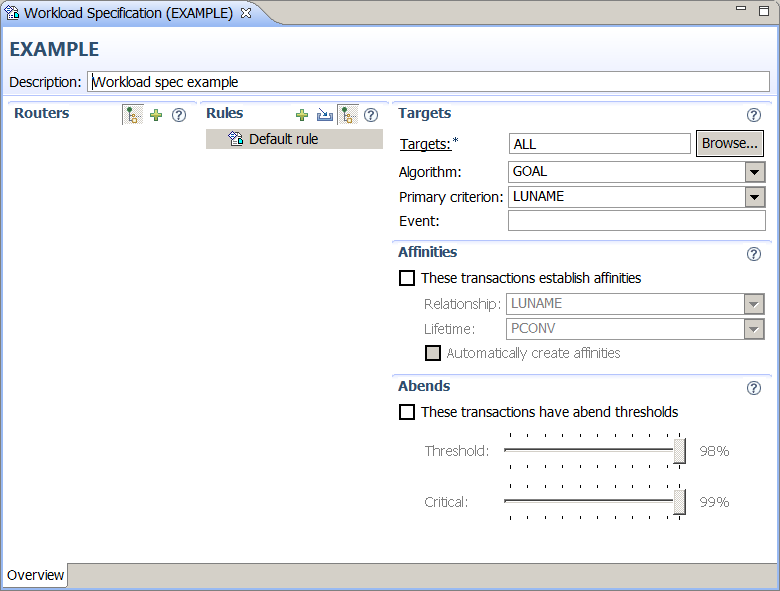
The Routers section
The Routers section shows the CICS system groups and the routing regions that are associated with the workload specification.
Initially, only the routing items, that is the systems or system groups, for this workload are
shown. You can click the Hide non-routing items icon  on the Routers toolbar to show the items that are routers for other workloads.
You can add or remove routers.
To add a router, click the Add routers icon ![]() on the Routers toolbar, and then select the system or system group that you want to assign
as a router for the workload in the Select routers window. For detailed
instructions, see Creating a routing rule or workload group.
on the Routers toolbar, and then select the system or system group that you want to assign
as a router for the workload in the Select routers window. For detailed
instructions, see Creating a routing rule or workload group.
To remove a router, right-click the system or system group and then click Remove.
The Rules section
The Rules section shows the workload definitions, which are known as routing rules, that are associated with the workload specification. The section shows the default routing rule, separation rules, and workload groups. Workload groups are shown only if they contain two or more rules. If a workload group contains only one rule, then only the rule is shown, and the workload group is hidden.
Initially, only the descriptions of the rules, or groups, are shown. You can click the
Show or hide names icon on the Rules toolbar to show the names and the descriptions. When you click a
rule, the details for the rule, such as the routing targets and affinities, are shown in the right
pane of the editor, and can be edited. The details that you see depend on the type of rule that you
have clicked.
You can add, import, edit, remove, or group rules.
To rename a rule or group, right-click the rule, or group, and click Edit Description from the context menu.
To add a routing rule, click the Add a New Routing Rule icon ![]() on the Rules toolbar. For detailed instructions, see Creating a routing rule or workload group.
on the Rules toolbar. For detailed instructions, see Creating a routing rule or workload group.
To import a routing rule or workload group, click the Import an Existing Routing Rule
or Group icon ![]() on the Rules toolbar and then use the Import window. For detailed instructions, see Adding a workload group.
on the Rules toolbar and then use the Import window. For detailed instructions, see Adding a workload group.
To remove a routing rule, right-click the rule and select Remove from Workload Specification from the context menu. For detailed instructions, see Removing a routing rule or a workload group.
To group or grouping a routing rule, right-click the rule and select Group with or Ungroup from the context menu. For detailed instructions, see Grouping or ungrouping routing rules.
You can install routing rules and groups independently of each other. To install a group or rule, right-click a rule or group and select Install from the context menu.
The Targets section
The Targets section for the routing rule shows the target systems, or system groups, terminal LU name, user ID, and BTS process ID for the routing rule. Information specified in specific rules overrides what is specified in the default rule.
- Targets
- The name of the CICS system, or CICS system group, that will be the target for transactions that are subject to workload routing.
- Terminal LU name
- The specific or generic logical unit name used in matching a transaction with a workload definition.
- User ID
- The specific or generic user ID used in matching a transaction with the workload definition.
- BTS process type
- The specific or generic process type that is used in matching a transaction with the workload definition.
Terminal LU name and User ID must both be set to '*' if a specific process type is defined.
The Transactions section
A transaction group is an association of logically similar transactions. The similarity can be based on workload management (WLM) or affinity requirements, common shared processing requirements, or any other user-determined characteristic.
For workload management, any WLM information you specify in the transaction group, including the routing algorithm type, overrides the defaults supplied in the associated workload specification. If you specify alternative WLM attributes in a transaction group, you can change workload routing characteristics for the associated transactions dynamically without stopping your routing region.
If there are no transactions specified for the workload, click Select transaction group to add an existing transaction group, and associated transactions. Alternatively, click Create transaction group to create a new group.
If the transaction group has been defined, the section shows the details of the transaction group.
- Name
- The name of the transaction group. If this is a new group, this field is empty until you save the group. At that time, CICS Explorer generates a name for the group. The name cannot be changed.
- Description
- The description for the transaction group.
- Transactions
- Shows the transactions in the transaction group.You can add transactions to the transaction group in two ways:
- Type the transaction name in the text field, and then click Add.
- Click Browse to show a list of the transactions that are currently installed as local in the CICS system, or CICS system group, specified in the Targets section. Select one or more transactions you want to add, and click OK.
Note: Browse is available only if a target is set in the Targets section. - Algorithm
- The algorithm that is used when selecting the best target region to which a transaction in the
current transaction group will be routed. Valid options are as follows:
- QUEUE
- LNQUEUE
- GOAL
- LNGOAL
- INHERIT
- Primary search criterion
- Identifies whether the user name or the logical unit name is used as the primary search criteria
for transactions associated with the transaction group. Valid options are as follows:
- USERID
- LUNAME
- Status
- Indicates how an AOR is to be selected for transactions that are associated with the transaction
group. Valid options are as follows:
- ACTIVE
- DORMANT
- Event
- The name of an analysis definition (RTADEF) or a status definition (STATDEF) that might affect transactions that use the default transaction group for this workload specification. If a real-time analysis event is generated by this definition, WLM uses the information to select the best routing for those transactions. If this field is blank, no analysis or status definition is associated with the default transaction group.
The Affinities section
The Affinities section for the rule shows the affinities that are in place for the workload. Information specified in specific rules overrides what is specified in the default rule.
Automatically create affinities: Select this option to create an affinity by using the values in the Affinity Relationship and Affinity Lifetime fields. If this option is not selected, an affinity is not automatically created, but it can be created by a customized version of the dynamic routing program EYU9WRAM.
The Abends section
The Abends section for the rule shows the abend thresholds for a transaction that is associated with the transaction group. Information specified in specific rules overrides what is specified in the default rule.
To set the abend thresholds, move the slider controls to the required value.
- Threshold
- The abend probability for a transaction that is associated with the default transaction group, that should cause a target region's load level to be doubled.
- Critical
- The abend probability for a transaction that is associated with the default transaction group, that should cause a target region to be considered unhealthy.