This tutorial shows you how to create a new LoopBack® project by using the command line in IBM® API
Connect Version
5.0.7 and later.
You can accomplish the same thing using API Designer; for more information, see Creating new projects with API Designer. For more information on LoopBack, see LoopBack documentation.
Before you begin
Before you begin, you must install the developer toolkit on your local machine. For details, see Installing the toolkit.
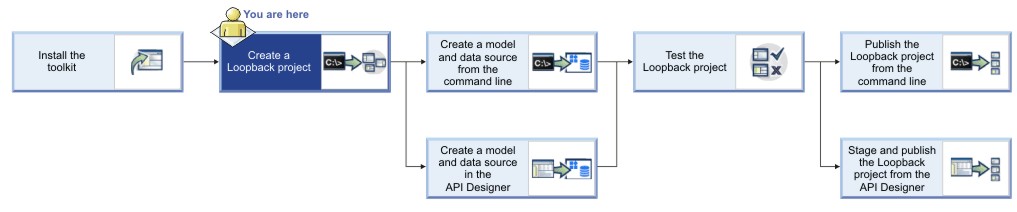
The following diagram shows the sequential flow through the IBM API
Connect Developer toolkit tutorials for working with LoopBack projects. Before beginning a tutorial, ensure that you have completed the previous tutorials in the sequence. You can click a tutorial in the diagram to open the instructions for that tutorial.
Note: To complete this tutorial, you must have internet access, because LoopBack installs dependencies from the public npm repository. Alternatively, you can configure a private npm repository.
Procedure
Complete the following steps:
- From the command-line interface, enter the following command, which is used to create and manage LoopBack applications:
apic loopback
You will now create a project called
acme-bank
.
- At the prompt, enter acme-bank as the project name. Then, press
Enter.
? What's the name of your application? acme-bank
Note: In general, a
project name can contain any characters except blank space (" "), forward slash ("/"), ampersand
("&"), at ("@"), plus ("+"), percent ("%"), and colon (":") .
- Enter the name of the directory in which to create the project. You can press Enter to use a
directory with the same name as the project, or type a new name and press
Enter.
? Enter name of the directory to contain the project: acme-bank
- Select the version of LoopBack to use. Choose the current production version, 3.x.
? Which version of LoopBack would you like to use? 3.x (current)
- Specify the kind of application that you want to create by using the arrow keys to select
empty-server:
? What kind of application do you have in mind? (Use arrow keys)
❯ empty-server (An empty LoopBack API, without any configured models or datasources)
  hello-world (A project containing a basic working example, including a memory datab
ase)
  notes (A project containing a basic working example, including a memory database)
Then,
press Enter to create an empty Loop Back API.
The tool displays a number of messages as it creates the project directory and adds a number of
directories and files to it. It also runs npm install to install all the project
dependencies, as specified in package.json. This process creates a
node_modules directory and might take some time.
An empty LoopBack project contains the following
directories:
server: contains server model and data source definitions, and other server
code.definitions: contains YAML definition files.node_modules: created by node.js
For more information on the contents of a LoopBack
project, see
Project layout reference (LoopBack documentation).
What you did in this tutorial
In this tutorial, you created a new LoopBack project called acme-bank
.
What to do next
Create a model and a data source by following either of these tutorials: