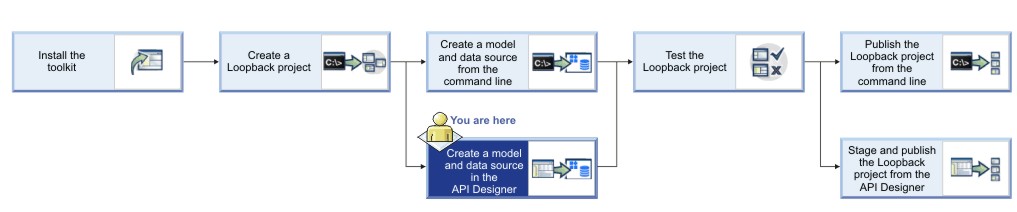
Tutorial: Creating a model and a data source in the API Designer
This tutorial shows you how to add a new model and data source to a LoopBack® project by using the API Designer in IBM® API Connect Version 5.0.7 and later.
Before you begin
Before you begin, you must install the developer toolkit on your local machine. For details, see Installing the toolkit.
You must also do the following:
- Change directories to your LoopBack project and enter the following command:
apic editAfter a brief pause, the console displays this message:Express server listening on http://127.0.0.1:9000API Designer opens in your web browser, initially displaying the login page if you haven't logged in recently.
Note: The login page prompts you to Sign in with IBM Cloud. Enter your IBM Cloud credentials, which authenticates you on IBM Cloud and provides access to the API Manager features such as Publish, Explore, and Analytics. You will continue to work in API Designer locally to create APIs, models and data sources.Note: If you need to run the editor on a different port, use the following command:where port_number is the port number to use.![[Icon indicating that this applies on Linux platforms]](../buildfiles/icon_linux.gif)
![[Icon indicating that this applies on Mac OS X platforms]](../buildfiles/icon_macosx.gif)
PORT=port_number apic edit![[Icon indicating that this applies on Windows platforms]](../buildfiles/icon_win.gif)
set PORT=port_number && apic edit
About this tutorial
- Create a model with the API Designer.
- Create a data source with the API Designer.
Adding a data source
A LoopBack project requires at least one data source. To access the data source, the appropriate LoopBack connector must be installed. By default, an empty LoopBack project does not have any data sources defined. For now, you will add the in-memory data source, which is suitable for development and testing. Complete the following steps to add the data source to the project:
- Click
 .
. - By default, the Connector setting shows In-memory db and the other settings are blank. Keep the default settings for now, and API Designer automatically saves the new data source.Note: The In-memory data source is built in to LoopBack and is suitable only for development and initial testing. When you are ready to connect your models to a real data source such as database server, change the Connector setting accordingly then install the data source connector by following the instructions in Tutorial: Installing LoopBack connectors. Then enter the connector settings (host name, port, database name, user name, password) as appropriate for your Connector type, and click the Save icon
 . Then, API Designer automatically tests the connection to the data source. If the test is successful, it displays the message Success - Data source connection test succeeded.
 - You can test the data source connection by clicking
 . The message Success - Data source connection test succeeded is
displayed.
. The message Success - Data source connection test succeeded is
displayed.
Adding a model
The next step is to add a model to the project. Models represent back-end data sources such as databases or other back-end services (for example, REST or SOAP). Every LoopBack application has a set of default models, which you can extend to suit your application's requirements. You can also define custom models. Models are stored in JSON format and determine properties and other characteristics of the API. For more information on models, see Defining models. Follow these steps to add a model to your LoopBack project:
- Click
 .
. - In the Properties section, click the Add property
icon
 .
. - Click the Add property icon again to add another property.
- Click the Save icon to save your changes.
What you did in this tutorial
- Created a new LoopBack model.
- Created a new LoopBack data source.