Authenticating and authorizing through a redirect URL
You can use a service that is hosted externally from IBM® API Connect to collect authentication and authorization details from your user when an application requests access on that user's behalf.
Before you begin
To complete this task, you must have created an API. For more information, see Creating API definitions.
Additionally, you will need to either create or have created an OAuth security definition that uses Implicit Flow or Authorization Code Flow. For more information, see Protecting an API with OAuth security definition.
About this task
If you use methods for authentication that are not supported by IBM API Connect, you can redirect users to a suitable URL at which they can authenticate. The user is then returned to the OAuth process after authentication and authorization have been confirmed.
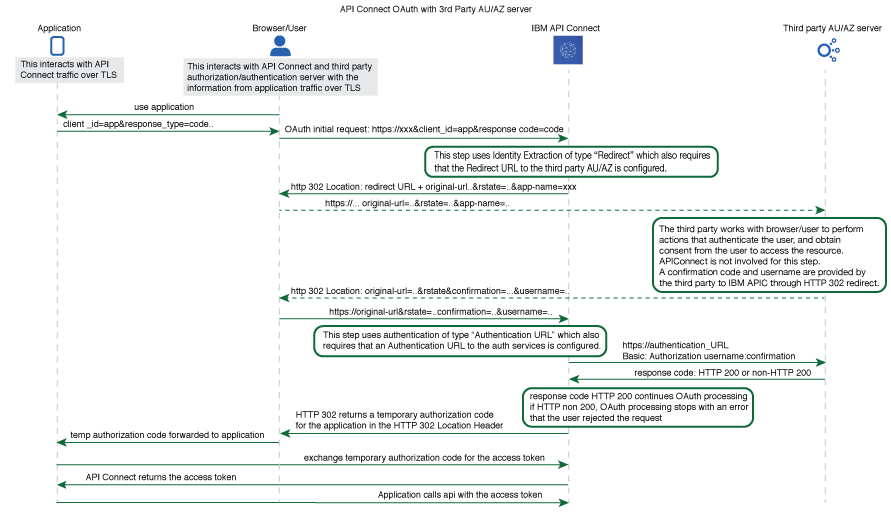
- The application initiates a request to access an API protected with a third-party entity. IBM API
Connect redirects the
application with an HTTP 302 redirect based on
identity
extraction -> redirect -> redirect-url
, for user authentication (and optional authorization). - The application communicates directly with the third-party entity to gather user identity. IBM API
Connect is not involved in
this communication. After the third-party entity finishes processing authentication (and optional
authorization), it returns an
HTTP 302redirect that uses theoriginal-urlfrom the request, with the username and confirmation code appended. -
IBM API
Connect receives the
request that includes the username and confirmation code, and communicates with the authentication
URL, based on
authentication -> x-ibm-authentication-url, to confirm user identity before the request is completed. - An
HTTP 200response from the third-party entity allows IBM API Connect to continue the OAuth 2.0 request process as if the owner is authenticated. The request is then processed according to thegrantstype.- accessCodereturns a temporary code to the application.- implicitreturns the access token to the application.
Procedure
To create an external form, and to indicate the URL to which API Connect will redirect users, complete the following instructions:
-
Create your service for authentication and authorization. Use the URL of the landing page of
this service as your redirect URL.
-
To include elements in your form that are provided by API Connect, use the query
parameters from the URL that your user is redirected to.
Except for
original-url, all other parameters are provided only as information for the third-party entity to use or ignore. When a user is redirected to your page, the URL includes any of the following parameters that contain a value:- app-name
- The name of the application requesting access, as provided through the Developer Portal.
- appid
- The id of the application requesting access.
- catalog
- The name of the catalog where the product is being used by the application.
- catalogid
- The id of the catalog where the product is being used by the application.
![[V5.0.8 or later]](../buildfiles/icon_v508.jpg) catalogtitle
catalogtitle- User-friendly display name for the catalog.
- g-transid
- Same definition as transid. This parameter is provided only if its content is different from transid.
- org
- The name of the developer organization that hosts the application.
- orgid
- The id of the developer organization that hosts the application.
- orgtitle
- User-friendly display name for the organization.
- original-url
- The original URL that the user was directed to by the application, including query parameters from the original URL that are necessary for standard OAuth 2.0 requests. You can include these parameters in your service to provide information to the user. Additionally the
rstateis appended. Therstateis a hash code that is generated by API Connect for verification purposes. The URL is URL-encoded and must be decoded before further use, therstateshould be left unchanged. - provider
- The name of the API provider organization.
- providerid
- The id of the API provider organization.
- providertitle
- User-friendly display name for the provider organization.
- requested-scope
- [optional] If Application Scope check is enabled and replaces the
scopefrom the initial application request, this field holds thescopevalue from the initial application request, and the new replacement scope value is put intooriginal-url. - transid
- Transaction id used in the gateway for the transaction that triggers this call.
The URL to which the user is sent to when they are redirected to your page has the following form:
with variables as described in the preceding list of query parameters. API Connect does not enforce a size limit on the length of the Redirect URL.Redirect_URL?original-url=Original_URL&rstate=R_State&app-name=Application_Name
-
To include elements in your form that are provided by API Connect, use the query
parameters from the URL that your user is redirected to.
-
If you have not previously pinned the UI navigation pane then
click the Navigate to icon
 .
The API Manager UI navigation pane opens. To pin the UI navigation pane, click the Pin menu icon
.
The API Manager UI navigation pane opens. To pin the UI navigation pane, click the Pin menu icon .
.