Persona Group Management
Product: Workbench
- Manage Persona Groups
-
- Only Workbench Administrators can configure Persona Groups. To configure the defaults per persona for the BrassRing home page or welcome messages, see User Interface Configuration.
- The home page is designed to displays cards, grids, visualizations, and welcome messages
specific to five different personas:
- Recruiter
- Hiring Manager
- Administrator
- HR User
- Reporting / Analytics
- The BrassRing user home page experience is based on persona designation. Each persona provides the users with the view of the data that works best for them. Users can personalize the view of the home page depending on their day-to-day tasks and needs.
- The HR Status Categories must be mapped in order for visualizations to work on the home page.
- Based on configuration and appropriate privileges, the home page for users with recruiter persona displays information specific to their requisitions in individual containers, also known as cards. The cards come with multiple view options and the permissions to refresh and update data in them.
- You can add up to 20 fields for display in the My Open Reqs grid views.
- New users logging in to BrassRing, or existing users accessing the New UI for the first time are
defaulted as follows:
- Recruiter – My Open Reqs tab, Card View
- Hiring Manager – My Tasks tab. When the user selects their My Open Reqs tab for the first time, they are defaulted to the Visualize View.
- When users access the My Open Reqs and the Card View the default view by personas are as, follows:
- Recruiter – Req number, Job Title, Location/Division, Department, Posting icon, New, and Total Candidates.
- Hiring Manager – Req number, Job Title, Location/Division, Department, Recruiter, New, and Total Candidates.
- Workbench administrators can configure different default fields for the My Open Reqs card and grid views, and the My Candidates grid view that apply to any new users to BrassRing. The Recruiter persona is used for the remainder personas, which are updated with persona-specific configuration in future Releases.
- Process
-
- Configure Persona Groups
-
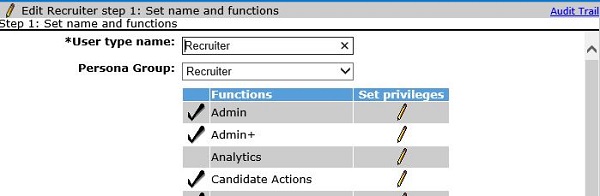
- Select .
- Select the Edit type permissions icon for the user type to configure.
- Select a Persona Group by using the pull-down menu.
- Select Save.
- Email WatsonTalentTraining@us.ibm.com if you have a suggestion for improvement, or encounter an issue on this documentation. Include the product and page title in your email.