User Interface Configuration
Product: Workbench and BrassRing on Cloud.
- Configure the User Interface
-
- The home page is designed to displays cards, grids, visualizations, and welcome messages specific to the five different personas. For more information, see Manage Persona Groups.
- Each persona provides the user with the view of the data that works best for them.
- Users can personalize the view of the home page for their day to day tasks and needs.
- The HR Status Categories must be mapped in order for visualizations to work on the home page.
- The persona group of Default is automatically assigned if a selection is not made by the client from the list of five personas.
- The Recruiter persona is used for the remainder personas that are updated with person-specific configuration in future Releases.
- Workbench Administrators can configure the home page, the client messages, and associate each message with one or multiple personas.
- The Screen Display Defaults option is only applicable to the Classic User Interface. Updating these settings have no effect on the Responsive User Interface.
- To configure what new users see when they log in to BrassRing for the first time, Workbench
Administrators can set default configurations for each persona for the My Open
Reqs card and grid views, and the My Candidates grid views. This
ensures that Workbench Administrators can regulate what new users are seeing; allowing users to
start working in the system quickly with company standard settings. The following items can have
defaults that are configured:
- Grid fields
- Card fields
- Quick links (including folder name)
- Tab order (first tab is set as the default tab)
- Relevant eLearning
-


- Process
-
- Configure BrassRing UI Colors
- Additional branding options are available for stand-alone BrassRing clients and their new UI
home page. Workbench users can make branding related updates to the color of the home page banner
text and icons. Advanced CSS cannot be applied to the BrassRing UI to manipulate colors or elements
of the user interface.
- Select .
- On the BrassRing UI Colors page, select Responsive Recruiter Branding, and select Launch.
- Right click on the home page banner and select Header Text
Color. The following text and icons are impacted by this change:
- Main Navigation icon color
- Hiring text color
- Home icon color
- Log-off icon color
- After colors are modified as needed, select Save.
- On the BrassRing UI Colors page in Workbench, select Save.
- Configure BrassRing home page
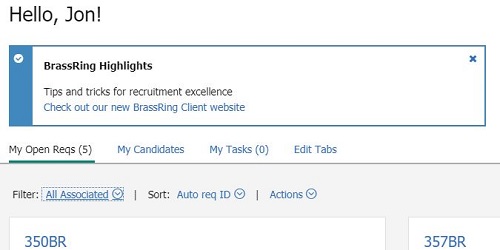
- Editing the welcome messages for a persona pushes the changes out to all new and existing users.
When BrassRing users select the X to close the messages, the messages are
dismissed and no longer display to the user. There is no way for the BrassRing user to redisplay the
welcome messages after it is closed. If the BrassRing (IBM) highlights message or the client-defined
message are updated, the next time the BrassRing user logs in to BrassRing, the new messages displays.
- Select .
- Select the Administer Welcome Messages Edit icon for a persona.
- If applicable, edit the title field to change the welcome message intro text for the persona.
- If applicable, edit the Text. The text field contains the welcome message that you want to display to the persona selected. The Text field can contain up to 350 alphanumeric characters. HTML is accepted but is included in the character limitation.
- Select Yes or No for Display Client Welcome Message Administrators. If Yes is selected, the client message is visible to the persona.
- Select Yes or No for Display BrassRing
Highlights Administrators. If Yes is selected, a message from
BrassRing to clients is visible.
- Select other personas that should also be able to view the message by using Also, apply this configuration to the selected personas.
- Select Save.
- Set Default Configuration
- Editing the home page defaults only applies to new users moving forward. Changes do not cascade
to existing users, with the exception of changes to Quick Links which are cascaded to
new and existing users in that persona.
- Select .
- Select the Administer Homepage icon for the persona you are configuring. The Administer Persona page appears.
- To configure My Open Reqs:
- Select the My Open Reqs link.
- To edit the card or grid views, select the card view or grid view icon and select Configure Display icon to add or remove fields. Users can display up to six fields in the card view and up to 20 fields in the grid view.
- Select Submit.
- To configure My Candidates:
- Select the My Candidates link.
b. Select the Configure Display icon to add or remove columns.
c. Select Submit.
- Select the My Candidates link.
- To configure the tabs shown to the persona, and the order in which they are shown:
- Select the Edit Tabs link.
- Move the tabs you would like displayed to that persona into the Selected Tabs section. Tabs can be reordered by dragging and dropping. The tab displayed first in the Selected Tabs list is the default tab shown when a BrassRing user first logs in.
- To configure default Quick Links for the persona:
- Select the Quick Links icon.
- On the Quick Links page, select Add Quick Link.
- Add the Name and URL of a link to appear in Quick Links.
- Select New Folder to create a folder or select an existing folder to categorize the persona Quick Links.
- Select Save.
- Configure the Req Diversity Visualization
- Updated Release 18.05.28. BrassRing users with appropriate privileges can
view more visualizations specific to requisitions. The new visualizations display diversity
distribution information of the requisition. These visualizations do not have any actions and they
provide overall distribution about gender and race diversity in two different charts.
- Select .
- Select BrassRing Home page - View Candidate Diversity Distribution. A new pull-down menu is added to the visualization section within the candidate results grid named Candidate Diversity Distribution.
- To configure the Gender visualization, select .
- To configure the Race visualization, select .
- Responsive Recruiter Branding Tool
- The Branding Tool is used to configure your organizations BrassRing interface design, such as
fonts, colors, and background images. Depending on whether your organization uses Talent Suite
BrassRing or Standalone BrassRing, the user interface is configured in different sections.
Table 1. UI Configuration Element Page Element Talent Suite Clients Standalone BrassRing Clients Base Font Size Responsive Recruiter Branding Tool Responsive Recruiter Branding Tool Base Font Responsive Recruiter Branding Tool Responsive Recruiter Branding Tool Link Color Responsive Recruiter Branding Tool Responsive Recruiter Branding Tool Header Background Color Talent Suite Admin App Responsive Recruiter Branding Tool Header Text Color Talent Suite Admin App Responsive Recruiter Branding Tool Logo Talent Suite Admin App Responsive Recruiter Branding Tool Background Image No Longer Applicable No Longer Applicable Title Font Color Responsive Recruiter Branding Tool Responsive Recruiter Branding Tool - To access the branding tool, select .
- Select Responsive Recruiter Branding.
- Select Launch.
- The Branding Tool opens which shows the current user interface that is seen by users in your organization. Right click an element on the screen to see any configuration options.
- Select the branding options as needed. For example, to change the logo, right click on the logo, and hover over Logo. Select Choose file to upload a new logo, and select Upload.
- Update the elements as needed, and select Save to save any changes.
- Email WatsonTalentTraining@us.ibm.com if you have a suggestion for improvement, or encounter an issue on this documentation. Include the product and page title in your email.