Installing and configuring Framework Manager for Cognos Analytics on Demand

Framework Manager can be used with the IBM® Cognos® Analytics on Demand offering only if the customer has an existing support and subscription (S&S) for the on-premises offering. Otherwise, Framework Manager is not available with the on demand offering.

The following conditions must be met for Framework Manager to connect to the Cognos Analytics on Demand offering:

  • You need an entitlement for the on-premises Framework Manager software.

    For more information, see Cognos Analytics offerings.

  • The dynamic query mode (DQM) must be enabled in Framework Manager.

    Compatible query mode (CQM) is not supported on Cloud.

  • Data source connections must be created from the Manage Cognos Analytics administration interface.

    Data source connections that are created in Framework Manager are not visible in the Manage user interface. For more information, see Creating a data server connection.

Before you begin

Cognos Analytics on Demand is always on the latest release. As a best practice, check IBM Fix Central (www.ibm.com/support/fixcentral) first to see if there is a version of Framework Manager for the current version of Cognos Analytics on Demand. If not, download the general release version of Framework Manager from Passport Advantage (www.ibm.com/software/passportadvantage/index.html).

Procedure

  1. Download the latest version of the Framework Manager installation files from Passport Advantage for general releases, or from Fix Central for an interim fix.

    The names of files that you need to download use the format analytics-installer-x.x.xxxxxxxx-win.exe and caclient-xx.x.x-xxxxxxxxxx.zip. An example of file names for the 11.1.7 version of Cognos Analytics on Demand might be analytics-installer-2.0.20100517-win.exe and caclient-11.1.7-2101190846.zip.

  2. Run the installer file analytics-installer-x.x.xxxxxxxx-win.exe.
  3. In the installation wizard, choose a language, and click Next.
  4. Browse to the client installation media that you downloaded, and click Next.
  5. Choose Cognos Analytics tools, and click Next.
  6. Choose IBM Cognos Framework Manager, click Next, accept the license agreement, and click Next again.
  7. Set your installation location and shortcut folder, and click Next. Follow the rest of the wizard to install Framework Manager.
  8. Launch IBM Cognos Configuration for Framework Manager.
  9. In the Explorer pane, click Environment.
  10. In the Properties pane, set the Encrypt temporary files to True (as a best practice).
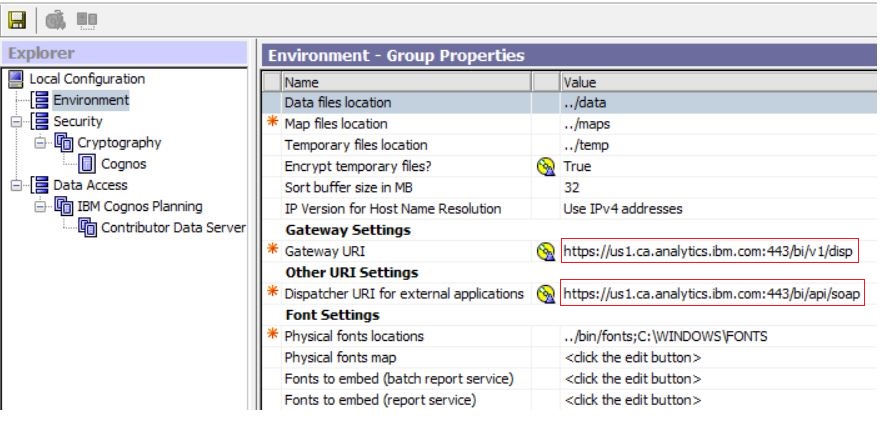
  11. Set the following properties:
    Gateway URI
    Set this property to https://CA_Cloud_Name.ca.analytics.ibm.com:443/bi/v1/disp, where CA_Cloud_Name should be replaced by your data center name.
    Dispatcher URI for external applications
    Set this property to https://CA_Cloud_Name.ca.analytics.ibm.com:443/bi/api/soap, where CA_Cloud_Name should be replaced by your data center name.

    In the following example, the CA_Cloud_Name is specified as us1.

    Environment properties in Cognos Configuration
  12. From the File menu, click Save.

    The Framework Manager configuration should be saved without error. However, if you receive the following warning: “The cryptographic information cannot be encrypted. Do you want to save the configuration in plain text?”, or encounter any general connectivity issues with Framework Manager, ensure that the following is correct:

    • The Gateway URI and Dispatcher URI for external applications properties in Cognos Configuration for Framework Manager.

      Ensure that the data center portion of the URIs and the port number are correct.

    • The Framework Manager version.

      The Framework Manager version must be compatible with the Cognos Analytics on Demand version.