Upload a file to add or remove multiple users (cloud only)
To add or remove multiple users, upload a file that includes user login IDs and ADD or REMOVE directives. Users that are added receive an invitation to the environment specified in the file.
Before you begin
When you are an account administrator for multiple organizations, you must use https://myibm.ibm.com to manage users in any organization other than the first organization to which you were added.
You can verify your role as an account administrator for your organization in the Subscription and Subscriber Management tool.
About this task
-
To add and/or remove multiple users in Planning Analytics Workspace on cloud, create a CSV file that contains one line for each user with the following information: Login ID, first name, last name, role, environment, directive.
The login ID is the email address that is used to sign in to Planning Analytics Workspace. Login ID, first name, and last name are mandatory. All other attributes are optional. If you omit role, it defaults to Analyst. If you omit environment, it defaults to the environment that you are logged in to. If you omit directive, it defaults to ADD.
Note: When uploading users from a .csv file, please save the file with the CSV UFT-8 format encoding to ensure that special characters are imported.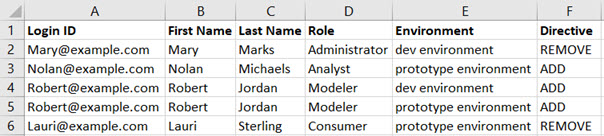
-
If you invite multiple users at a time, the number of users that you can invite is limited to the number of actual available Planning Analytics Workspace subscriptions you purchased, exclusive of any overage allowances. For example, if you have seven subscriptions available with unlimited overage, you can invite up to seven users. If you invite a number of users greater than the number of actual available subscriptions, the invitation fails.
- You must invite users to your primary environment first and they must be active in the primary environment before you can upload them to any secondary environments.
- You cannot assign a user to an environment that they already belong to, nor to an environment that does not exist.
- You can add users to multiple secondary environments by using a single CSV file.
- A user can have different roles in different environments. For more information about roles, see User roles.
- You can use file upload to remove users only from a non-primary environment. To remove a user from the primary environment, see Remove a user (cloud only). You must remove a user from all non-primary environments before you remove them from the primary environment.
- You can use a file to add or remove up to 100 users at a time.
Results
When you send an invitation, the user receives an email similar to this. The invitation clearly shows the email address of the administrator who sent the invitation, as well as the account and plan associated with the invitation.
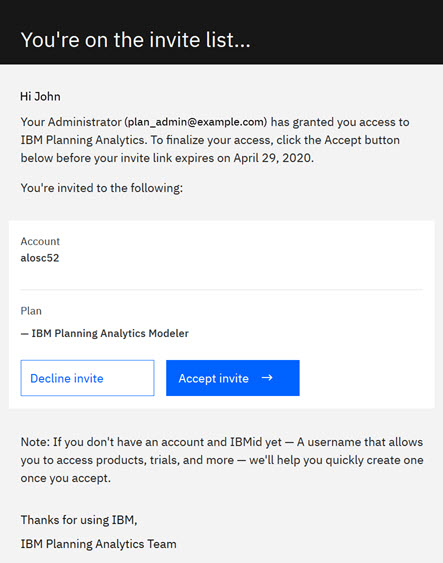
The invitation is valid for 28 days. A user cannot access Planning Analytics Workspace if they do not accept the invitation. If the user declines the invitation or does not accept within 28 days, the invitation is revoked and you must send a new invitation to grant access to the user.
Note that invitation and confirmation emails come from several different IBM systems and email accounts. Tell your users to expect these emails.
After the user accepts the invitation and logs in to Planning Analytics Workspace, their status changes to Active.
Upload a file to add or remove multiple users in Planning Analytics Workspace
Procedure
- Click Upload users
 .
. - Drag the CSV file to the Drop your .csv file here region
 , or browse to the file location and import the file. The file is uploaded and you see a success message.
Upload a file to add or remove multiple users in Planning Analytics Workspace Classic
Procedure
- Drag the CSV file to the .csv icon , or browse to the file location and import the file. The file is uploaded and you see a success message.
-
To invite users that you uploaded with the ADD directive, select the users with a status of
Not invited yet. Click the circle next to a user name to select an individual
user. Click the circle
 at the beginning of the list to select all users. To select multiple adjacent users, click
the circle next to the first user and then press Shift + click the circle next to the last
user.
A user is selected when a check mark in the circle
at the beginning of the list to select all users. To select multiple adjacent users, click
the circle next to the first user and then press Shift + click the circle next to the last
user.
A user is selected when a check mark in the circle accompanying the user name.
 - Click Invite uploaded users (100 users max) in the Applicable actions list.
- Click OK.