Manage user invitation capability (cloud only)

Your organization (account) can have multiple users that are account administrators. Account administrators can invite other users to your organization.

Manage user invitation capability in Planning Analytics Workspace

Before you begin

When you are an account administrator for multiple organizations, you must use https://myibm.ibm.com to manage users in any organization other than the first organization to which you were added.

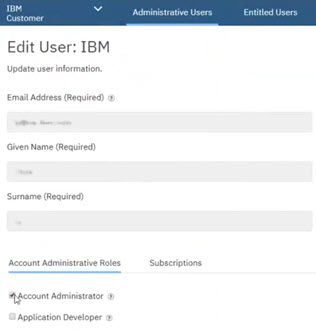
You can verify your role as an account administrator for your organization in the Subscription and Subscriber Management tool.

Subscription and Subscriber Management tool showing account administrator selection

Procedure

  1. On the Welcome page, click the Administration tile.
  2. Click Users & Groups.
  3. Click IBM Subscriptions Management.
    The organization (account) that you belong to is displayed in the upper left of the window.
  4. Click Entitled Users.
    The list that displays shows all the users that are members of your organization. For each user, their name, email address, subscription, and entitlement status is displayed.
  5. In the list, click the name of the user that you want to make an account administrator.
  6. In the Edit User window, click Account Administrative Roles, and select the Account Administrator check box.
    Remember: The user can be an account administrator only for the first organization that they were added to.
  7. Click Save and Close.

Manage user invitation capability in Planning Analytics Workspace Classic

Before you begin

When you are an account administrator for multiple organizations, you must use https://myibm.ibm.com to manage users in any organization other than the first organization to which you were added.

Procedure

  1. On the Welcome page, click the Administration tile.
  2. On the Users page, click Manage user accounts.
    The organization (account) that you belong to is displayed in the upper left of the window.
  3. Click Entitled Users.
    The list that displays shows all the users that are members of your organization. For each user, their name, email address, subscription, and entitlement status is displayed.
  4. In the list, click the name of the user that you want to make an account administrator.
  5. In the Edit User window, click Account Administrative Roles, and select the Account Administrator check box.
    Remember: The user can be an account administrator only for the first organization that they were added to.
  6. Click Save and Close.