 Python 配置-配置 Instana 套件
一般
Instana Python 套件旨在成為 Python 監視的完全無接觸自動解決方案,但在需要時仍可完全配置。 此頁面概述配置此套件時可用的選項。
已淘汰: 透過主機代理程式進行 Python AutoTrace 的舊式自動安裝
監視 Python 應用程式的偏好方法是 AutoTrace WebHook。 不過,此方法僅適用於 Kubernetes/OpenShift。 不在 Kubernetes上且尚未完成 手動檢測 的客戶可以暫時執行下列動作:
在主機中安裝「Instana 主機代理程式」之後,它可以定期掃描是否執行 Python 程序,並以追溯方式自動套用 Instana Python 檢測。
此程序由 Instana 主機代理程式控制,可以使用 configuration.yaml 檔案的變更來自訂。 如需此檔案的完整資料,請參閱 代理程式配置頁面 ,但如需 Python的特性,請繼續閱讀。
您可以在 Instana 主機代理程式的 configuration.yaml 檔案中使用下列區塊,選擇性地啟用及配置 Python 自動檢測。 若要查看每一個選項執行的動作,請參閱行內說明:
com.instana.plugin.python:
  # Python AutoTrace will automatically find and instrument Python processes.
  # This is supported on Linux 64bit Python processes.
  autotrace:
    # Valid values: true, false
    enabled: true

    # The AutoTrace includes are used to identify python processes.  They are applied
    # _before_ the excludes to get a list of potential candidate processes.  The
    # includes are used to create a list of processes that contain the following strings
    # in their command line.  Items specified here will _override_ the defaults.
    # Matching is case sensitive.
    includes:
      - 'uwsgi'
      - 'python'

    # The AutoTrace excludes used to identify processes to ignore.  It is applied
    # _after_ the includes.  Any processes that have the following strings in their
    # command line will be ignored.  Items specified here will be added to the built
    # in defaults.
    # Matching is case sensitive.
    excludes:
      - 'pipenv'         # pipenv processes
      - 'setup.py'       # Package development
注意事項與限制
Python AutoTrace 為:
- 僅在 Linux 64bit 二進位檔上受支援
- 目前在 Alpine (musl) 型二進位檔上不受支援
警告: Python AutoTrace 取決於 ptrace 系統呼叫,可能不容許呼叫,視安全系統設定而定。 在許多其他設定中,已知 SELinux、 AppArmor 和 seccomp 具有禁止 ptrace 系統呼叫的設定。 特別是依預設, Yama Linux 安全模組將 ptrace 的使用限制為母程序。 如果核心具有 Yama 模組,請執行下列指令來檢查 ptrace scope 設定: 如果指令傳回 0,則表示 AutoTrace 不受 Yama 模組限制:
cat /proc/sys/kernel/yama/ptrace_scope
AutoProfile™
AutoProfile 會自動且連續地將程序設定檔產生並報告給 Instana。 在 分析設定檔 區段中進一步瞭解設定檔。
若要啟用 AutoProfile ,請設定環境變數 INSTANA_AUTOPROFILE=true。 目前僅 手動安裝 支援 AutoProfile 。 請確定 Instana 感應器已在主要執行緒中起始設定。
主機代理程式通訊
Instana Python 套件會嘗試透過 IP 127.0.0.1 與 Instana 代理程式進行通訊,並透過主機的預設閘道作為容器化環境的撤回。 如果代理程式無法在下列任一位置使用,您可以使用環境變數來配置在何處尋找 Instana 主機代理程式。
應該在執行中處理程序的環境中設定環境變數。
export INSTANA_AGENT_HOST = '127.0.0.1'
export INSTANA_AGENT_PORT = '42699'
另請參閱:
設定服務名稱
依預設, Instana 會盡最大努力適當地命名您的服務。 如果您基於任何原因而想要自訂服務的命名方式,則可以透過設定環境變數來執行此動作:
export INSTANA_SERVICE_NAME=myservice
另請參閱 一般參照: 語言感應器的環境變數
設定處理程序名稱
使用 INSTANA_PROCESS_NAME 來設定代表 Python 處理程序之基礎架構實體的自訂標籤。
套件配置
Instana 套件包含一個執行時期配置模組,用來管理各種元件的配置。
附註: 隨著套件的發展,將在這裡新增其他選項
from instana.configurator import config

# To enable tracing context propagation across Asyncio ensure_future and create_task calls
# Default is false
config['asyncio_task_context_propagation']['enabled'] = True
除錯及更詳細
將 INSTANA_DEBUG 設為非零值將啟用額外記載輸出,通常有助於開發及疑難排解。
export INSTANA_DEBUG="true"
另請參閱 一般參照: 語言感應器的環境變數
停用自動檢測
這個 Instana 套件包含在套件載入時起始設定的自動檢測。 此檢測提供 Instana 儀表板的分散式追蹤資訊。 若要查看自動檢測的完整清單,請參閱 支援的版本 文件。
您可以透過設定環境變數 INSTANA_DISABLE_AUTO_INSTR來停用自動檢測 (追蹤)。 這將暫停載入內建於感應器中的設備測試。
Kubernetes
在此平台上的某些實務範例中, Python 感應器可能無法自動找到並聯絡 Instana 主機代理程式。 若要解決此問題,請參閱文件中的 Configuring Agent Network Access for Kubernetes 一節。
另請參閱:
架構
Django (手動)
設定 AUTOWRAPT_BOOTSTRAP=instana 環境變數時,應該會自動偵測並檢測 Django 架構。 如果基於某些原因,您偏好或需要手動檢測 Django ,則可以改為將 instana.instrumentation.django.middleware.InstanaMiddleware 新增至 settings.py中的 MIDDLEWARE 清單:
import os
import instana

# ... <snip> ...

MIDDLEWARE = [
    'instana.instrumentation.django.middleware.InstanaMiddleware',
    'django.middleware.security.SecurityMiddleware',
    'django.contrib.sessions.middleware.SessionMiddleware',
    'django.middleware.common.CommonMiddleware',
    'django.middleware.csrf.CsrfViewMiddleware',
    'django.contrib.auth.middleware.AuthenticationMiddleware',
    'django.contrib.messages.middleware.MessageMiddleware',
    'django.middleware.clickjacking.XFrameOptionsMiddleware',
]
角錐體
從: Instana Python 套件 1.22.0
Instana 套件包含對「金字塔」的手動支援。 若要將可見性新增至「金字塔型」應用程式,請執行下列動作:
- 確保
instana套件已新增至 requirements.txt 並安裝在虛擬環境或儲存器中 - 將
import instana新增至「金字塔」應用程式的__init__.py檔案頂端 - 將 Instana 檢測 Tween 新增至您的配置
import instana

with Configurator(settings=settings) as config:
    # ...
    config.include('instana.instrumentation.pyramid.tweens')
    # ...
例如:
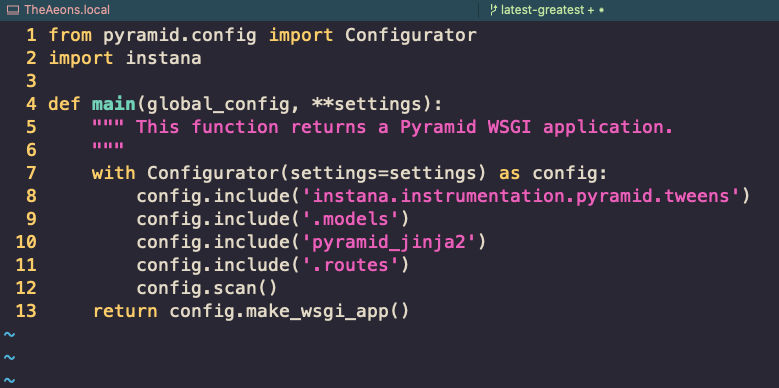
如果您在 production.ini 配置中設定 pyramid.tweens 選項,請確定 instana.instrumentation.pyramid.tweens.InstanaTweenFactory 是此清單中的第一個項目:
pyramid.tweens =
    instana.instrumentation.pyramid.tweens.InstanaTweenFactory
    # other tweens
在 Instana 套件的未來版本中,將不需要這些手動步驟,當偵測到「金字塔」時,會自動執行這些手動步驟。
WSGI 與 ASGI 堆疊
Instana 感應器包括可新增至任何相容堆疊的 WSGI 及 ASGI 中介軟體。 這是針對各種堆疊自動執行的,但也可以針對我們尚未新增隱含支援的那些堆疊手動執行。
一旦安裝 Instana Python 套件 (透過 pip install instana) ,一般用法如下:
import instana

from instana.middleware import InstanaWSGIMiddleware
# or
from instana.middleware import InstanaASGIMiddleware

# Wrap the wsgi app in Instana middleware (InstanaWSGIMiddleware)
wsgiapp = InstanaWSGIMiddleware(MyWSGIApplication())
我們正在針對所有主要架構進行自動化,但在此同時,對於我們尚未自動支援的那些架構,有一些特定的快速入門。
附註: 先前的 from instana.wsgi import iWSGIMiddleware 匯入形式仍可運作,但已淘汰。 該匯入表單的支援將在未來版本中移除。
Bottle WSGI
# Import Instana and the Instana WSGI middleware wrapper
import instana
from instana.middleware import InstanaWSGIMiddleware

from bottle import Bottle, run

app = Bottle()

@app.route('/hello')
def hello():
    return "Hello World!"

# Wrap the application with the Instana WSGI Middleware
app = InstanaWSGIMiddleware(app)

# Alternative method for reference
# app = InstanaWSGIMiddleware(bottle.default_app())

run(app, host='localhost', port=8080)
CherryPy WSGI
import cherrypy

# Import Instana and the Instana WSGI middleware wrapper
import instana
from instana.middleware import InstanaWSGIMiddleware

# My CherryPy application
class Root(object):
    @cherrypy.expose
    def index(self):
        return "hello world"

cherrypy.config.update({'engine.autoreload.on': False})
cherrypy.server.unsubscribe()
cherrypy.engine.start()

# Wrap the application with the Instana WSGI Middleware
wsgiapp = InstanaWSGIMiddleware(cherrypy.tree.mount(Root()))
在此範例中,我們使用 uwsgi 作為 Web 伺服器,並以啟動:
uwsgi --socket 127.0.0.1:8080 --enable-threads --protocol=http --wsgi-file mycherry.py --callable wsgiapp -H ~/.local/share/virtualenvs/cherrypyapp-C1BUba0z
其中 ~/.local/share/virtualenvs/cherrypyapp-C1BUba0z 是來自 pipenv 的本端 virtualenv 的路徑
Falcon WSGI
也可以透過 WSGI 封套來檢測 Falcon 架構,例如:
import falcon

# Import Instana and the Instana WSGI middleware wrapper
import instana
from instana.middleware import InstanaWSGIMiddleware

app = falcon.API()

# ...

# Wrap the application with the Instana WSGI Middleware
app = InstanaWSGIMiddleware(app)
然後以 uwsgi --http :9000 --enable-threads --module=myfalcon.app 作為範例來啟動堆疊
gevent 型應用程式
Instana 支援以 gevent 1.4 版及更新版本為基礎的應用程式。
對於預設 零接觸 AutoTrace Python 監視,不需要任何使用者步驟。
如果您是手動匯入 Instana Python 套件,請確保先執行 gevent 匯入及猴子修補。
    from gevent import monkey
    monkey.patch_all()
    import instana # <--- after the gevent monkey patching of stdlib
附註: gevent 型應用程式不應使用套件啟動 (使用 AUTOWRAPT_BOOTSTRAP 環境變數) 的 啟動而不變更程式碼 方法。 不幸的是,由於上述 gevent的第一訂單猴子修補需求,此方法將無法運作。 在此情況下,請使用 AutoTrace 或 使用程式碼變更來啟動 方法。
工具
Web 伺服器
uWSGI Web 伺服器
tldr; 請確定已針對 uwsgi 啟用 enable-threads 。
執行緒
此 Python 檢測會大量產生輕量型背景執行緒,以定期收集並報告處理程序度量值。 依預設,在 uWSGI下會停用 GIL 和執行緒作業。 如果您想要檢測在 uWSGI下執行的應用程式,請確保透過傳遞 --enable-threads (或 enable-threads = true in ini 樣式) 來啟用執行緒。 uWSGI 說明文件中的更多詳細資料。
uWSGI 範例: 指令行
uwsgi --socket 0.0.0.0:5000 --protocol=http -w wsgi -p 4 --enable-threads
uWSGI 範例 :ini 檔案
[uwsgi]
http = :5000
master = true
processes = 4
enable-threads = true # required
一般使用者監視 (EUM)
Instana 提供深度一般使用者監視,可鏈結伺服器端追蹤與瀏覽器事件,以提供從伺服器到瀏覽器的完整視圖。
如需詳細資料,請參閱 一般使用者監視 頁面。