About this task
Server A refers to either the only server in
a stand-alone configuration or the first (bottom) server in a clustered
configuration. In the following procedures, the system output might
also use the term
Node A to mean the same thing. Commands
are case-sensitive. Use care to enter the characters exactly as shown.
Note: If
you are working with new servers (directly from the factory), the
most current versions of Red Hat Linux and ProtecTIER® software are preinstalled.
If
you are not working with new servers (direct from the factory), you
must install Red Hat Linux version
5.6 and ProtecTIER code before
you configure ProtecTIER.
Attention: If you are working with a clustered configuration,
you must do the following tasks before you configure Server B:
Attention: Before you start to
configure server A, you must have a new or existing TSSC that is
installed, connected, and configured as described earlier in this
installation roadmap. Not installing, connecting, and configuring
the TSSC (either purchased or preexisting) in accordance with this
installation roadmap causes the ProtecTIER server
configuration procedure to fail.
- Configuration
failure can result from IP address conflicts in installations with
multiple servers. To prevent configuration failure, disconnect cables
from replication (VTL, OpenStorage, and FSI) and customer host network
Ethernet (OpenStorage and FSI only) ports. Choose one of the following
options, depending upon your installation.
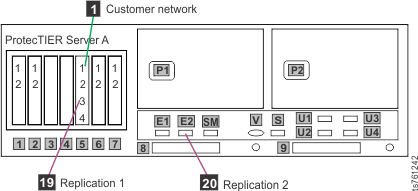
- Option 1: VTL
- Remove replication cables from server ports that are labeled 19 and 20 in Figure 1.
Figure 1. Customer and replication Ethernet connections for stand-alone
VTL configuration
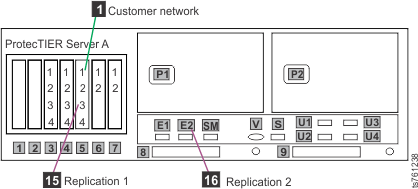
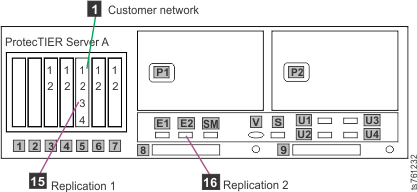
- Option 2: 1 Gb OpenStorage or FSI (FC 3456)
- Remove replication cables from server ports that are labeled 15 and 16 in Figure 2.
Figure 2. Customer and replication Ethernet connections for stand-alone
1 Gb OpenStorage and FSI configuration, Feature
Code 3456
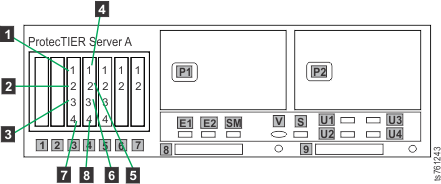
- Remove customer host network Ethernet connections that are labeled 1
- 8 in Figure 3.
Not all of these connections might exist, depending upon the customer.
Figure 3. Customer and replication Ethernet connections for stand-alone
1 Gb OpenStorage and FSI configuration, Feature
Code 3456
Remove cables.- Option 3: 10 Gb OpenStorage or FSI (FC 3457)
- Remove replication cables from server ports that are labeled 15 and 16 in Figure 4.
Figure 4. Customer and replication Ethernet connections for stand-alone
OpenStorage and FSI configuration, Feature Code
3457
- Remove customer host network Ethernet connections that are labeled 13
- 16 in Figure 5.
Not all of these connections might exist, depending upon the customer.
Figure 5. Customer and replication Ethernet connections for stand-alone
10 Gb OpenStorage and FSI configuration, Feature
Code 3457
- Log in to Server A.
- Connect the USB keyboard and monitor to Server A.
- Verify that Server A is powered up and the startup cycle
is complete.
Note: The startup cycle is complete when the
system returns to a command prompt, or the message RUNNING is
displayed on the monitor. Press Enter to get to the login prompt.
- If this is a clustered configuration, verify that Server
B (the top server) is powered off.
- At the login prompt, type: ptadmin and
press Enter.
- At the password prompt, type: ptadmin and
press Enter.
- At the command line, type menu and
press Enter. The ProtecTIER Service menu
displays.
----------------------------------------------------------------------
  ProtecTIER Service Menu running on rasddx
----------------------------------------------------------------------
   1) ProtecTIER Configuration (...)
   2) Manage ProtecTIER services (...)
   3) Health Monitoring (...)
   4) Problem Alerting (...)
   5) Version Information (...)
   6) Generate a service report
   7) Generate a system view
   8) Update ProtecTIER code

   E) Exit
----------------------------------------------------------------------
>>> Your choice?
- Type the numeral corresponding to ProtecTIER
Configuration and press Enter. The ProtecTIER
Configuration menu displays.
----------------------------------------------------------------------
  ProtecTIER Service Menu running on rasddx
  ProtecTIER Configuration (...)
----------------------------------------------------------------------
   1) Configure ProtecTIER node
   2) Recover Configuration for a replaced server
   3) Configure machine serial number for a replaced server
   4) Configure RAS
   5) Update Time, Date, Timezone & Timeserver(s)
   6) Scan storage interconnections
   7) File Systems Management (...)
   8) Configure replication (...)
   9) IP Network configuration (...)
   10) Update Firmware
   11) Update the System's name
   12) Validate configuration
   13) Single node - code upgrade (for Support Use Only)

   B) Back
   E) Exit
----------------------------------------------------------------------
>>> Your choice?
- Type the numeral corresponding to Configure
ProtecTIER node and press Enter.
- The system checks your
hardware and presents one of two selection menus.
Example
(VTL)
1. VTL
VTL is the only option
Example (OpenStorage
or FSI)
1. OST_10G
2. FSI_10G
CAUTION:
FSI is not supported
in clustered gateways in release 3.3. However, both FSI and OpenStorage
are listed as choices on the installation menu. For clustered gateways,
the only supported options are VTL or OpenStorage; do not choose FSI.
If
you are installing a clustered gateway, whichever option you choose
for Server A now, you must choose the same option for server B later
in this document.
- Type the numeral corresponding to your choice and press
Enter. A confirmation prompt like the following example
displays.
About to execute:
Operation:    install
Model:        TS7650G
Application:  OST_10G

Continue? (yes|no)
- Type yes to confirm your selection
and press Enter. The system automatically starts
the configuration process, with output similar to the following example.
Note: These
examples are for an OpenStorage configuration with FC 3457 (dual-port
10 Gb Ethernet adapters).
Stopping services, please wait
Stopping Cluster Services                                       [ Done ]
Services stopped
Checking Fence Device                                           [ Done ]
Checking BOM                                                    [ Done ]
Checking for existing nodes                                     [ Done ]
Checking Application Interfaces                                 [ Done ]
Checking repository                                             [ Done ]
Checking installed applications                                 [ Done ]
Checking local raid                                             [ Done ]
Checking conditions done
- The installation process
prompts you to enter IP addresses for primary and secondary NTP servers
and information for external application interfaces, as shown in the
following example output. When prompted for the IP addresses of the
NTP primary and secondary servers, choose one of the following options:
- If you do not want to use NTP servers, press Enter when prompted
without entering IP addresses.
- If you want to use NTP servers, enter the IP address for the primary
and secondary NTP servers when prompted and press Enter after each.
Note: NTP
servers are required for use in FSI installations in which Active
Directory is used when you set up file system authentication through
the ProtecTIER Manager
user interface. You can enter the IP addresses for the NTP servers
now or later, but they must be entered before you set up file system
authentication.
The following paragraphs deal with the external
application interface IP addresses to be entered.
ProtecTIER exposes
virtual interfaces to the host, such as a media server with the plug-in
installed. In version 3.3.6,
the physical Ethernet ports are assigned to one virtual application
interface. Currently, the physical ports are assigned to virtual interface
ost1 or fsi1, depending on the server configuration. This assignment
option is used to group several physical interfaces into a single
virtual interface, and create a bond configuration of several physical
interfaces. Each virtual interface used must be configured with a
corresponding IP address.
Attention: Each configured IP address on the same server needs
to be on a different subnet, and each subnet needs to be on a different
VLAN. If separate subnets and VLAN’s are not used, in certain environments
and networks, network packets can move to other subnets, which can
harm network performance and potentially reduce the network's quality
of service.
In addition, each virtual
interface containing more than one physical interface (configured
as a bond) needs to be configured with a load balancing method. For
a server with 10 Gb interfaces, where bonding is implemented, the
recommended load balancing method is LACP with L3L4.
For more information about bonding, the different
load balancing methods, and whether to configure bonds at all, refer
to the Best Practices Guide for IBM® System
Storage TS7600 ProtecTIER Deduplication
Solutions, GA32-0924 or
the IBM ProtecTIER Implementation
and Best Practices, IBM Redbooks® publication
SG24-8025.
Please provide the following information:
-----------------------------------------
NTP server timeserver, IP Address (optional):
NTP server secondary_timeserver, IP Address (optional):
ApplicationInterface external, IP Address [192.168.10.161]: 9.148.220.157
ApplicationInterface external, Netmask [255.255.255.0]: 255.255.252.0
ApplicationInterface external, Default Gateway [192.168.10.1]: 9.148.220.4
ApplicationInterface external, Hostname [node1]: popeye
- When prompted to confirm
your choices as shown in the following example, verify that they are
correct, type y and press Enter.
Please check the following values:
----------------------------------
NTP server timeserver, IP Address:
NTP server secondary_timeserver, IP Address:

ApplicationInterface external, IP Address: 9.148.220.157
ApplicationInterface external, Netmask: 255.255.252.0
ApplicationInterface external, Default Gateway: 9.148.220.4
ApplicationInterface external, Hostname: popeye

Are you sure you want to submit these values? (yes|no|quit) y
If you did not configure RAS in Configuring RAS for the TS7650G (Gateway), ProtecTIER version 3.3.6,
you are prompted to configure the SMTP server as shown in the following
example. If you configured the SMTP server earlier during RAS configuration,
this output does not appear. If you did not configure the SMTP server
earlier and want to do so now, use the information on the completed
Company Information and IP address worksheets. See Company information worksheet and IP address worksheet for details
about the information that you must enter.
Please provide the following information:
-----------------------------------------
Customer SMTP server IP address (optional):
Customer number:
     Input should be 7 alphanumeric: abcderf
Country code:
     Input should be 2 or 3 alphanumeric: av
Business company name, e.g. IBM, (optional):
Machine location, e.g. Server room, (optional):
MODEM Phone number, (optional):
Voice Phone number, (optional):

Please check the following values:
----------------------------------
Customer SMTP server IP address:
     The first administrator email-address:
     The second administrator email-address:
     The third administrator email-address:
Customer number: abcderf
Country code: av
Business company name:
Machine location:
MODEM Phone number:
Voice Phone number:
Are you sure you want to submit these RAS values? (yes|no|quit)
- The configuration process continues, with output
similar to the following example.
Configuring network                                             [ Done ]
Restarting Network Service                                      [ Done ]
Configuring Application Interfaces                              [ Done ]
Stopping cluster                                                [ Done ]
Configuring cluster                                             [ Done ]
Starting cluster                                                [ Done ]
Installing NTP                                                  [ Done ]
Set interfaces addresses                                        [ Done ]
Starting VTFD                                                   [ Done ]
Starting RAS                                                    [ Done ]
Collecting RAS Persistent configuration                         [ Done ]
Running RAS Eth Agent                                           [ Done ]
validation will start in 10 seconds
Testing customer network connectivity                           [ Done ]
Testing connectivity to the Default Gateway                     [ Done ]
Getting number of nodes                                         [ Done ]
This is a 1 node cluster, will not test fencing
validation ended
install ended successfully

End Processing Procedure Successfully

Press <ENTER> to continue
- Press the Enter key to return to the ProtecTIER
Configuration menu.
- Go to Defining the date and time for the TS7650G (Gateway), ProtecTIER V3.3.6.