TAM (technical account managers) reports
The TAM reports page of IBM Support Insights allows designated technical account managers and other internal users, representing a particular client, to generate detailed reports targeting the clients' Premium assets. Note, all other assets are excluded from the view. Any details provided on the page are related only to the specific sub-set of device.
When you open the TAM reports page of the application, you will see a table containing either existing reports or a message that there are no reports yet. By default, the table is sorted in a descending manner per the Last updated column, but you can modify the sorting either by changing it to ascending in the same column or by sorting by a different column instead. You may also search within the TAM reports list table based on contents from any of its columns. Please bear in mind that modifying the sorting and searching within this table is maintained for the duration of your application session. In other words, if you switch to a custom sorting - that will remain applied during you session even if you switch to another client you have access to.
If you do not have the appropriate TAM access level for the specific client account, you will not be able to create new reports and will only see reports in Published status.

Users with a role different from a TAM user can only view published reports - draft and archived reports will be hidden from view. Published reports cannot be edited - they are static.
A TAM report can be in one of the following statuses:
- Draft - a report that is not yet finalized and can be modified by a TAM user.
- Published - a finalized report that can no longer be modified, visible by both TAM and non-TAM users.
- Archived - a report that is no longer required, archived by a TAM user, non-modifiable.
- Deleted - a removed report, not visible to any user, deleted by a TAM user.
Please note, if you want to archive or delete a Draft report - you must first publish it, then archive it and only then will you be able to delete it. The reports' statuses are consequential and cannot be skipped.
When a report is moved from the Draft to Published status - it becomes a static element. In other words - tables with more than one page in Draft status will only contain one page in the Published status. If you wish to have as much data as possible from the tables of a report - adjust the table's row count, using the Items per page dropdown, prior to publishing the report.
If you wish to create a new report, click on the Create blank report button located at the right-hand side of the reports table. That will create an entirely new report for you, without carrying over any properties from any existing report.
However, if you wish to re-create a report using properties from an existing one - you may click on the Replicate button located at the far right-hand side of the respective report's row in the table. That will copy the particular report's settings (e.g. domain filters) and static data (e.g. notes) into the newly created one. Assets and cases data will not be carried over.
The report creation page consists of the following items and sections:
Heading
At the beginning of the page, you will see the report's name which is editable using the pencil icon button located at the right-hand side of the report's name.
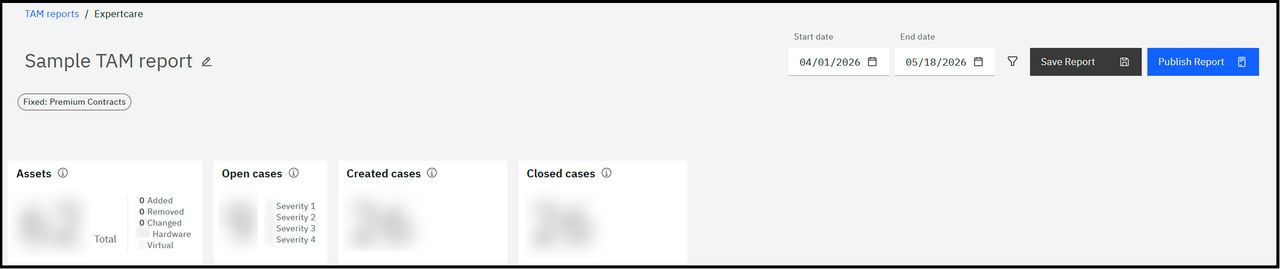
Located on the right-hand side of the screen, you will find the calendar selector, the domain filter, the Save report button and the Publish report button.
Using the calendar selector, you can choose a start date and an end date, for which you wish to see data in the current report - the start date can be a maximum of 6 months prior to the chosen end date. If the report is in status Published, you will not be able to make calendar selections.
Using the domain filters, you can opt to view a particular devices subset from the client's inventory. You can choose between four different device domains - AIX/IBMi, Storage, Power, and Linux. By default, none of the four available domains are selected, i.e. domain filtering is not applied - you will be able to see the entire inventory. When you opt to view a particular subset of the inventory, using the domain filters, please note they affect the TAM report page (and any individual draft reports you have access to), but not the rest of the application itself. When a domain filter is applied - you will only be able to see those devices that do have a domain specified.
Please note, the domain filters are applied only to the particular draft report you are editing. You can auto-apply them to a new report using the Create from previous report functionality, but if you simply create a new report from scratch - the domain filters from your previous report will not be applied to the new one. Domain filters persist across application sessions.
Using the Save report button, you can save the current version of the report in Draft status. The report can be edited multiple times while in Draft status.
Using the Publish report button, you can move your report from status Draft to status Published. When a report is in Published status, it can no longer be modified, but it can be either deleted or archived. If a report is published, the visible buttons will change to a bin icon button - used for deleting a report - and an Archive report button - used for archiving a report. Deleting a report removes it entirely from the application and its database. Archiving a report removes from the view of non-TAM users, but it remains for the TAM users who can see it in the reports list and also view its details or delete it entirely.
Please note, while a user has opened and is modifying a particular report - edits by a different user are not accepted by the system, i.e. the report is in locked status for the time-being. When the user logs out of the application, the report is unlocked and can be modified by another user.
Lastly, you will see four KPI cards on the screen - the Assets, Open cases, Created cases and Closed cases cards. These provide a brief overview of your premium assets' count and support status. The KPI cards are automatically refreshed when a different period is selected.
Details tab
In this tab of the page, you can type any data you wish to be visible in the generated report afterwards.

In the Report details section, you can type in a description, contract details, customer number details, meeting details, as well as select the date and time of the report's delivery.
In the Technical account manager details section, your own contact details - name and e-mail - are automatically populated, and you can also add your telephone number and a picture. Additionally, you can add the contacts of another technical account manager.
As a next section in the tab, you will find the Report recommendation notes section where you can add any free-form overall recommendations to the report if you see fit.
Afterwards is the Report recommendations, where you can populate any references you deem necessary. In order to add a recommendation, you can click on the plus icon button at the right hand side of the section. That will open a Report recommendations item dialog window, where you can populate the display name of the recommendation and a link to it. The section accepts only linked items. Once you are ready, you can click on the Add to Report recommendations button of the dialog - that will add your custom reference to the list.

You will see the item as a clickable link that, when clicked, will take you to the URL you have populated in the previous step. If you wish to edit or delete an existing report recommendation item, you can click on the three lines icon located at the far right-hand side of each item's row, then choose your desired action - Edit or Delete.
At the end of the page, you will find the Report agenda section, where you can manually add any agenda items you see fit. To do so, click on the plus icon button at the right-hand side - that will open a dialog window where you can populate the item (in a free form single row field). When ready, you can click on the Add to Report agenda button of the dialog window and that will save your item.
If you wish to edit or delete an existing agenda item, you can click on the three lines icon located at the far right-hand side of each item's row, then choose your desired action - Edit or Delete.
References tab

In this tab, you can find links to different references that are applicable to your client's particular inventory. At the beginning of the section, you have the Product references, which are populated automatically depending on what type of assets the client has. Each row in the list is expandable, broken down into different sub-product sections which contain clickable links.
Immediately after are the Recommended references, where you can populate any references you deem necessary. In order to add a recommendation, you can click on the plus icon button at the right hand side of the section. That will open a Recommended references item dialog window, where you can populate the display name of the reference and a link to it. The section accepts only linked items. Once you are ready, you can click on the Add to Recommended references button of the dialog - that will add your custom reference to the list.

You will see the item as a clickable link that, when clicked, will take you to the URL you have populated in the previous step. If you wish to edit or delete an existing recommended reference item, you can click on the three lines icon located at the far right-hand side of each item's row, then choose your desired action - Edit or Delete.
And at the end of the section, you will find the Report recommendation notes section where you can add any free-form overall recommendations to the report if you see fit.
Case metrics tab
In this tab, you can see your client's support experience history across the selected time-frame spanning specifically the assets in question.

In this tab of the page you will find the Case History table, which contains a list of the client's support cases for the selected period. The table functions identically to the case history table in the Case metrics page, however it also contains a Comments column, which is unique for all available rows, and there you can populate your own comments related to the specific support case.
Additionally, the table also gives you the option to exclude cases from it and to have a separate view containing only the excluded cases. In order to exclude a particular case from the default view, you can select it using the checkbox in the left-hand side of the case's row and then click on the Exclude case button that will then appear in the table's header. Once you have excluded all cases you wish to remove from the default view, you can click on the View excluded cases button in the table's header and that will switch the contents of the table. When you wish to go back to the default table view, click the View cases button in the header.
Please note, excluded cases are not visible in Published reports and neither is the View excluded cases button - a published report is a static report.
Assets tab
The last tab on the page contains an assets table, where you can see a list of all Premium contract devices for the client. The recommendations and metrics from the previous tabs are applicable only to the sub-set of assets found in the table on this tab.

In this asset details table, you can perform all available actions from similar tables across the application - searching, filtering, column selection and exporting the table content.