Installing components with the IBM ADDI Installer
To install IBM® AD on Windows , use the IBM ADDI installer.
Procedure
- To run the IBM ADDI installer, double-click the installer file. For example, IBM_Application_Discovery_and_Delivery_Intelligence_Installer-6.1.2.0-ifix1.exe.
- On the Welcome page, click Next.
- On the Licensing Agreements page, click I accept the terms of this license agreement, and then click Next.
- On the Installation Path page, specify the installation path, and then
click Next. The default installation path is C:\Program Files\IBM Application Discovery and Delivery Intelligence.
If the installation path that you specify does not exist, the target directory is created. Confirm the path, and click OK in the Message dialog box.
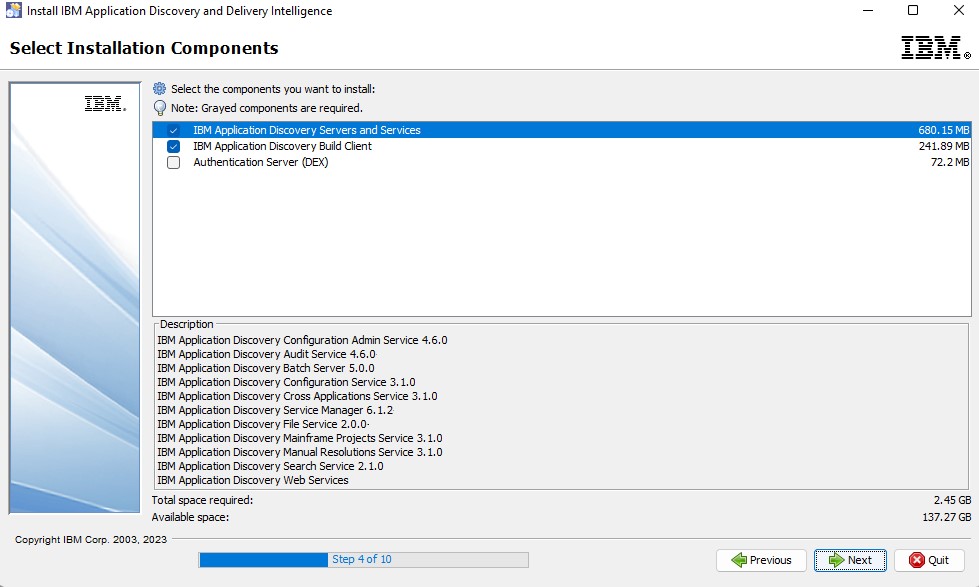
- On the Select Installation Components page, select all the components that
you need to install, and then click Next. The components that are not
applicable for the current system cannot be selected.
Figure 1. Select Installation Components wizard page 
- On the User Data pages, perform the following actions, then
click Next.
- On the IBM Application Discovery Configuration Wizard page, make sure to
select the IBM Application Discovery
Configuration Wizard check box. The IBM AD Configuration
Wizard will open in the system's default browser after the installation is completed. For more
information, see Configuring by using IBM AD Configuration Wizard.Note: Depending on the machine performance, you might see the Context root not found page in your browser. Wait for a minute and then refresh the page until you see IBM AD Configuration Wizard showing in your browser.
- Specify the configuration service IP address and service port for IBM AD Build Client.
- On the IBM Application Discovery Configuration Wizard page, make sure to
select the IBM Application Discovery
Configuration Wizard check box. The IBM AD Configuration
Wizard will open in the system's default browser after the installation is completed. For more
information, see Configuring by using IBM AD Configuration Wizard.
- On the Setup Shortcuts page, select the shortcuts that you want to create, and then click Next.
- Additionally, after the installation is completed choose the Generate an automatic installation script option to create an installation script, where the installation parameters are saved in a *.xml file, that can be used later for silent installations. A Save dialog box is displayed, allowing to choose the location and name of the installation script. By default, the name of the installation script is auto-install.xml.
Important: Once the installation and configuration of IBM Application Discovery and Delivery Intelligence is completed, make sure to activate the
full functionality of IBM AD by using the latest
Activation Kit available on Passport Advantage®. For more information, see Activating the full functionality of IBM AD from a free version.
Next step
After all installation process is completed, you need to go to the IBM AD Configuration Wizard page from where you can perform the initial configuration. For more information, see Configuring by using IBM AD Configuration Wizard.