Deploying IBM Storage Scale Container Native
IBM Storage Scale container native (formerly known as CNSA) allows the deployment of IBM Storage Scale in a Red Hat OpenShift cluster. IBM Storage Scale container native deployment makes persistent data store available using an IBM Storage Scale remote file system.
This data store can be used by the applications through the IBM Storage Scale CSI driver by using Persistent Volumes (PVs). A more detailed guide on the requirements and setup for an IBM Storage Scale container native cluster can be found here.
Prerequisites
- Validate that the Red Hat OpenShift cluster, or the node from where you are managing the Red Hat OpenShift cluster, has access to the manifest files in the IBM Storage Scale container native repository of GitHub. For more information, see IBM Storage Scale container native repository .
- Obtain an IBM Cloud Container Registry entitlement key to access the container images of the IBM Storage Scale container native.
- An installed Red Hat OpenShift cluster.
- An IBM Storage Scale cluster providing a file system and GUI nodes.
Overview of the required steps
- Configure the IBM Storage Scale cluster
- Prepare the IBM Cloud Container Registry (ICR) pull secrets
- Configure Red Hat OpenShift (on-premises)
- Install IBM Storage Scale container native components
- Configure Kubernetes resources
- Verify the IBM Storage Scale container native cluster
- Access the IBM Storage Scale container native GUI
Detailed steps
- Configure the non-containerized IBM Storage Scale cluster
The operators of IBM Storage Scale container native and IBM Storage Scale Container Storage Interface driver (CSI) interact with the storage cluster through ReST API (which is part of the GUI stack). To enable the operators to interact with storage cluster, user IDs need to be created on the storage cluster GUI. Specific roles are used to grant those user IDs only the operations that are needed to provide their functionality. In addition, some settings on the cluster and the file system are required for interoperability with the CSI.
- Create container native operator GUI
user:
$ /usr/lpp/mmfs/gui/cli/mkuser cnsa_storage_gui_user -p <CNSA_STORAGE_GUI_PASSWORD> -g ContainerOperator - Create the CSI GUI
user:
$ /usr/lpp/mmfs/gui/cli/mkuser csi_storage_gui_user -p <CNSA_STORAGE_GUI_PASSWORD> -g CsiAdmin - Ensure that the perfileset quota on the file systems that are used by IBM Storage Scale
Container Storage Interface driver is set to
no:
$ mmlsfs <FILE SYSTEM> --perfileset-quota flag value description ------------------- ------------------------ ----------------------------------- --perfileset-quota no Per-fileset quota enforcement -
Enable the
--auto-inode-limitparameter on the remotely mounted file system:$ mmchfs <FILE SYSTEM> --auto-inode-limit $ mmlsfs <FILE SYSTEM> --auto-inode-limit flag value description ------------------- ------------------------ ----------------------------------- --auto-inode-limit yes Increase maximum number of inodes per inode space automatically? - Enable quota for the file system:
$ mmchfs <FILE SYSTEM> -Q yes $ mmlsfs <FILE SYSTEM> -Q flag value description ------------------- ------------------------ ----------------------------------- -Q user;group;fileset Quotas accounting enabled none Quotas enforced none Default quotas enabled - Enable
quotafor the root user:$ mmchconfig enforceFilesetQuotaOnRoot=yes -i - Ensure that the
controlSetxattrImmutableSELinuxparameter is set to yes:$ mmchconfig controlSetxattrImmutableSELinux=yes -i - Ensure that the
ignoreReplicationForQuotaparameter is set to yes:$ mmchconfig ignoreReplicationForQuota=yes -i - Enable
filesetdfof the file system:$ mmchfs <FILE SYSTEM> --filesetdf
- Create container native operator GUI
user:
- IBM Cloud Container Registry (ICR) pull secrets
IBM Storage Scale container native images are hosted in the IBM Cloud Container Registry. For images to be properly pulled at the pod level, the Red Hat OpenShift global pull secrets must be modified to contain credentials to access the IBM Cloud Container Registry. Obtain an entitlement key from IBM container software library.
- For using IBM Cloud Container Registry, the credentials must use the
cpuser along with the entitlement key. Create a Base64 encoded string of the credentials used to access the image registry:$ echo -n "cp:<ADD_YOUR_ENTITLEMENT_KEY>" | base64 -w0 - Create an
authority.jsonfile to include the Base64 encoded string of your credentials, the fixed usernamecp, and the entitlement key for the IBM Cloud Container Registry:{ "auth": "ADD_BASE64_ENCODED_ENTITLEMENT_KEY_FROM_PREVIOUS_STEP", "username":"cp", "password":"ADD_YOUR_ENTITLEMENT_KEY" } - Enter the following command to include the
authority.jsonas a new authority in your.dockerconfigjsonand store it astemp_config.json:$ oc get secret/pull-secret -n openshift-config -ojson | jq -r '.data[".dockerconfigjson"]' | base64 -d - | jq '.[]."cp.icr.io" += input' - authority.json > temp_config.json - Verify that your authority credentials are appended at the end of the
file:
$ cat temp_config.json { "auths": { ... ... ... "cp.icr.io": { "auth": "ADD_BASE64_ENCODED_ENTITLEMENT_KEY", "username": "cp", "password": "ADD_YOUR_ENTITLEMENT_KEY" } } } - Use the contents of the
temp_config.jsonfile and apply the updated config to the Red Hat OpenShift cluster:$ oc set data secret/pull-secret -n openshift-config --from-file=.dockerconfigjson=temp_config.json - To verify that your pull-secret is updated with your new authority, issue the following command
and confirm that your authority is
present:
$ oc get secret/pull-secret -n openshift-config -ojson | jq -r '.data[".dockerconfigjson"]' | base64 -d - - This update is rolled out to all nodes. Use
$ oc get mcpTo track the progress of the roll out.
- Remove the temporary files:
$ rm authority.json temp_config.json
- For using IBM Cloud Container Registry, the credentials must use the
- Configure Red Hat OpenShift on-premises
- Apply Machine Config Operator (MCO) settings:
Before you can start with the IBM Storage Scale CNSA installation, you must change the Red Hat OpenShift compute nodes to ensure that IBM Storage Scale CNSA can operate properly.
- Install kernel development and kernel header packages for IBM Storage Scale to successfully build its portability layer.
- Set the
vmallockernel parameter to operate properly with Red Hat CoreOS.Note: Applying Machine Configs to update the Red Hat OpenShift Container Platform cluster can take around 30 minutes depending on the size of the compute node pool, as the compute nodes will be rebooted. If you have previously applied these Machine Configs, you do not need to apply them again.$ oc apply -f https://raw.githubusercontent.com/IBM/ibm-spectrum-scale-container-native/v5.2.1.x/generated/scale/mco/ocp4.16/mco_s390x.yaml
- Allow infrastructure nodes share roles with worker pool:
Similar to the configuration tasks on the workers nodes, Machine Configuration Operator (MCO) settings must be applied to the infrastructure nodes if you want to run IBM Storage Scale core pods.
$ curl https://raw.githubusercontent.com/IBM/ibm-spectrum-scale-container-native/v5.2.1.x/generated/scale/mco/ocp4.16/mco_s390x.yaml | sed 's/worker/infra/g' | oc apply -f -
- Apply Machine Config Operator (MCO) settings:
- Install IBM Storage Scale container native components
- Labels and annotations:
IBM Storage Scale container native automatically assigns designations (quorum, manager) to a subset of worker nodes. Since automatic assignement is recommened no additional steps will be performed here. If manual designation is required see https://www.ibm.com/docs/en/scalecontainernative/5.2.1?topic=cluster-labels-annotations for more information.
- The installation process for IBM Storage Scale Container Native begins with applying the install.yaml to create and define Kubernetes configuration
across the following namespaces:
- ibm-spectrum-scale-operator
- ibm-spectrum-scale-dns
- ibm-spectrum-scale-csi
- ibm-spectrum-scale
$ oc apply -f https://raw.githubusercontent.com/IBM/ibm-spectrum-scale-container-native/v5.2.1.x/generated/scale/install.yaml
- Validate that the following namespaces have been created by running the
command:
$ oc get namespaces | grep ibm-spectrum-scale ibm-spectrum-scale Active 85s ibm-spectrum-scale-csi Active 85s ibm-spectrum-scale-dns Active 85s ibm-spectrum-scale-operator Active 85s - Validate that operator pods are running in the ibm-spectrum-scale-operator and
ibm-spectrum-scale-csi namespaces:
$ oc get pods -n ibm-spectrum-scale-operator
NAME                                                     READY   STATUS              RESTARTS   AGE
ibm-spectrum-scale-controller-manager-7c7b49d7c9-jpmn2   1/1     Running             0          62s
+
$ oc get pods -n ibm-spectrum-scale-csi
NAME                                              READY   STATUS              RESTARTS   AGE
ibm-spectrum-scale-csi-operator-5cc78b697-lqq5n   1/1     Running             0          45s
- Labels and annotations:
- Configure Kubernetes resources
- A cluster definition is needed to declare the properties of the IBM Storage Scale container
native cluster:
- Download the cluster.yaml file and make changes according your configuration. See cluster spec for more information.
- Set the
nodeSelectorlabel on the Red Hat OpenShift compute nodes:$ oc label nodes --selector node-role.kubernetes.io/worker scale.spectrum.ibm.com/daemon-selector="" - Apply the
cluster.yamlfile:$ oc apply -f cluster.yaml
- To enable callhome functionality, create a callhome custom resource to the Kubernetes cluster:
- Download the callhome.yaml file and make changes according your configuration. See callhome spec for more information.
- Apply the
callhome.yamlfile:$ oc apply -f callhome.yaml - Verify the callhome resource:
$ oc get callhome -n ibm-spectrum-scale
NAME       MODE       COMPANY NAME   COMPANY EMAIL    ENABLED   AGE
callhome   disabled   ibm            christian.m@ibm.com        0s
- To allow the IBM Storage Scale container native cluster to access remote IBM Storage Scale
storage clusters, a RemoteCluster custom resources (CR) must be defined for each storage cluster.
See RemoteClusters for more information.
- Download the remotecluster.yaml from the GitHub repository and change the fields that are specific to your installation. For details on the Remote Cluster specification, see RemoteCluster spec.
- Apply the resource:
$ oc apply -f remotecluster.yaml
- To configure a file system in the IBM Storage Scale container native cluster, a Filesystem
custom resource (CR) must be defined for each file system you want mounted. See Remote file system for more information.
- Download the filesystem.remote.yaml from the GitHub repository and change the fields that are specific to your installation. For details on the Filesystem specification, see Filesystem spec
- Apply the resource:
$ oc apply -f filesystem.remote.yaml - Verify the Filesystem resources:
$ oc get filesystem.scale -n ibm-spectrum-scale
NAME            ESTABLISHED   AGE
remote-sample   True          11m
- Create a secret for the
ContainerOperatorGUI user defined on the storage cluster:$ oc create secret generic cnsa-remote-mount-storage-cluster-1 --from-literal=username='cnsa_storage_gui_user' \ --from-literal=password=<CNSA_STORAGE_GUI_PASSWORD> -n ibm-spectrum-scale -
Create a secret for the
CsiAdminGUI user defined on the storage cluster:$ oc create secret generic csi-remote-mount-storage-cluster-1 --from-literal=username='csi_storage_gui_user' \ --from-literal=password=<CNSA_STORAGE_GUI_PASSWORD> -n ibm-spectrum-scale-csi - Label the
secret:
$ oc label secret csi-remote-mount-storage-cluster-1 -n ibm-spectrum-scale-csi product=ibm-spectrum-scale-csi - Configure Certificate Authority (CA) certificates:
IBM Storage Scale container native uses Transport Layer Security (TLS) verification to guarantee secure HTTPS communication with the storage cluster GUI. It verifies the server’s certificate chain and host name. By default, the storage cluster GUI self-signs a certificate that can be used in lieu of a CA certificate. This certificate can be obtained and used to create the cacert ConfigMap by entering the following command. Replace GUI_HOST_NAME with the hostname of the storage cluster GUI node.
$ oc create configmap cacert-storage-cluster-1 --from-literal=storage-cluster-1.crt="$(openssl s_client -showcerts -connect <GUI_HOST_NAME>:443 </dev/null 2>/dev/null|openssl x509 -outform PEM)" -n ibm-spectrum-scaleFollow the link to Configuring Certificate Authority (CA) certificates for more information.
- A cluster definition is needed to declare the properties of the IBM Storage Scale container
native cluster:
- Verify the IBM Storage Scale container native cluster
Verify whether the deployment of the IBM Storage Scale container native cluster is done correctly.
- Verify that the Operator has created the cluster by checking the
pods:
$ oc get pods -n ibm-spectrum-scale NAME READY STATUS RESTARTS AGE ibm-spectrum-scale-gui-0 4/4 Running 25 (11m ago) 19h ibm-spectrum-scale-gui-1 4/4 Running 25 (11m ago) 19h ibm-spectrum-scale-pmcollector-0 2/2 Running 4 19h ibm-spectrum-scale-pmcollector-1 2/2 Running 4 19h worker-001 2/2 Running 0 11m worker-002 2/2 Running 0 11m worker-003 2/2 Running 0 11m worker-004 2/2 Running 0 11m worker-005 2/2 Running 0 11m worker-006 2/2 Running 0 11m - Verify the CNSA cluster configuration by entering the
mmlsclustercommand:$ oc exec $(oc get pods -lapp.kubernetes.io/name=core \ > -ojsonpath="{.items[0].metadata.name}" -n ibm-spectrum-scale) \ > -c gpfs -n ibm-spectrum-scale -- mmlscluster GPFS cluster information ======================== GPFS cluster name: ibm-spectrum-scale.stg.a311lp37fr25gs.lnxperf.boe GPFS cluster id: 458590586386177132 GPFS UID domain: ibm-spectrum-scale.stg.a311lp37fr25gs.lnxperf.boe Remote shell command: /usr/bin/ssh Remote file copy command: /usr/bin/scp Repository type: CCR Node Daemon node name IP address Admin node name Designation ----------------------------------------------------------------------------------------------------------------------------------------------------------------------------- 1 worker-002.daemon.ibm-spectrum-scale.stg.a311lp37fr25gs.lnxperf.boe. 10.161.36.175 worker-002.admin.ibm-spectrum-scale.stg.a311lp37fr25gs.lnxperf.boe. quorum-manager-perfmon 2 worker-003.daemon.ibm-spectrum-scale.stg.a311lp37fr25gs.lnxperf.boe. 10.161.36.176 worker-003.admin.ibm-spectrum-scale.stg.a311lp37fr25gs.lnxperf.boe. quorum-manager-perfmon 3 worker-004.daemon.ibm-spectrum-scale.stg.a311lp37fr25gs.lnxperf.boe. 10.161.36.177 worker-004.admin.ibm-spectrum-scale.stg.a311lp37fr25gs.lnxperf.boe. quorum-manager-perfmon 4 worker-005.daemon.ibm-spectrum-scale.stg.a311lp37fr25gs.lnxperf.boe. 10.161.36.178 worker-005.admin.ibm-spectrum-scale.stg.a311lp37fr25gs.lnxperf.boe. perfmon 5 worker-001.daemon.ibm-spectrum-scale.stg.a311lp37fr25gs.lnxperf.boe. 10.161.36.174 worker-001.admin.ibm-spectrum-scale.stg.a311lp37fr25gs.lnxperf.boe. perfmon 6 worker-006.daemon.ibm-spectrum-scale.stg.a311lp37fr25gs.lnxperf.boe. 10.161.36.179 worker-006.admin.ibm-spectrum-scale.stg.a311lp37fr25gs.lnxperf.boe. perfmon - Verify the active status of the GPFS daemon using the
mmgetstatecommand:$ oc exec $(oc get pods -lapp.kubernetes.io/name=core \ > -ojsonpath="{.items[0].metadata.name}" -n ibm-spectrum-scale) \ > -c gpfs -n ibm-spectrum-scale -- mmgetstate -a Node number Node name GPFS state -------------------------------------- 1 worker-002 active 2 worker-003 active 3 worker-004 active 4 worker-005 active 5 worker-001 active 6 worker-006 active - Verify that the Remote Cluster authentication is successfully created. Get a list of the remote
clusters:
$ oc get remotecluster.scale -n ibm-spectrum-scale NAME READY AGE remotecluster-sample True 2d20h - Inspect the file systems and ensure that the value for ESTABLISHED is
True:
$ oc get filesystem.scale -n ibm-spectrum-scale NAME ESTABLISHED AGE remote-sample True 2d20h - Manually verify that the file system is mounted using the
mmlsmountcommand:$ oc exec $(oc get pods -lapp.kubernetes.io/name=core \ -ojsonpath="{.items[0].metadata.name}" -n ibm-spectrum-scale) \ -c gpfs -n ibm-spectrum-scale -- mmlsmount remote-sample -L File system remote-sample (gpfs_perf.lnxperf.boe:SCSIfs) is mounted on 10 nodes: 10.161.10.1 a311lp10.lnxperf.boe gpfs_perf.lnxperf.boe 10.161.23.1 a311lp23.lnxperf.boe gpfs_perf.lnxperf.boe 10.161.24.1 a311lp24.lnxperf.boe gpfs_perf.lnxperf.boe 10.161.25.1 a311lp25.lnxperf.boe gpfs_perf.lnxperf.boe 10.161.36.176 worker-003.daemon.ibm-spectrum-scale.stg.a311lp37fr25gs.lnxperf.boe. ibm-spectrum-scale.stg.a311lp37fr25gs.lnxperf.boe 10.161.36.177 worker-004.daemon.ibm-spectrum-scale.stg.a311lp37fr25gs.lnxperf.boe. ibm-spectrum-scale.stg.a311lp37fr25gs.lnxperf.boe 10.161.36.179 worker-006.daemon.ibm-spectrum-scale.stg.a311lp37fr25gs.lnxperf.boe. ibm-spectrum-scale.stg.a311lp37fr25gs.lnxperf.boe 10.161.36.178 worker-005.daemon.ibm-spectrum-scale.stg.a311lp37fr25gs.lnxperf.boe. ibm-spectrum-scale.stg.a311lp37fr25gs.lnxperf.boe 10.161.36.174 worker-001.daemon.ibm-spectrum-scale.stg.a311lp37fr25gs.lnxperf.boe. ibm-spectrum-scale.stg.a311lp37fr25gs.lnxperf.boe 10.161.36.175 worker-002.daemon.ibm-spectrum-scale.stg.a311lp37fr25gs.lnxperf.boe. ibm-spectrum-scale.stg.a311lp37fr25gs.lnxperf.boe - Verify that the CSI pods are up and
running:
$ oc get pods -n ibm-spectrum-scale-csi NAME READY STATUS RESTARTS AGE ibm-spectrum-scale-csi-operator-5cc78b697-lqq5n 1/1 Running 3 3d22h - Verify that the Core DNS pods are running. There will be at least one Core DNS pod per core
pod:
$ oc get pods -n ibm-spectrum-scale-dns NAME READY STATUS RESTARTS AGE coredns-2cxj8 1/1 Running 3 3d22h coredns-464rk 1/1 Running 3 3d22h coredns-4pwnk 1/1 Running 3 3d22h coredns-62g7q 1/1 Running 3 3d22h coredns-c4ph5 1/1 Running 3 3d22h coredns-n778q 1/1 Running 3 3d22h coredns-s7l9m 1/1 Running 3 3d22h coredns-x74ln 1/1 Running 3 3d22h coredns-x7znz 1/1 Running 3 3d22h - Verify that a storageclass was created:
$ oc get storageclass
NAME                          PROVISIONER                    RECLAIMPOLICY   VOLUMEBINDINGMODE      ALLOWVOLUMEEXPANSION   AGE
ibm-spectrum-scale-internal   kubernetes.io/no-provisioner   Delete          WaitForFirstConsumer   false                  4d
ibm-spectrum-scale-sample     spectrumscale.csi.ibm.com      Delete          Immediate              true                   2d21h
- Verify that the Operator has created the cluster by checking the
pods:
- Access the IBM Storage Scale container native GUI
You can manage and monitor cluster and node information through the IBM Storage Scale container native GUI. Users who are created on the Red Hat OpenShift Container Platform having a role of
ibm-spectrum-scale-maintenanceoribm-spectrum-scale-monitorcan log in to the IBM Storage Scale container native GUI through Single Sign On using the OAuth implementation. See IBM Storage Scale container native GUI for more information.$ oc adm policy add-cluster-role-to-user <role> <user> $ oc adm policy add-cluster-role-to-group <role> <group>- In a browser, go to https://ibm-spectrum-scale-gui-ibm-spectrum-scale.apps.<ocp-domain>/, where
<ocp-domain>is the domain of your Red Hat OpenShift cluster. There, you should see the login page for IBM Storage Scale GUI. - If your Red Hat OpenShift domain is
ocp4.example.com, the URL would be https://ibm-spectrum-scale-gui-ibm-spectrum-scale.apps.ocp4.example.com. - Click Sign in and you are redirected to the Red Hat OpenShift login page. Authenticate by using
your OpenShift Container Platform user credentials. On success, you are redirected to the IBM
Storage Scale GUI.Note: You can also log in to the IBM Storage Scale container native GUI as Openshift cluster administrator kubeadmin.
Figure 1. IBM Storage Scale container native GUI 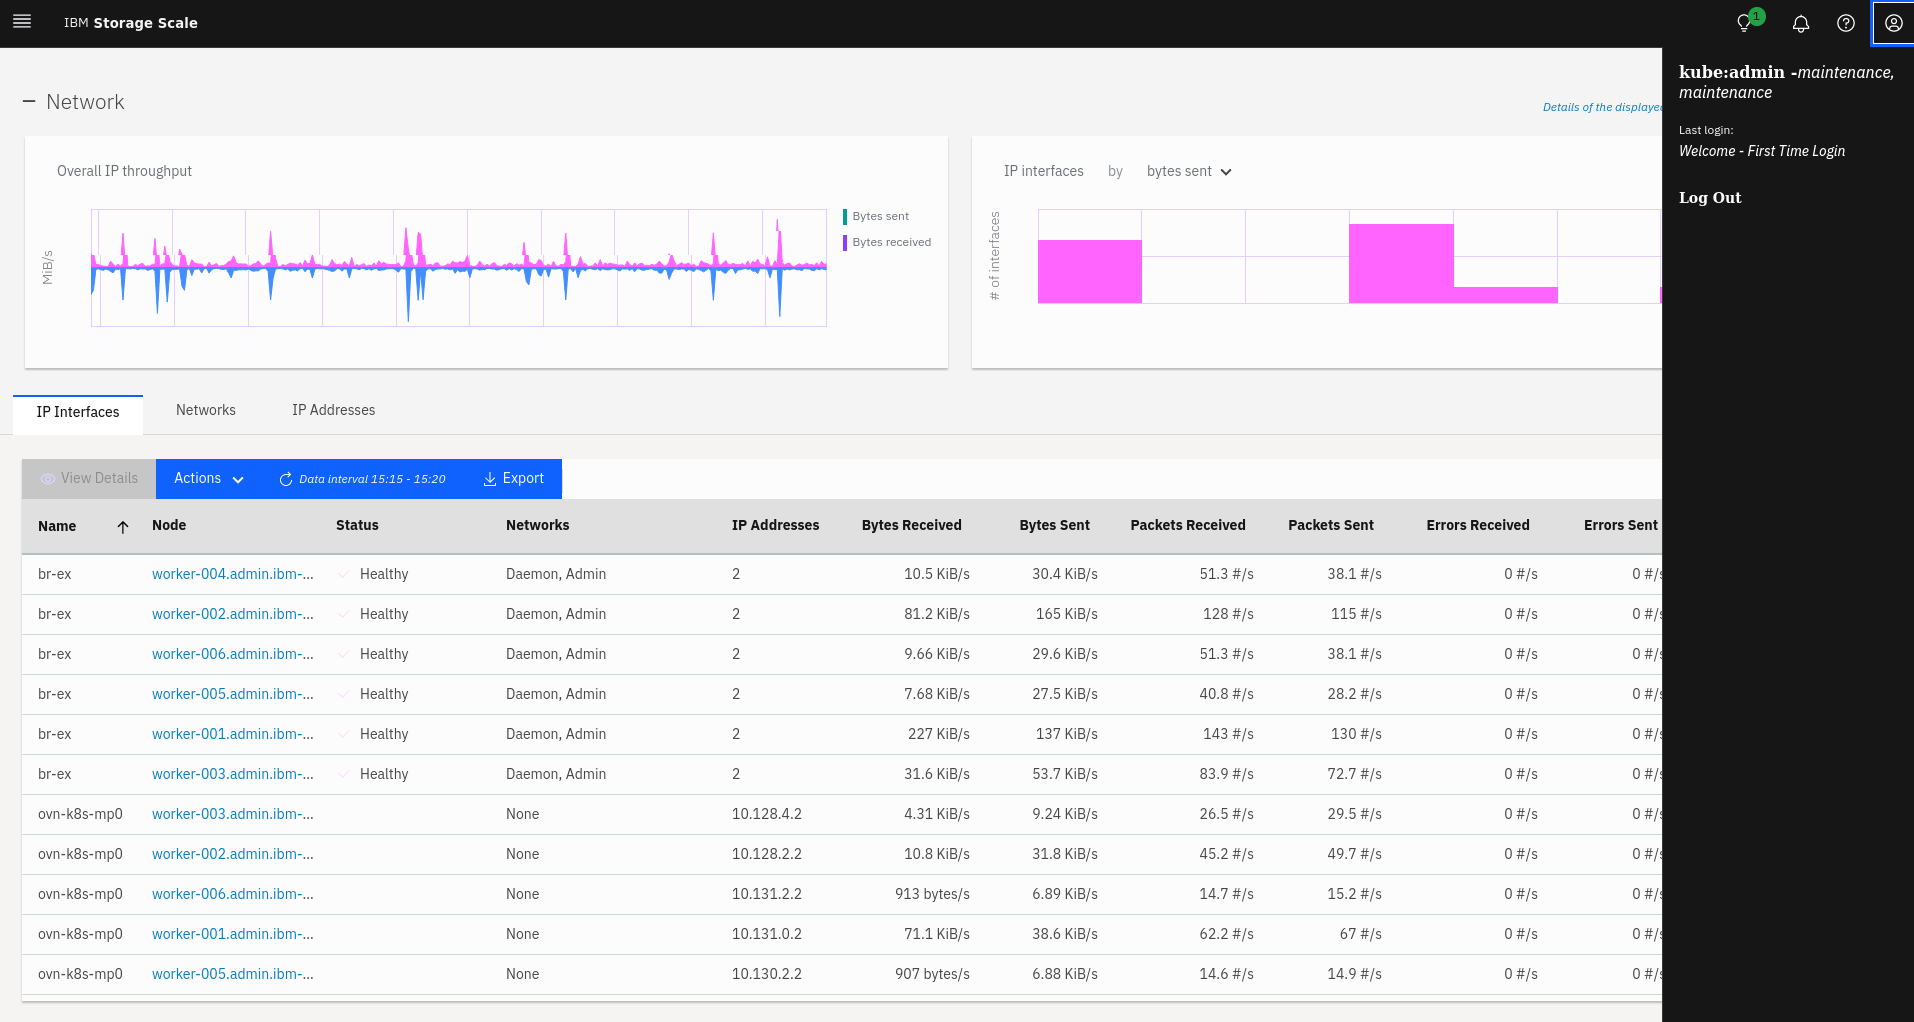
- In a browser, go to https://ibm-spectrum-scale-gui-ibm-spectrum-scale.apps.<ocp-domain>/, where