POWER7 information

Replacing the 8202-E4B, 8202-E4C, 8202-E4D, 8205-E6B, 8205-E6C, or 8205-E6D vital product data card

Learn how to replace the vital product data (VPD) card.

To complete this procedure, you must have already completed the removal procedure. For the removal procedure instructions, see Removing the 8202-E4B, 8202-E4C, 8202-E4D, 8205-E6B, 8205-E6C, or 8205-E6D vital product data card.

If your system is managed by the Hardware Management Console (HMC), use the HMC to replace a VPD card. For instructions, see Replacing a part by using the HMC.

If your system is managed by the IBM® Systems Director Management Console (SDMC), use the SDMC to replace a VPD card. For instructions, see Replacing a part by using the SDMC.

If you do not have an HMC or SDMC, complete the following steps to replace the VPD card:

Attention:
  • Attach a wrist strap to an unpainted metal surface of your hardware to prevent electrostatic discharge from damaging your hardware.
  • When using a wrist strap, follow all electrical safety procedures. A wrist strap is for static control. It does not increase or decrease your risk of receiving electric shock when using or working on electrical equipment.
  • If you do not have a wrist strap prior to removing the product from ESD packaging and installing or replacing hardware, touch an unpainted metal surface of the system for a minimum of 5 seconds.
Note: If you plan to replace the VPD card and have the replacement card, you can contact the following email address from 8 a.m. to 5 p.m. US Central Time, Monday to Friday, to obtain replacement activation codes prior to repair. You must supply the machine type and serial number, and the part number and serial number of the replacement VPD card. If you use the AIX® or Linux operating systems, contact pcod@us.ibm.com. If you use the IBM i operating system, contact icod@us.ibm.com.
  1. Install the VPD card.
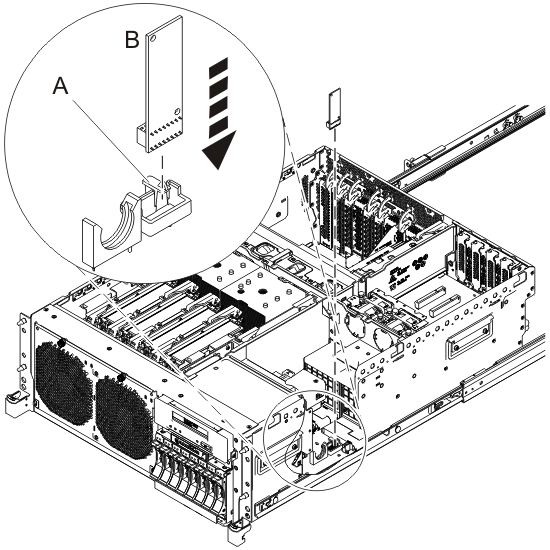
    1. Press on the handle (A) to insert the VPD card (B) into its slot on the system backplane. See Figure 1
    2. Push the VPD card into place until it is fully seated.
    Figure 1. Installing the VPD card
    Installing the VPD card
  2. When replacing the VPD card, if you have moved the optional tape drive out of the way during VPD removal, slide the tape drive back into place after installing the VPD card.
  3. Replace the service access cover:
  4. Place the system in the operating position. For a rack-mounted system, see Placing the rack-mounted 8202-E4B, 8202-E4C, 8202-E4D, 8205-E6B, 8205-E6C, or 8205-E6D system into the operating position.
  5. Install the power cords.
    If you removed the power cords, install the power cords by completing following steps:
    1. Identify the system unit you are servicing in the rack.
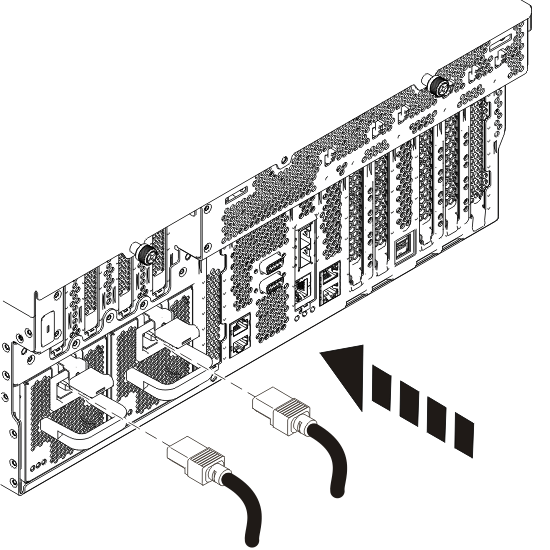
    2. Connect all power cords to the unit you are servicing.
      Figure 2. Installing power cords
      Installing power cords
    3. Close the rear rack door.
  6. When the service processor comes up to the standby state (the power-on LED on the control panel is flashing slowly), continue to the next step.
  7. Access the ASMI.

    If you are already connected to the ASMI, go to the next step.

    • To access the ASMI through the HMC, complete the following steps:
      1. Select the server that you are working with.
      2. Click Tasks.
      3. Click Operations > Launch Advanced System Management (ASM).
    • To access the ASMI through the SDMC, complete the following steps:
      1. Select the server that you are working with.
      2. Click Actions > Operations > Launch Advanced System Management (ASM).
  8. Set the system identifiers and the activation codes for the Capacity on Demand (CoD) and Virtualization Engine technologies:
    Note: To perform this operation, your authority level must be administrator or authorized service provider.
    1. In the ASM Welcome pane, if you have not already logged in, specify your user ID and password, and click Log In.
    2. In the navigation area, expand System Configuration > Program Vital Product Data.
    3. Click System Brand.
      Note: If you do not know the correct system brand, contact your next level of support.
    4. If the backed up system brand is correct, click Accept backed up setting and save the settings. Otherwise, enter the correct system brand and click Continue.
    5. Click Save setting to update the system brand to the VPD.
    6. Click System Keywords.
      Note: If you do not know the system unique ID, contact your next level of support. You cannot boot the system until valid values are entered for all fields. You can change these entries only once.
    7. If the backed-up system keywords are correct, click Accept backed up setting and save the settings. Otherwise, enter the values for the machine type, model number, system serial number, system unique ID and RB Keyword.
    8. Click Save settings to update the system keywords and to save them to the VPD.
    9. Update the field core override value if necessary. Ask the customer if they are overriding any processor cores, if so, see Field core override function overview.
    10. Start the system or logical partition. See Starting the system or logical partition.
    11. In the ASMI navigation panel, expand On demand Utilities > CoD Activation. Enter the CoD code and click Continue to write the CoD code to VPD.


Send feedback Rate this page

Last updated: Fri, April 08, 2016