Configuring pipeline components
Configure the components of your pipeline to specify inputs and to create outputs as part of your pipeline.
Beta notice: The Watson Studio Pipelines service is provided as a Beta, solely for purposes of testing and providing feedback to IBM prior to general availability. It is not intended for production use. You can download this service from the Watson Studio Pipelines Early Access Site.
Specifying the Cloud Pak for Data scope
By default, the scope for a pipeline is the project containing the pipeline. You can explicitly specify a scope other than the default, to locate an asset used in the pipeline. The scope is the project, catalog, or space containing the asset. From the user interface, you can browse for the scope. In a notebook, specify the scope as part of the path to an asset, as follows:
[cpd://]/(projects|spaces|catalogs)/<scope-id>/<resource-type>/<resource-ID>
where:
- context is the URL for the cluster or server where you access Cloud Pak for Data.
- scope is the project, space, or catalog containing the asset
- asset can be identified with the asset name or asset ID
Changing the input mode
When you are configuring a node, you can specify any resources including data and notebooks in various ways, such as directly entering a name or ID, browsing for an asset, or by using the output from a prior node in the pipeline to populate a field. To see what options are available for a field, click the input icon for the field. Depending on the context, options can include:
- Select resource: use the asset browser to find an asset such as a data file.
- Assign pipeline parameter: assign a value by using a variable configured with a pipeline parameter. For more information, see Configuring global objects.
- Select from another node: use the output from a node earlier in the pipeline as the value for this field.
- Enter expression: enter code to assign values or identify resources. For details, see Coding elements.
Configure the following types of pipeline components:
Copy
Use Copy nodes to add assets to your pipeline or to export pipeline assets.
- Copy assets
- Export assets
- [Import assets]
Copy assets
Copy selected assets from a project or space to a non-empty space. You can copy these assets to a space:
- Data asset
- Model
- ML Pipeline
- Function
- Connection
- Software specification
- Data Refinery flow
- Environment
- Script
Input parameters
| Parameter | Description |
|---|---|
| Source assets | Browse or search for the source asset to add to the list. You can also specify an asset with a pipeline parameter, with the output of another node, or by entering the asset ID |
| Target | Browse or search for the target space |
| Copy mode | Choose how to handle a case where the flow tries to copy an asset and one of the same name exists. One of: ignore, fail, overwrite |
Output parameters
| Parameter | Description |
|---|---|
| Output assets | Path to the file for the copied assets |
Export assets
Export selected assets from the scope, for example, a project or deployment space. The operation exports all the assets by default. You can limit asset selection by building a list of resources to export.
Input parameters
| Parameter | Description |
|---|---|
| Assets | Path to project, catalog, or space. You can export all exportable items or create a list of specific items |
| Source project or space | Name of project or space containing the assets to export |
| Exported file | File location for storing the export file |
| Creation mode (optional) | Choose how to handle a case where the flow tries to create an asset and one of the same name exists. One of: ignore, fail, overwrite |
Output parameters
| Parameter | Description |
|---|---|
| Exported file | Path to exported file |
Notes:
- If you export a project that contains a notebook, the latest version of the notebook is included in the export file. If the Pipeline configured with the Run notebook node was configured to use a different notebook version other than the latest version, the exported Pipeline is automatically reconfigured to use the latest version when imported. This might produce unexpected results or require some reconfiguration following the import.
- If assets are self-contained in the exported project, they are retained when importing new project. Otherwise, some configuration might be required following an import of exported assets.
Import Assets
Import assets from the exported location.
Input parameters
| Parameter | Description |
|---|---|
| Path to import target | Browse or search for the assets to import |
| Archive file to import | Specify the path to a ZIP file or archive |
Notes: After you import a file, paths and references to the imported assets are updated, following these rules:
- References to assets from the exported project or space are updated in the new project or space after the import.
- If assets from the exported project refer to external assets (included in a different project), the reference to the external asset will persist after the import.
- If the external asset no longer exists, the parameter is replaced with an empty value and you have to reconfigure the field to point to a valid asset.
Send
Communicate with other users about events in your pipeline.
Send email
Send email to notify recipients about an event in a pipeline. Provide a string of comma-separated addresses. Input the subject, body, and attachments.
Prerequisites
- Users must configure their user preferences to receive emails.
- SMTP service must be configured on the Cloud Pak for Data cluster. For details, see Enabling email notifications. Note that you must configure an admin for SMTP before completing the mail setup.
Input parameters
| Parameter | Description |
|---|---|
| Recipient input type | Input users as a list or as a string. |
| Recipient email addresses | List of recipients emails. Enter in prefix@domain format |
| Email subject | Title for the message |
| Attachments (optional) | Optionally, attach a document to the message |
| Email body | Message text you want to send |
| Error policy (optional) | Optionally, override the default error policy for the node |
Output parameters
| Parameter | Description |
|---|---|
| Execution status | Returns a value of: Completed, Completed with warnings, Completed with errors, Failed, or Canceled |
| Status message | Message associated with the status |
Create
Configure the nodes for creating assets in your pipeline.
Create AutoAI experiment
Use this component to train an AutoAI experiment and generate model-candidate pipelines.
Input parameters
| Parameter | Description |
|---|---|
| AutoAI experiment name | Name of the new experiment |
| Scope | A project or a space, where the pipeline is going to be created |
| Prediction type | The type of model for the given data: binary, classification, or regression |
| Prediction column (label) | The prediction column name |
| Positive class (optional) | Specify a positive class for a binary classification experiment |
| Training data split ratio (optional) | The percentage of data to hold back from training and use to test the pipelines(float: 0.0 - 1.0) |
| Algorithms to include (optional) | Limit the list of estimators to be used (the list depends on the learning type) |
| Algorithms to use | Specify the list of estimators to be used (the list depends on the learning type) |
| Optimize metric (optional) | The metric used for model ranking |
| Hardware specification (optional) | Specify a hardware specification for the experiment |
| AutoAI experiment description | Description of the experiment |
| AutoAI experiment tags (optional) | Tags to identify the experiment |
| Creation mode (optional) | Choose how to handle a case where the pipeline tries to create an experiment and one of the same name exists. One of: ignore, fail, overwrite |
Output parameters
| Parameter | Description |
|---|---|
| AutoAI experiment | Path to the saved model |
Create batch deployment
Use this component to create a batch deployment
Input parameters
| Parameter | Description |
|---|---|
| ML asset | Name or ID of the machine learning asset to deploy |
| New deployment name (optional) | Name of the new job, with optional description and tags |
| Creation mode (optional) | How to handle a case where the pipeline tries to create a job and one of the same name exists. One of: ignore, fail, overwrite |
| New deployment description (optional) | Description of the deployment |
| New deployment tags (optional) | Tags to identify the deployment |
| Hardware specification (optional) | Specify a hardware specification for the job |
Output parameters
| Parameter | Description |
|---|---|
| New deployment | Path of the newly created deployment |
Create data asset
Use this component to create a data asset.
Input parameters
| Parameter | Description |
|---|---|
| File | Path to file in a file storage |
| Target scope | Path to the target space or project |
| Name (optional) | Name of the data source with optional description, country of origin, and tags |
| Description (optional) | Description for the asset |
| Origin country (optional) | Origin country for data regulations |
| Tags (optional) | Tags to identify assets |
| Creation mode | How to handle a case where the pipeline tries to create a job and one of the same name exists. One of: ignore, fail, overwrite |
Output parameters
| Parameter | Description |
|---|---|
| Data asset | The newly created data asset |
Create deployment space
Use this component to create and configure a space that you can use to organize and create deployments:
Input parameters
| Parameter | Description |
|---|---|
| New space name | Name of the new space with optional description and tags |
| New space tags (optional) | Tags to identify the space |
| New space COS instance CRN | CRN of the COS service instance |
| New space WML instance CRN (optional) | CRN of the Watson Machine Learning service instance |
| Creation mode (optional) | How to handle a case where the pipeline tries to create a space and one of the same name exists. One of: ignore, fail, overwrite |
| Space description (optional) | Description of the space |
Output parameters
| Parameter | Description |
|---|---|
| Space | CPD Path of the newly created space |
Create web service
Use this component to create an online deployment where you can submit test data directly to a web service REST API endpoint.
Input parameters
| Parameter | Description |
|---|---|
| ML asset | Name or ID of the machine learning asset to deploy |
| New deployment name (optional) | Name of the new job, with optional description and tags |
| Creation mode (optional) | How to handle a case where the pipeline tries to create a job and one of the same name exists. One of: ignore, fail, overwrite |
| New deployment description (optional) | Description of the deployment |
| New deployment tags (optional) | Tags to identify the deployment |
| Hardware specification (optional) | Specify a hardware specification for the job |
Output parameters
| Parameter | Description |
|---|---|
| New deployment | CPD Path of the newly created deployment |
Wait
Use nodes in this section to pause a pipeline until an asset is available in the location specified in the path.
Wait for all results
Use this node to wait until all results from the previous nodes in the pipeline are available so the pipeline can continue.
This node takes no inputs and produces no output. When the results are all available, the pipeline continues automatically.
Wait for any results
Use this node to wait until any result from the previous nodes in the pipeline is available so the pipeline can continue. Run the downstream nodes as soon as any of the upstream conditions have been met.
This node takes no inputs and produces no output. When any results are available, the pipeline continues automatically.
Wait for file
Wait for an asset to be created or updated in the location that is specified in the path from a job or process earlier in the pipeline. Specify a timeout length to wait for the condition to be met. If 00:00:00 is the specified timeout length, the flow waits indefinitely.
Input parameters
| Parameter | Description |
|---|---|
| File location | Specify the location in the asset browser where the asset resides. Use the format data_asset/filename where the path is relative to the root. The file must exist and be in the location you specify or the node fails with an error. |
| Wait mode | By default the mode is for the file to appear. You can change to waiting for the file to disappear |
| Timeout length (optional) | Specify the length of time to wait before proceeding with the pipeline. Use the format hh:mm:ss |
| Error policy (optional) | See Handling errors |
Output parameters
| Parameter | Description |
|---|---|
| Return value | Return value from the component |
| Execution status | Returns a value of: Completed, Completed with warnings, Completed with errors, Failed, or Canceled |
| Status message | Message associated with the status |
Control
Control the pipeline by adding error handling and logic.
Loops
Loops are a node in a Pipeline that operates like a coded loop.
There are two types of loops: parallel and sequential.
You can use loops when the number of iterations for an operation is dynamic. For example, if you don't know the number of notebooks to process, or you want to choose the number of notebooks at run time, you can use a loop to iterate through the list of notebooks.
You can also use a loop to iterate through the output of a node or through elements in a data array.
Loop in parallel
Add a parallel looping construct to the pipeline. A parallel loop runs the iterating nodes independently and possibly simultaneously.
For example, to train a machine learning model with a set of hyperparameters to find the best performer, you can use a loop to iterate over a list of hyperparameters to use for training the notebook variations in parallel. The results can be compared later in the flow to find the best notebook. To see limits on the number of loops you can run simultaneously, see Limitations.
In the following example, a Run Bash script node searches for and retrieves notebooks that match specified criteria. A Run DataStage flow node retrieves data from a Git repository. When input from each node is available, the loop process begins, running each notebook retrieved by the search and processing the data retrieved from the Git repository.
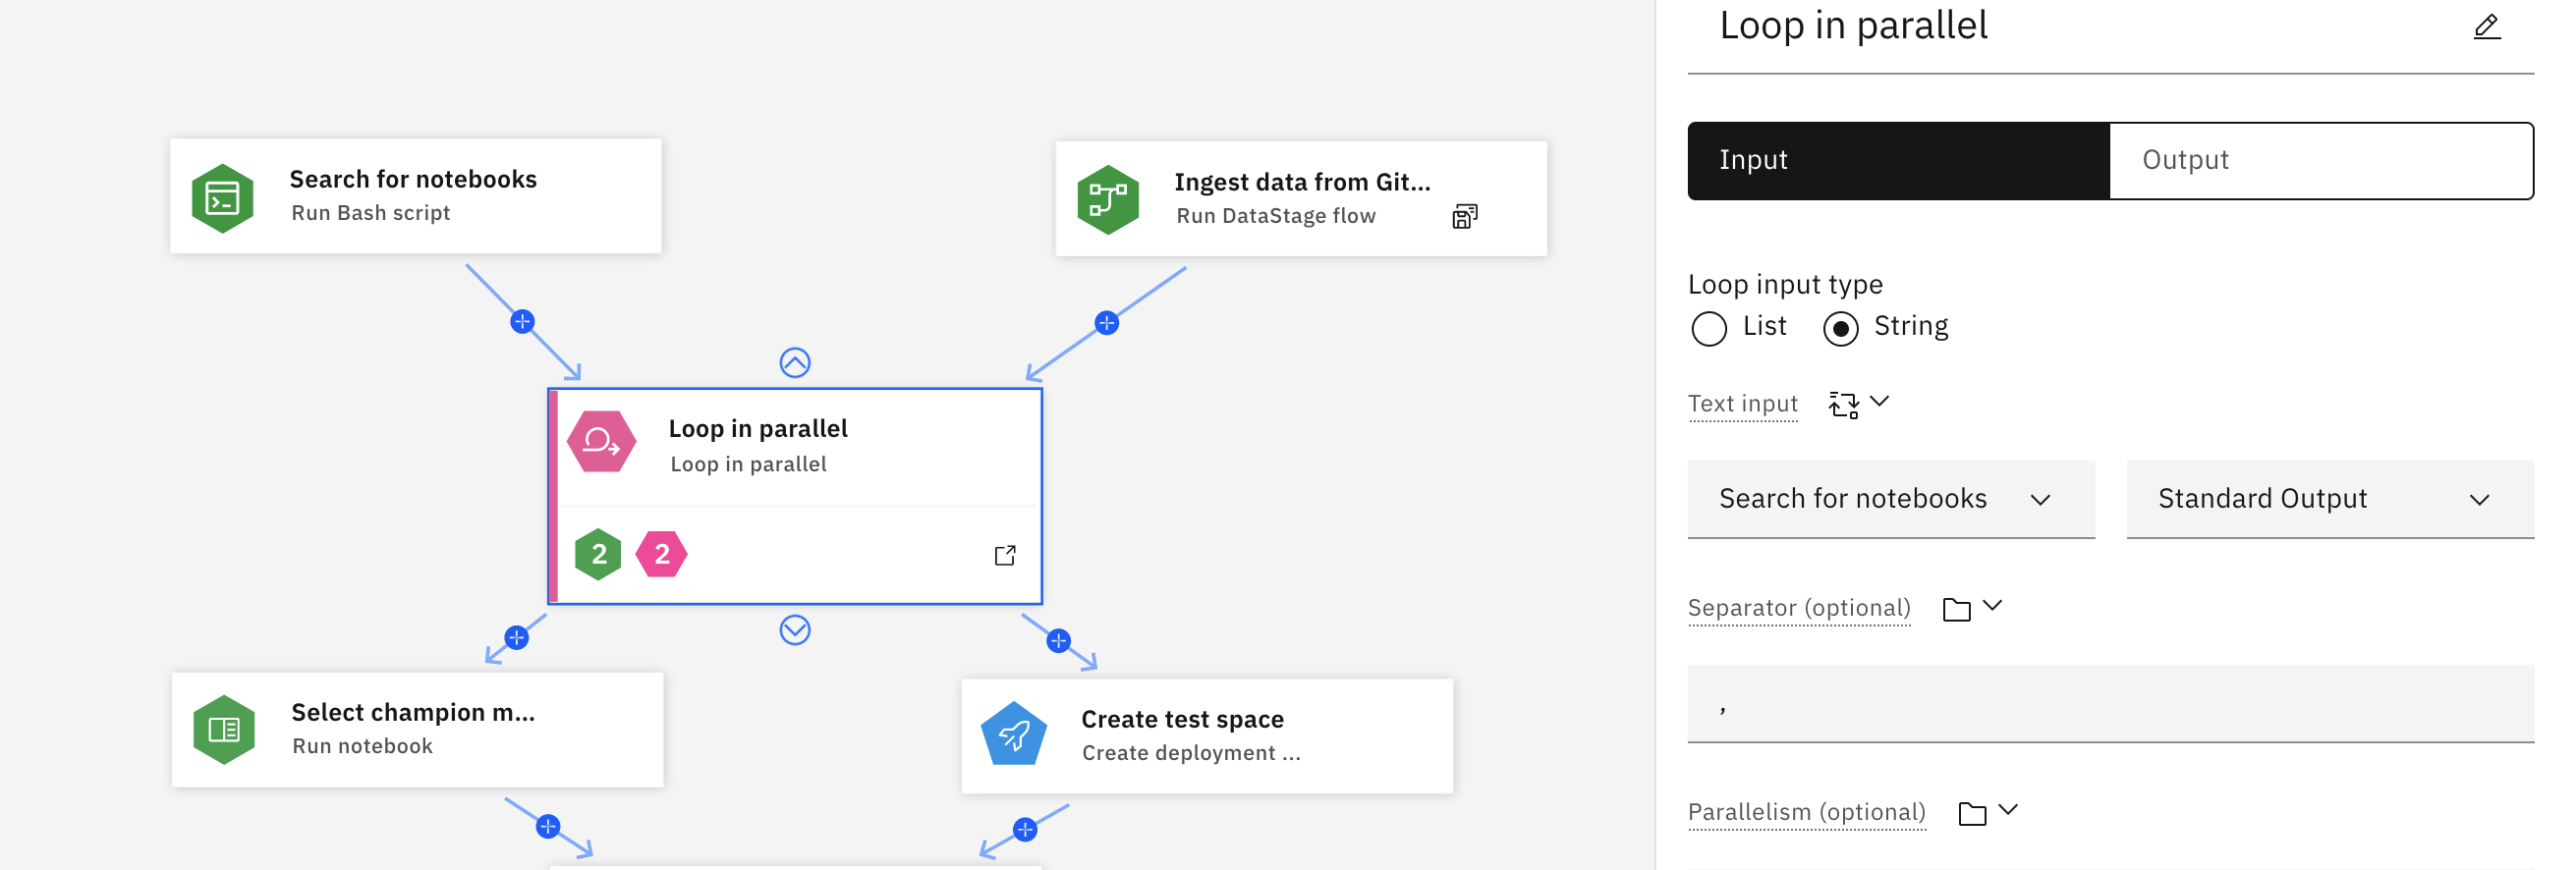
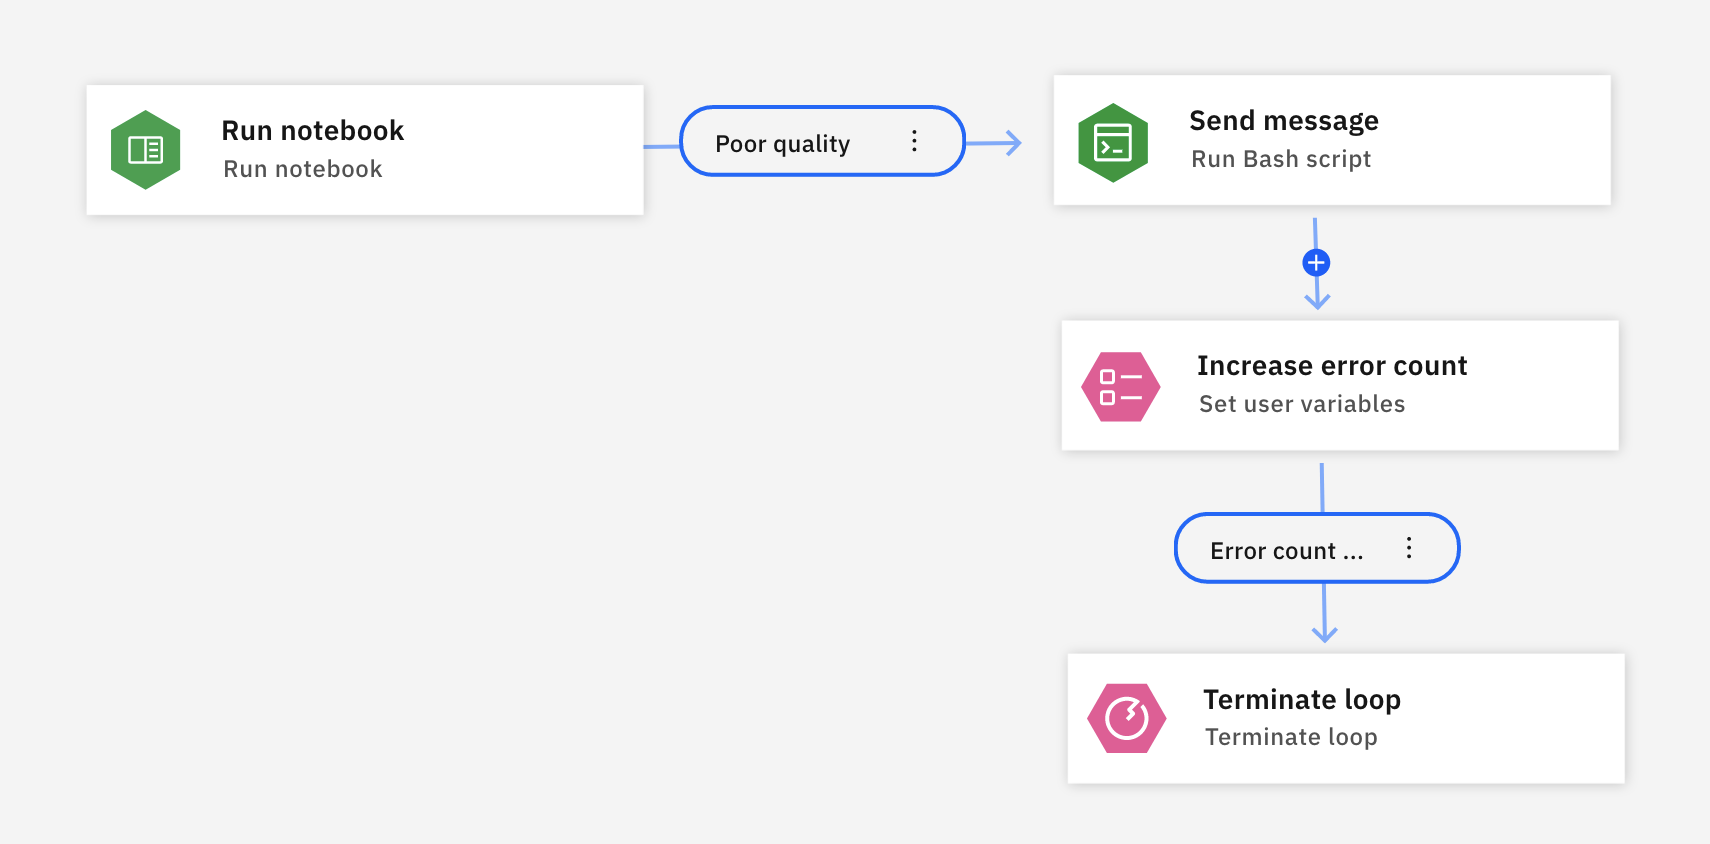
If you click the lower part of the node where the green and pink badges are, it displays the full loop process. The colored badges summarize the types of nodes that are in the loop. As the notebooks run, any errors in the notebook is captured in a condition called Poor quality. The condition triggers a Bash script to increment a user variable named Increase error count. When the value of the Increase error count variable meets the specified threshold, the loop is terminated.
Since the flow is executed in parallel for each notebook, it will return results faster than a sequential loop.
Input parameters
| Parameter | Description |
|---|---|
| List input | List literal that the loop iterates over or a standard link to pipeline input or pipeline output |
| Parallelism | Maximum number of tasks to be run simultaneously. Must be greater than zero |
| Parameter | Description |
|---|---|
| Text input | Text data that the loop reads from |
| Separator | A char used to split the text |
| Parallelism (optional) | Maximum number of tasks to be run simultaneously. Must be greater than zero |
If the input arrays element type is JSON or any type that is represented as such, this field might decompose it as dictionary. Keys are the original element keys and values are the aliases for output names.
Loop in sequence
Add a sequential loop construct to the pipeline. Iterates over the given range in range, for example 1 - 100 by 4 and perform action like: invoke notebook, script, or other flow per iteration. Loops can iterate over a numeric range, a list, or text with a delimiter. Define a subpipeline flow inside the loop to run until the loop is complete.
A use case for sequential loops is if you want to try an operation 3 times before determining whether an operation has failed.
Input parameters
| Parameter | Description |
|---|---|
| List input | List literal that the loop iterates over or a standard link to pipeline input or pipeline output |
| Parameter | Description |
|---|---|
| Text input | Text data that the loop reads from |
| Separator | A char used to split the text |
| Parameter | Description |
|---|---|
| Start | The integer that the loop begins its counter |
| Step (optional) | The increment of the counter for each loop. If unspecified, default is 1. |
| End | The integer that the loop ends when counter reaches |
Set user variables
Configure a user variable with a key/value pair, then add the list of dynamic variables for this node.
For details on creating a user variable, see Configuring global objects.
Input parameters
| Parameter | Description |
|---|---|
| Name | Enter the name, or key, for the variable |
| Input type | Choose Expression or Pipeline parameter as the input type. |
- For expressions, use the built-in Expression Builder to create a variable that results from a custom expression.
- For pipeline parameters, assign a pipeline parameter and use the parameter value as input for the user variable.
Terminate pipeline
You can initiate and control the termination of a pipeline with a Terminate pipeline node from the Control category. When the error flow runs, you can optionally specify how to handle notebook or training jobs that were initiated by components in the pipeline. You must specify whether to wait for jobs to finish, cancel the jobs then stop the pipeline, or just stop everything without canceling. Specify the options for the Terminate pipeline node.
Input parameters
| Parameter | Description |
|---|---|
| Terminator mode (optional) | Choose the behavior for the error flow |
Terminator mode can be:
- Terminate pipeline run and all running jobs stops all jobs and stops the pipeline.
- Cancel all running jobs then terminate pipeline cancels any running jobs before stopping the pipeline.
- Terminate pipeline run after running jobs finish waits for running jobs to finish, then stops the pipeline.
- Terminate pipeline that is run without stopping jobs stops the pipeline but allows running jobs to continue.
Update
Use update components to replace or update assets to improve performance. For example, if you want to standardize your tags, you can update to replace a tag with a new tag.
Update AutoAI experiment
Update the training details for an AutoAI experiment.
Input parameters
| Parameter | Description |
|---|---|
| AutoAI experiment | Path to a project or a space, where the experiment resides |
| AutoAI experiment name (optional) | Name of the experiment to be updated, with optional description and tags |
| AutoAI experiment description (optional) | Description of the experiment |
| AutoAI experiment tags (optional) | Tags to identify the experiment |
Output parameters
| Parameter | Description |
|---|---|
| AutoAI experiment | CPD Path of the updated experiment |
Update batch deployment
Use these parameters to update a batch deployment.
Input parameters
| Parameter | Description |
|---|---|
| Deployment | Path to the deployment to be updated |
| New name for the deployment (optional) | Name or ID of the deployment to be updated |
| New description for the deployment (optional) | Description of the deployment |
| New tags for the deployment (optional) | Tags to identify the deployment |
| ML asset | Name or ID of the machine learning asset to deploy |
| Hardware specification | Update the hardware specification for the job |
Output parameters
| Parameter | Description |
|---|---|
| Deployment | CPD Path of the updated deployment |
Update deployment space
Update the details for a space.
Input parameters
| Parameter | Description |
|---|---|
| Space | Path of the existing space |
| Space name (optional) | Update the space name |
| Space description (optional) | Description of the space |
| Space tags (optional) | Tags to identify the space |
| WML Instance (optional) | Specify a new Machine Learning instance |
Output parameters
| Parameter | Description |
|---|---|
| Space | CPD Path of the updated space |
Update web service
Use these parameters to update a web service (online deployment).
Input parameters
| Parameter | Description |
|---|---|
| Deployment | Path of the existing deployment |
| Deployment name (optional) | Update the deployment name |
| Deployment description (optional) | Description of the deployment |
| Deployment tags (optional) | Tags to identify the deployment |
| Asset (optional) | Machine learning asset (or version) to be redeployed |
Output parameters
| Parameter | Description |
|---|---|
| Deployment | CPD Path of the updated deployment |
Delete
Configure parameters for delete operations. You can delete:
- AutoAI experiment
- Batch deployment
- Deployment space
- Web service
For each item, choose the asset for deletion.
Run
Use these nodes to train an experiment, execute a script, or run a data flow.
- Run AutoAI Experiment
- Run Bash script
- Run batch deployment
- Run DataStage flow
- Run Data refinery flow
- Run notebook
- Run pipeline
Run AutoAI Experiment
Trains and stores AutoAI experiment pipelines and models.
Input parameters
| Parameter | Description |
|---|---|
| AutoAI experiment | Browse for the ML Pipeline asset or get the experiment from a pipeline parameter or the output from a previous node. |
| Training data assets | Browse or search for the data to train the experiment. Note that you can supply data at runtime by using a pipeline parameter |
| Models count (optional) | Specify how many models to save from best performing pipelines. The limit is 3 models |
| Run name (optional) | Name of the experiment and optional description and tags |
| Model name prefix (optional) | Prefix used to name trained models. Defaults to <(experiment name)> |
| Run description (optional) | Description of the new training run |
| Run tags (optional) | Tags for new training run |
| Creation mode (optional) | Choose how to handle a case where the pipeline flow tries to create an asset and one of the same name exists. One of: ignore, fail, overwrite |
| Error policy (optional) | Optionally, override the default error policy for the node |
Output parameters
| Parameter | Description |
|---|---|
| Models | List of paths of top N trained and persisted model (ordered by selected evaluation metric) |
| Best model | path of the winning model (based on selected evaluation metric) |
| Model metrics | a list of trained model metrics (each item is a nested object with metrics like: holdout_accuracy, holdout_average_precision, ...) |
| Winning model metric | elected evaluation metric of the winning model |
| Optimized metric | Metric used to tune the model |
| Execution status | Information on the state of the job: pending, starting, running, completed, canceled, or failed with errors |
| Status message | Information about the state of the job |
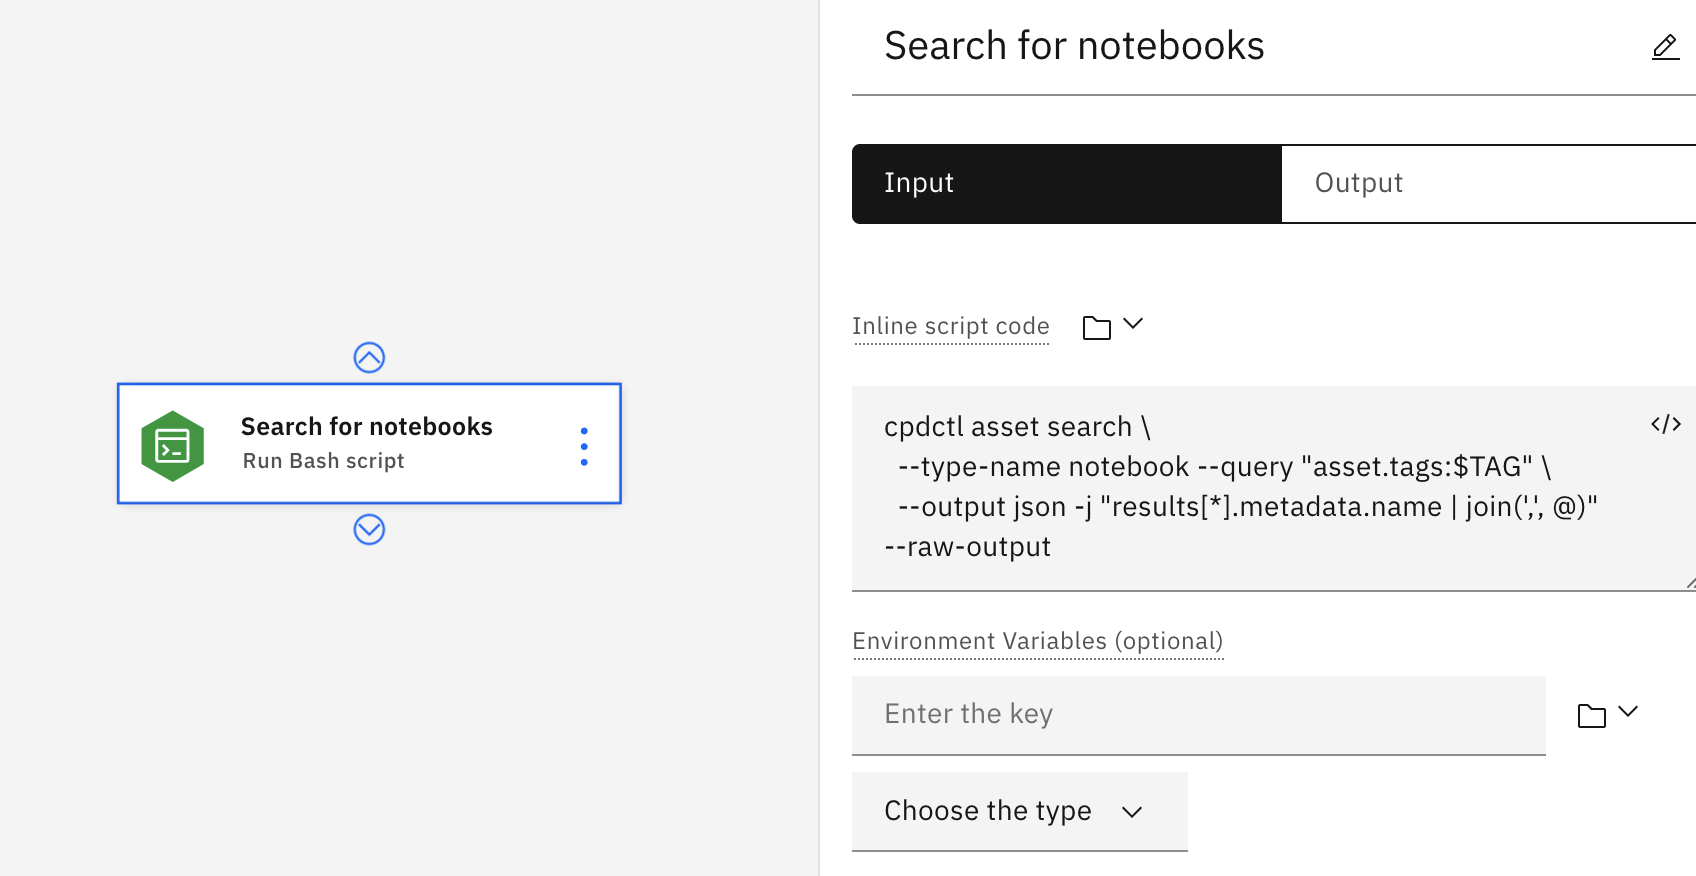
Run Bash script
Run an inline Bash script to automate a function or process for the pipeline. You can enter the Bash script code manually, or you can import the bash script from a resource, pipeline parameter, or the output of another node.
In the following example, the user entered the inline script code manually. The script uses the cpdctl tool to search all notebooks with a set variable tag and aggregates the results in a JSON list. The list can then be used in another
node, such as running the notebooks returned from the search.
Input parameters
| Parameter | Description |
|---|---|
| Inline script code | Enter a Bash script in the inline code editor. Optional: Alternatively, you can select a resource, assign a pipeline parameter, or select from another node. |
| Environment variables (optional) | Specify a variable name (the key) and a data type and add to the list of variables to use in the script. |
| Error policy (optional) | Optionally, override the default error policy for the node |
Output parameters
| Parameter | Description |
|---|---|
| Output variables | Configure a key/value pair for each custom variable, then click the Add button to populate the list of dynamic variables for the node |
| Return value | Return value from the component |
| Standard output | Standard output from the script |
| Execution status | Information on the state of the job: pending, starting, running, completed, canceled, or failed with errors |
| Status message | Message associated with the status |
Run batch deployment
Configure this component to run selected deployment jobs.
Input parameters
| Parameter | Description |
|---|---|
| Deployment | Browse or search for the deployment |
| Input data assets | Specify the data used for the batch job |
| Output data asset | Name of the output file for the results of the batch job |
| Hardware specification (optional) | Browse for a hardware specification to apply for the job |
| Error policy (optional) | Optionally, override the default error policy for the node |
Output parameters
| Parameter | Description |
|---|---|
| Output asset | Path to the file with results from the deployment job |
| Execution status | Information on the state of the job: pending, starting, running, completed, canceled, or failed with errors |
| Status message | Information about the state of the job |
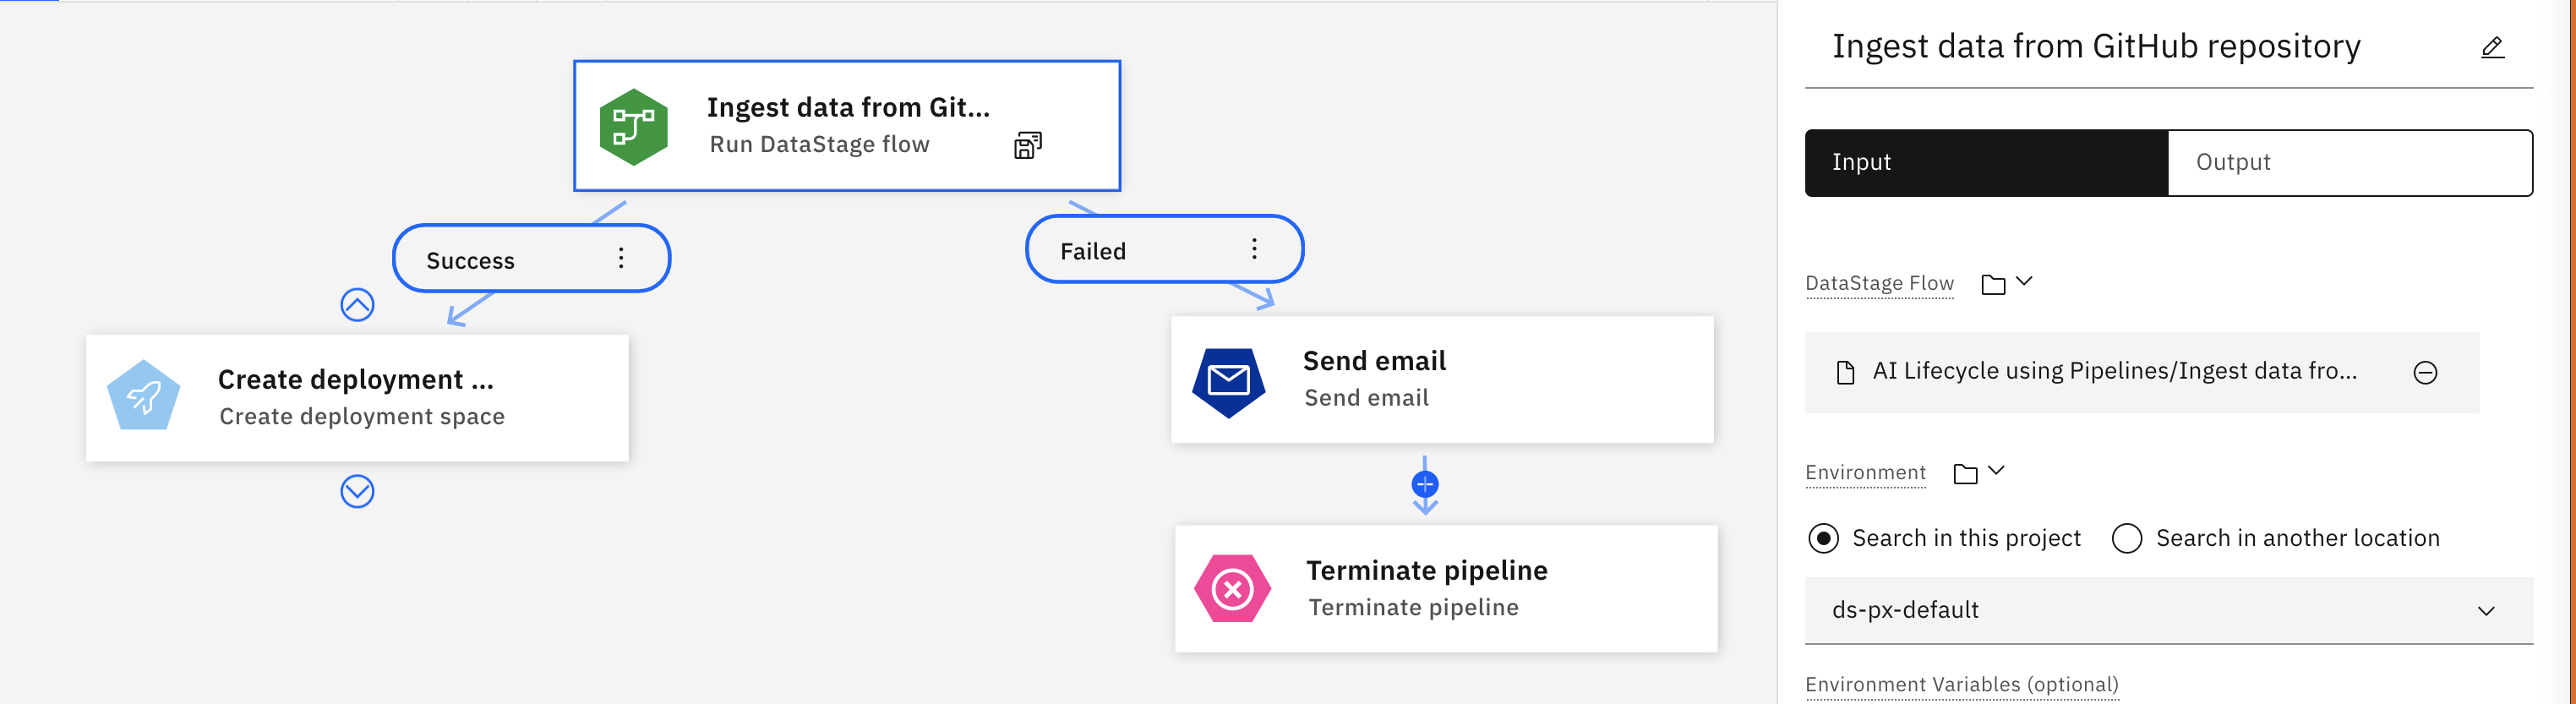
Run DataStage flow
IBM DataStage is a data integration tool for designing, developing, and running jobs that move and transform data. Run a DataStage flow and use the output in a later node. For details on building a DataStage pipeline, see Orchestrating flows with Watson Pipelines.
For example, the following flow shows a Run DataStage node that retrieves and runs a flow from a Git repository. If the flow completes successfully, the pipeline executes the next node and creates a deployment space. If the flow fails, a notification email is triggered, and the loop is terminated.
| Parameter | Description |
|---|---|
| DataStage flow | Specify the flow to run |
| Environment | Find and select the environment used to run the DataStage flow |
| Environment variables (optional) | Specify a variable name (the key) and a data type and add to the list of variables to use in the flow |
| Job parameters (optional) | Additional parameter to pass to the flow when it runs. Specify a key/value pair and add to the list |
| Error policy (optional) | Optionally, override the default error policy for the node |
Output parameters
| Parameter | Description |
|---|---|
| Job | Path to the results from the DataStage job |
| Job run | Information about the job run |
| Job name | Name of the job |
| Execution status | Information on the state of the flow: pending, starting, running, completed, canceled, or failed with errors |
| Status message | Information about the state of the flow |
Run Data Refinery Flow
This component runs a specified Data Refinery flow.
Input parameters
| Parameter | Description |
|---|---|
| Data-refinery flow | Name or ID of the Data Refinery flow asset |
| Environment | Path of the environment used to run the flow |
| Error policy (optional) | Optionally, override the default error policy for the node |
Output parameters
| Parameter | Description |
|---|---|
| Output asset | Path to the results from the Data Refinery job |
| Execution status | Information on the state of the flow: pending, starting, running, completed, canceled, or failed with errors |
| Status message | Information about the state of the flow |
Run Notebook
Use these configuration options to specify how to run a Jupyter Notebook in a pipeline.
Input parameters
| Parameter | Description |
|---|---|
| Notebook | Path of the notebook asset. The path cannot be to a notebook in a space |
| Environment | Path of the environment used to run the notebook |
| Environment variables (optional) | List of environment variables used to run the notebook |
| Error policy (optional) | Optionally, override the default error policy for the node |
Notes:
- Environment variables you define in a pipeline cannot be used for notebook jobs you run outside of Watson Studio Pipelines.
- You cannot run notebooks from a space.
Output parameters
| Parameter | Description |
|---|---|
| Output variables | Configure a key/value pair for each custom variable, then click Add to populate the list of dynamic variables for the node |
| Execution status | Information on the state of the run: pending, starting, running, completed, canceled, or failed with errors |
| Status message | Information about the state of the notebook run |
Run pipeline
Starting in 4.5.2, you can add a pipeline to run a nested pipeline job as part of a containing pipeline. This is a way of adding reusable processes to multiple pipelines. You can use the output from a nested pipeline run as input for a node in the containing pipeline.
Input parameters
| Parameter | Description |
|---|---|
| Pipeline | Select or enter a path to an existing pipeline. |
| Job parameter | Optionally specify the name and type of a parameter used in the nested pipeline. Note: The parameters must match both name and type of the global parameter as defined in the nested pipeline or the job will not run. |
Output parameters
| Parameter | Description |
|---|---|
| Job | Path to the results from the pipeline job |
| Job run | Information about the job run |
| Job name | Name of the job |
| Execution status | Returns a value of: Completed, Completed with warnings, Completed with errors, Failed, or Canceled |
| Status message | Message associated with the status |
Notes for running nested pipeline jobs
If you create a pipeline with nested pipelines and run a pipeline job from the top-level, the pipelines are named and saved as project assets using this convention:
- The top-level pipeline job is named "Trial job - pipeline guid".
- All subsequent jobs are named "pipeline_ pipeline guid".
Parent topic: Creating a pipeline