Learn how to change the header names in a table by using the customization by
configuration technique. In this lesson, you modify a
buc-table-config.json file that defines table characteristics.
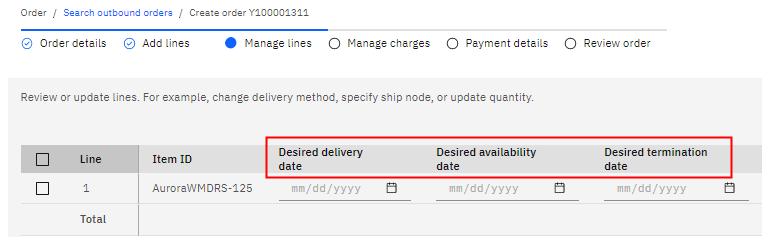
For this scenario, you want to modify the table on the
Manage lines page. In
the table, you want to change the header names
Requested delivery date,
Cancel date, and
Requested ship date to
Desired delivery date,
Desired termination date, and
Desired availability date.
Note: This approach is not limited to table
headers. It can be used to change any label that you can find in the translation JSON files. For
convenience, all label changes can be defined in a single custom JSON file.
Procedure
-
First, you need to find the schema in the buc-table-config.json file that
corresponds to the table that you need to modify.
-
Log in to Order Hub.
-
Open the browser's Console tab.
-
Go to the Manage lines page of the Create order
flow.
- If you are continuing in the same browser session as the previous lesson, add an item to the
order and then click Next.
- If you are starting a new session, go to Orders > Outbound. Click
Create order and go through the steps until you reach the Manage
lines page.
-
When you get to the Manage lines page, check the
Console for the last message that includes
BaseTableComponent.initializeTable.
You can see the schema name
create-orderline.
-
Open the file
buc-app-order/packages/create-order/src-custom/assets/buc-app-order/buc-table-config.json.
-
Under the create-orderline schema, find the table headers that you want
customize.
The following snippet displays the three headers that correspond to
Requested
delivery date,
Cancel date, and
Requested ship
date:
      {
          "id": "deliveryDate",
          "name": "SHARED.GENERAL.LABEL_reqDelDate",
          "sortable": true,
          "sortKey": "ReqDeliveryDate",
          "style": {
            "min-width": "12rem"
          }
      },
      {
          "id": "cancelDate",
          "name": "SHARED.GENERAL.LABEL_cancelDate",
          "sortable": true,
          "sortKey": "ReqCancelDate",
          "style": {
            "min-width": "12rem"
          }
      },
      {
          "id": "requestShipDate",
          "name": "SHARED.GENERAL.LABEL_REQUESTED_SHIPDATE",
          "sortable": true,
          "sortKey": "ReqShipDate",
          "style": {
            "min-width": "12rem"
          }
      }
The
name key defines the header string.
-
Now that you know the keys that are used for the header, open the
packages/create-order/src-custom/assets/custom/i18n/en.json file.
-
Add the following entry to the JSON file to use the custom strings Desired delivery
date, Desired termination date, and Desired
availability date.
This tutorial added the
CREATE_ORDER object in the JSON file earlier so
add this code after
CREATE_ORDER.
    "SHARED": {
        "GENERAL": {
          "LABEL_reqDelDate": "Desired delivery date",
          "LABEL_REQUESTED_SHIPDATE": "Desired availability date",
          "LABEL_cancelDate": "Desired termination date"
        }
    }
-
Reload the frame and go to the Manage lines page to verify the
changes.
You can now see the updated strings in the table.