

Note:
An alternate way to launch
the wizard to specify a new data source is to right-click in the Data
Sources white area of the window.
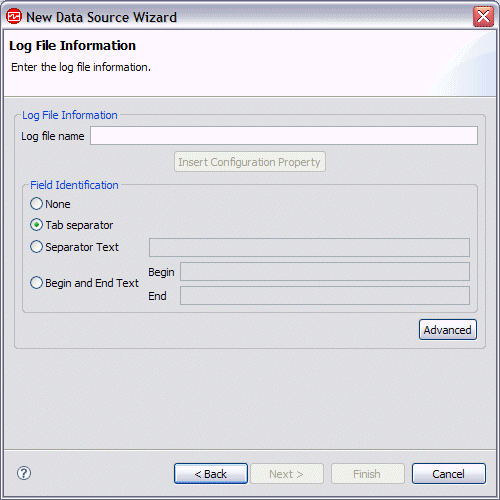
Note:
Unless you click Advanced and fill out the
information on that panel, the information that you fill out here assumes
the following:
- Only one log file is monitored at a time
- Each line of the log file contains all the fields necessary to fill the attributes that will be defined
- Monitor more than one file at a time, or monitor files with different names on different platforms
- Draw a set of fields from more than one line in the log file
- Produces output summary information. This summary produces an additional attribute group at each interval. For more information about this attribute group, see Log File Summary.

- To monitor more than one log file, click Add and type the name. Optionally, select platforms to monitor that particular log file. If more than one file is listed, a unique label must be entered for each file. The label can be displayed as an attribute to indicate which file generated the record. It must not contain spaces.
- Choose how the file is processed. Process all records when the file is sampled allows processing of all records in the entire file every time a situation runs against the data source or a sample is taken. The same records are reported every time unless they are removed from the file. With this selection, event data is not produced when new records are written to the file. A file must have at least two records to be processed correctly. Process new records appended to the file allows processing of new records appended to the file while the agent is running. An event record is produced for every record added to the file. If the file is replaced (the first record changes in any way), the entire file is processed and an event is produced for each record in the file.
- If you chose to process new records appended to the file, you can also choose how new records are detected. Detect new records when record count increases allows new records to be detected when the number of records in the file increases, whether or not the size of the file changes. This is useful when an entire log file is pre-allocated before any records are written to the file. Note that this can be selected for files that are not pre-allocated, but it is less efficient than monitoring the size of the file. Detect new records when the file size increases allows for the typical way for determining when a new entry has been appended to a file. There may be a brief delay recognizing that a monitored file has been replaced.
- If you chose to detect new records based on the size of the file, you can also choose how to process a file that exists when the monitoring agent starts. Ignore existing records disables event production for any record in the file at the time agent starts. Process ___ existing records from the file allows production of an event for a fixed number of records from the end of the file at the time the agent starts. Process records not previously processed by the agent allows for restart data to be maintained by the monitoring agent so the agent knows which records were processed the last time it ran. Events are produced for any records appended to the file since the last time the agent was running. Note that this involves a little extra overhead each time a record is added to the file.
- If you chose to process records not previously processed by the agent, you can choose what to do when the agent starts and it appears that the existing file has been replaced. Process all records if the file has been replaced allows for the production of events for all records in the file if the current information about the monitored file and the information stored in the restart data do not match. Examples of mismatches include: the file name or file creation time has changed, the file size has decreased, the file last modification time is earlier than it was. Do not process records if the file has been replaced disables processing of any existing records in the file if the current information about the monitored file and the information stored in the restart data do not match.
- Use the Record Identification section to treat multiple lines in the log file as a single logical record. Ending pattern enables you to identify a sequence of characters that indicate the end of a record. Rule allows you to identify a maximum number of lines that make up a record and optionally a sequence of characters that indicate the beginning or end of a record. With Rule, the character sequence must occur at a specific offset within a line. You can also specify the beginning or end of a record where a particular character sequence does not occur (the != selection).
- Summary produces one set of output attributes at each interval that summarizes the log file records that were written during that interval. The output consists of a fixed set of attributes that include the number of log entries and a time stamp. When Force Summary is checked, summary output is generated even if no new log entries were read; otherwise output is generated only when at least one log file entry was read.
- Click OK.