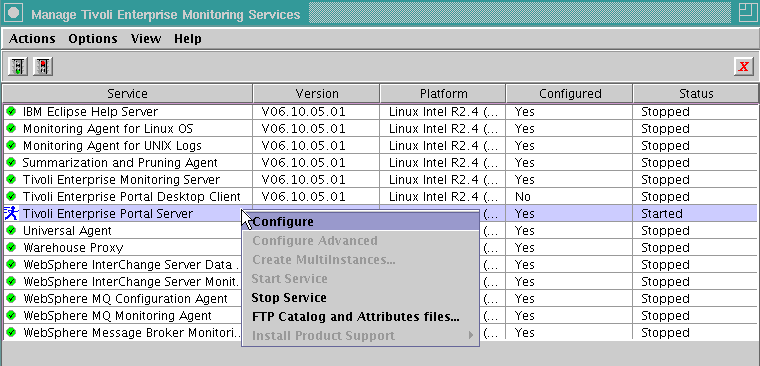
Tivoli OMEGAMON XE for Messaging, Version 7.0 Fix Pack 1

Configuring the Tivoli Enterprise Portal Server on a UNIX or Linux system

You have two options to configure the Tivoli® Enterprise Portal Server on a UNIX® or Linux® system:

Configuring the Tivoli Enterprise Portal Server using the GUI

Perform the following steps to configure the Tivoli Enterprise Portal Server using the GUI on a UNIX or Linux system:

  1. Navigate to the install_dir/bin directory, where install_dir is the directory where IBM® Tivoli Monitoring is installed. The default directory is /opt/IBM/ITM.
  2. Open the Manage Tivoli Enterprise Monitoring Services window by running the following command:
    ./itmcmd manage
    The Manage Tivoli Enterprise Monitoring Services window is displayed.
  3. On the Manage Tivoli Enterprise Monitoring Services window, select Tivoli Enterprise Portal Server, right-click it, and click Configure , as shown in Figure 8.
  4. On the Common Event Console Configuration window, click OK.
  5. The Configure Tivoli Enterprise Portal Server window is displayed, as shown in Figure 9. On the TEMS Connection tab, perform the following steps:
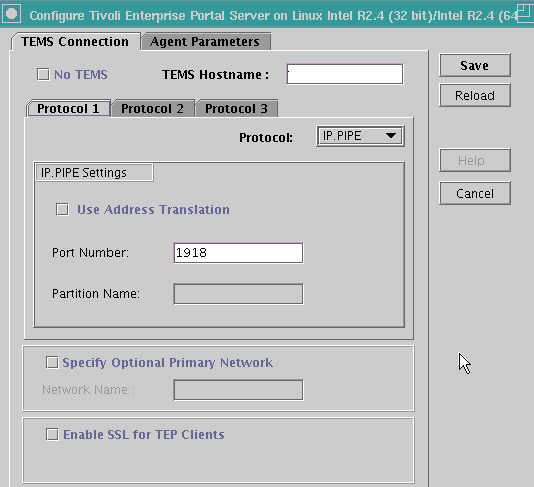
    1. In the TEMS Hostname field, enter the host name of the hub Tivoli Enterprise Monitoring Server.
    2. In the Protocol 1 tab, select the protocol that you want to use to communicate with the hub Tivoli Enterprise Monitoring Server. You have four choices: TCP/IP, SNA, IP.PIPE and IP.SPIPE. Depending on the protocol you select, provide the following information:
      Table 10. Tivoli Enterprise Monitoring Server protocols and values on UNIX or Linux systems
      Protocol Value Definition
      TCP/IP IP port number The port number of the Tivoli Enterprise Monitoring Server. The default value is 1918.
      SNA Net name The SNA network identifier for your location.
      LU name The LU name of the Tivoli Enterprise Monitoring Server. This LU name corresponds to the Local LU Alias in your SNA communications software.
      Log mode The name of the LU6.2 LOGMODE. The default value is CANCTDCS.
      IP.PIPE IP.PIPE port number The port number for the Tivoli Enterprise Monitoring Server. The default value is 1918.
      KDC Partition The KDC partition. The default value is null.
      IP.SPIPE IP.SPIPE port number The port number for the Tivoli Enterprise Monitoring Server. The default value is 3660.
    3. If you want to set up a backup protocol, select the protocol in the Protocol 2 tab. For information about how to fill in the fields, see Table 10. You can specify a second backup protocol in the Protocol 3 tab.
  6. The Agent Parameters tab is displayed, as shown in Figure 10. Perform the following steps:
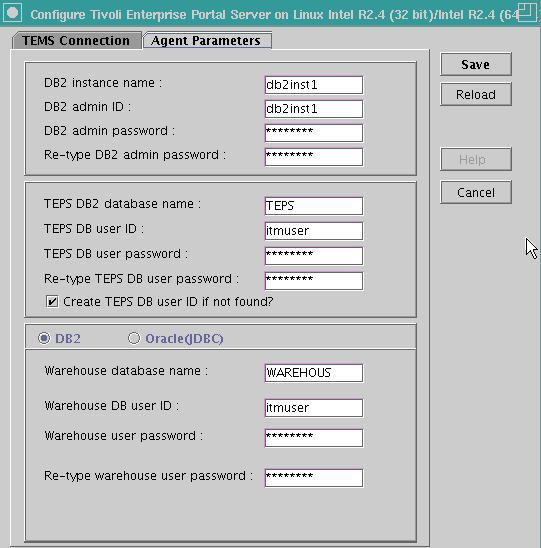
    1. Enter the DB2® instance name. The default value is db2inst1.
    2. Enter the DB2 administrator ID. The default value is db2inst1.
    3. Enter the password for the DB2 administrator ID.
    4. Confirm the password for the DB2 administrator ID by typing it again.
    5. Enter the name of the DB2 database for the Tivoli Enterprise Portal Server. The default value is TEPS.
    6. Enter the name of the database user ID that the Tivoli Enterprise Portal Server will use to access the database. The default value is itmuser.
    7. Enter the password for the database user.
    8. Confirm the password for the database user by entering it again.
    9. Select Create Tivoli Enterprise Portal Server DB user ID if not found.
    10. Select DB2 if you are using DB2 to warehouse data. Select Oracle(JDBC) if you are using Oracle to warehouse data.
    11. Enter the name of the database that the Tivoli Data Warehouse will use. The default value is WAREHOUS.
    12. Enter the name of the database user that the Tivoli Data Warehouse will use. The default value is itmuser.
    13. Enter the password for the Warehouse user ID.
    14. Confirm the password for the Warehouse user by typing it again.
    15. Click Save to save your changes.
  7. In the Manage Tivoli Enterprise Monitoring Services window, stop the Tivoli Enterprise Portal Server, if it is started, by right-clicking the Tivoli Enterprise Portal Server item and clicking Stop Service.
  8. In the Manage Tivoli Enterprise Monitoring Services window, Restart the Tivoli Enterprise Portal Server by right-clicking the Tivoli Enterprise Portal Server item and clicking Start Service.

Installation and configuration of application support on the Tivoli Enterprise Portal Server is now complete. Go to Installing application support at the Tivoli Enterprise Portal desktop client to continue with the installation process.

Configuring the Tivoli Enterprise Portal Server using the command line

Perform the following steps to configure the Tivoli Enterprise Portal Server on a UNIX or Linux system using the command line:

  1. Navigate to the install_dir/bin directory, where install_dir is the directory where IBM Tivoli Monitoring is installed. The default directory is /opt/IBM/ITM.
  2. Run the following command:
    ./itmcmd config -A cq
  3. When asked if you want to edit commen event console for IBM Tivoli Monitoring settings, enter 2 (no), and press Enter.
  4. Enter 1 (yes) when you are asked if the agent connects to a Tivoli Enterprise Monitoring Server.
  5. Enter the host name of the hub Tivoli Enterprise Monitoring Server, and press Enter.
  6. Enter the protocol that you want to use to communicate with your hub Tivoli Enterprise Monitoring Server. You have four choices: ip, sna, ip.pipe, or ip.spipe.
  7. If you want to set up a backup protocol, enter the name of the protocol and press Enter. If you do not want to use a backup protocol type 0, and press Enter.
  8. Depending on the protocols you specified, provide the information in Table 10 when prompted.
  9. Press Enter to accept the default value (none) for the Optional Primary Network Name.
  10. Press Enter to accept the default setting for SSL between the portal server and clients (N). By default, SSL is disabled. To enable SSL, type 1 (yes), and press Enter.
  11. Type the DB2 instance name. The default value is db2inst1. Press Enter.
  12. Type the DB2 administrator ID. The default value is db2inst1. Press Enter.
  13. Type the password for the DB2 administrator ID, and press Enter.
  14. Confirm the password for the DB2 administrator ID by typing it again. Press Enter.
  15. Type the name of the database used by the Tivoli Enterprise Portal Server. The default value is TEPS. Press Enter.
  16. Type the name of the database user that the Tivoli Enterprise Portal Server will use to access the database. The default value is itmuser. Press Enter.
  17. Type the password for the database user, and press Enter.
  18. Confirm the password for the database user by typing it again. Press Enter.
  19. You are asked if it is OK to create the DB2 login user if it does not exist. Type 1 (yes), and press Enter.
  20. You are asked whether you are using DB2 or Oracle (JDBC) for data warehousing. Enter the number corresponding to the database you want to use.
  21. Type the name of the database that the Tivoli Data Warehouse will use. The default value is WAREHOUS. If you select the DB2 database, this database must be cataloged locally if the warehouse database is on a remote computer. Press Enter.
    Remember:
    If you are using a remote node and database, you must manually configure (catalog) the remote node and the remote database from the Linux system DB2 command line. Run the following commands:
    db2 catalog tcpip node node_name remote host_name server port 
    db2 catalog db db_name as dbalias at node node_name
  22. Type the name of the database user ID that the Tivoli Data Warehouse will use. The default value is itmuser. Press Enter.
  23. Type the password for the Warehouse user ID, and press Enter.
  24. Confirm the password for the Warehouse user by typing it again. Press Enter.
  25. If you selected the Oracle database in step 20, enter the following information when prompted:
    1. JDBC driver class path
    2. JDBC driver name
    3. JDBC driver URL
    4. User-defined attributes
  26. You are asked whether you want to validate user with LDAP. Press Enter to accept the default value for the LDAP security.

Installation and configuration of application support on the Tivoli Enterprise Portal Server is now complete. Go to Installing application support at the Tivoli Enterprise Portal desktop client to continue with the installation process.


Feedback

[ Top of Page | Previous Page | Next Page | Contents ]