The following flow-based actions are available for IBM Rational Integration Tester tests:
- Action Group
- Assert
- Decision
- Pass
- Fail
- Run Test
- Sleep
- Fetch Test Data
- Lookup Test Data
- Iterate actions
Action Group
An Action Group combines multiple actions and treats them as a single test step. For example, you can use an action group to control how subscription-based operations are started and how they process their received messages. Messages in an Action Group are processed in parallel, as opposed to one after the other when used as normal steps in a test sequence.
A failure within an action group does not propagate to the Action Group container within the test tree. After you start the execution sequence for an Action Group, that sequence is independent of the execution of the containing test.
In the example that is shown below, an Action Group contains two subscribers on different subjects. When executed, the test starts both subscribers and validates their corresponding messages, regardless of the order in which they are received. The Action Group is considered complete after both messages are received.

In the following example, two subscribers have the same subject (that is, they both receive the first subject message simultaneously). This enables separate filters to be applied at the same time.

Assert
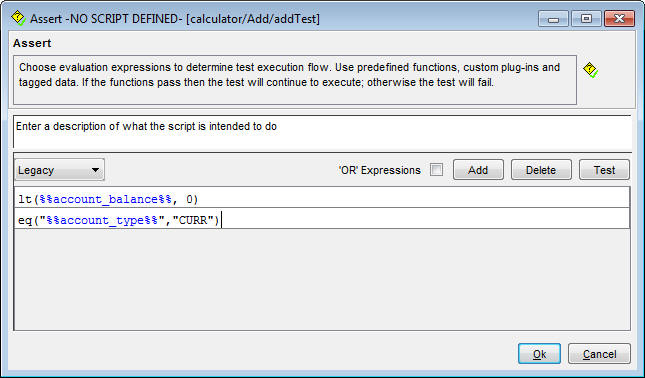
The Assert action is a conditional action that lets the user construct a list of expressions that determine whether a test proceeds. If the Assert action passes, the test continues. If the Assert action fails, the test fails and no further test actions are executed.
- ECMAScript (such as JavaScript)
- Legacy functions
- Other scripting languages (requires customization)
Expressions must evaluate to true or false. Any other result causes the test to fail with a console message that identifies the non-boolean result.
To enter an expression, click Add and type into the empty input field. To remove an expression, select it and click Delete. To test the expressions, click Test and enter temporary values for any tags shown.
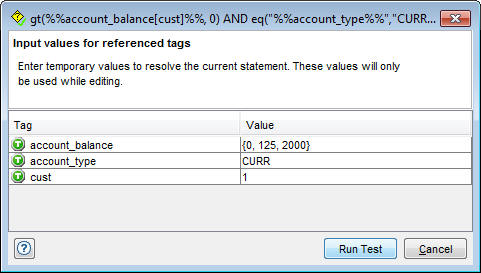
For more information about list tags, see Tags and repeating elements.
By default, multiple expressions are joined with a logical AND, meaning that all expressions must pass in order for the action to pass and for the test to proceed. To join expressions with a logical OR, enable the ‘OR’ Expressions option, which means that only one of the expressions needs to pass in order for the action to pass and for the test to proceed.
Decision
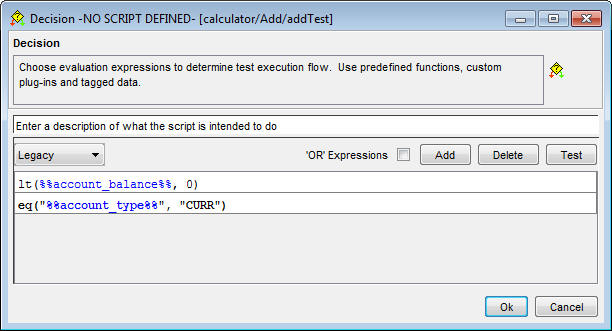
A Decision is a conditional action, the body of which is essentially a function and whose result controls test flow. A Decision can have one of two outcomes: true or false.

Any Rational Integration Tester function can be added as an expression from the Decision editor menu (for example, simple expressions by using XPath value comparison operators, such as equals, less than). Expression arguments can be tags or literals.
- ECMAScript (such as JavaScript)
- Legacy functions
- Other scripting languages (requires customization)
Expressions must evaluate to true or false. Any other result causes the test to fail with a console message that identifies the non-boolean result.
Multiple expressions are processed as being joined by a logical AND. To override (that is, join them with a logical OR), enable the ‘OR’ Expressions option.
To enter an expression, click Add and type it into the empty input field. To remove an expression, select it and click Delete. To test the expressions, click Test.
For more information about list tags, see Tags and repeating elements.
You can drag another action onto the branches of a Decision action. For example, you can drag a Log action onto the False branch to send a message to the console with information about the negative outcome of the Decision function.
Pass
When a Pass action is encountered during the execution of a test, the test is deemed to pass and execution jumps to the Tear-down step. This action is commonly used as one of the paths under a decision step to make a test pass its current iteration.
In the Pass action editor, you can set the location of the logging output file by typing the full path to the file, which can include tags, and then clicking Browse to locate the file, or by selecting an entry from a list of the most recently used files. If no output file is set, no logging occurs.
Once an output file is designated, two more file options can be enabled/disabled: Append and Flush.
- If Append is enabled, the test action adds new logging to the existing file contents. Otherwise, the existing contents are overwritten.
- If Flush is enabled, the test action writes the message to the file immediately. Otherwise, messages are buffered and written in batches (which can improve performance).
Fail
When a Fail action is encountered during the execution of a test, the test is deemed to fail and execution jumps to the Tear-down step. This action is commonly used as one of the paths under a Decision step to force a test to fail its current iteration.
In the Fail action editor, you can set the location of the logging output file by typing the file’s full path (which can include tags), clicking Browse to locate the file, or by selecting an entry from a list of the most recently used files. If no output file is set, no logging occurs.
Once an output file is designated, two more file options can be enabled/disabled: Append and Flush .
- If Append is enabled, the test action adds new logging to the existing file contents. Otherwise, the existing contents are overwritten.
- If Flush is enabled, the test action writes the message to the file immediately. Otherwise, messages are buffered and written in batches (which can improve performance).
Run Test
The Run Test action executes another test as a step (subtest) of the current test.
The following table describes the general options available for the action under the Config tab:
| Run Settings | |
| Test | Click Browse to select the test to execute. Click Clear to reset the field. |
| Run process in parallel | Enable this option to execute the selected test in parallel
with the parent test (that is, the test that contains this Run Test
action). Note: If this option is enabled,
the Store tab is unavailable.
|
| Parallel Settings (used with "Run process in parallel") | |
| Parent waits for child to complete | The parent test waits for the selected test to finish before it terminates. |
| Child exits when parent completes | The selected test is terminated as soon as the parent test is finished executing. |
| Child Subscriber Settings (controls message delivery when parent and child tests subscribe to the same message subjects) | |
| Default | Use independent subscribers in parallel and shared subscribers in series. |
| Shared | Separate message queues deliver messages to both processes. |
| Independent | Subscribers retrieve messages in turn from a single message queue. |
Within the Run Test action, the Value and Store pages are used to pass data between the parent and child tests.
- In the child test, create a set of tags that can be used as inputs, using the Tag Data Store or another method.
- On the Properties page of the child test, select All Tags in the Input section. Individual tags can also be selected using the other controls on this page. Either method makes the chosen tags visible to the parent test.
- In the parent test, open the Run Test step and click the Value tab.
- On the Value page you can now see all the input tags from the child test in the Unmapped list. Select all tags for which you want to provide a value and move them to the Mapped list. Any tag that is not mapped uses the default value provided in the Tag Data Store for the child test.
- Select each tag in the Mapped list in turn and provide a value for it in the Value field. This value can be a constant, or a tag used by the parent test.
- When the parent test runs, it passes the specified values to the child test.
- In the child test, create a set of tags that can be used as outputs, using the Tag Data Store or another method. The child test should provide values to these tags when it runs.
- On the Properties page of the child test, select All Tags in the Input section. Individual tags can also be selected using the other controls on this page. Either method makes the chosen tags visible to the parent test.
- In the parent test, create a set of tags to hold the output values, using the Tag Data Store or another method.
- In the parent test, open the Run Test step and click the Store tab.
- On the Value page, you can now see all the tags from the parent test in the Unmapped list. Select all tags for which you want to provide a value and move them to the Mapped list. Any tag that is not mapped will keep the same value that it had prior to the Run Test action.
- Select each tag in the Mapped list in turn and provide a value for it in the Value field. This value is typically a tag used by the child test.
- When the parent test runs, it reads the data provided by the child test and stores that data into the set of specified tags.
Input and output tags are optional. You can run the child test without passing any data between the two tests.
Sleep
A sleep action stops a test’s execution for a specified period, in milliseconds. You can specify a fixed time, a uniformly distributed random time, or a random time with Gaussian distribution. The time range for the Uniform and Gaussian delay is defined by the values that are used in the Minimum Delay and Maximum Delay fields).
A sleep action can be used to make a test wait to ensure that some previous processing is complete, or for simulating delays in adapter stubs.
Fetch Test Data
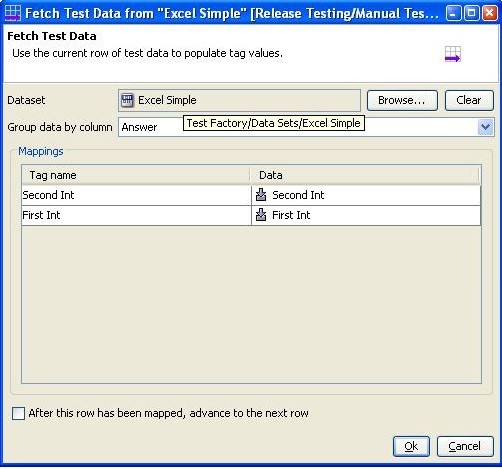
The Fetch Test Data action can be used to map data from a test data source to existing test tags.
Click Browse to locate and select the data source from the project resource dialog. The "Group data by column" list, which is sorted alphabetically, facilitates with working with test data sets containing repeating elements. The column that uniquely defines the rows that belong to the group (usually a parent ID) must be selected.
In the Mappings section, select the data source field to map for each of the wanted tags.
If you run the Fetch Test Data option in multiple iterations, select the After this row has been mapped, advance to the next row option to map the next row of data for each subsequent iteration. If you do not select this option, each iteration reads the same row of data over and over.
- A tag must already exist that exactly matches each new column name
- The column count property must not be set
- The Auto map new columns to tags at runtime check box must be selected (the default state) in the data source editor
Lookup Test Data
The Lookup Test Data action provides keyed access to a data set. For example, a stub might receive a request message and tag value for customerName. You can search the data set, keying off the customerName, and returning data that you can use to send a reply.
The action has two pages, where you can complete the following fields:
| Field | Description |
|---|---|
| Config page | |
| Test data set | The data set, previously configured in IBM Rational Integration Tester (see Test data sources), to use for looking up data. |
| Lookup values | The Column Key within the data set to use as the lookup key, and the Lookup Value to search for within the data set that is based on that key. The value is likely to be dynamic and come from a tag that is populated earlier in the test sequence. To use multiple columns, click Add Lookup. To remove a column, select it and click Remove Lookup. |
| Store page | |
| Output format | Select Store all matching rows into lists to write list tags instead of single values. See Tags and repeating elements. |
| Data field | The column value from a returned row in the data set to which the tag is mapped. For example, if %%customerName%% is found, then the values in the ADDRESS and PHONE columns of the same row are mapped to tags named %%Address%% and %%Phone%%. |
| Tag name | The name of an existing tag within the test. Alternatively,
you can click the pencil icon |
Like the Decision action, Lookup Test Data provides two execution paths. If a row is found in the data set, the Found branch is executed. Otherwise, the Not Found branch is executed. More actions can be added to the two paths to provide different success or failure results.
- A tag must already exist that exactly matches each new column name
- The column count property must not be set
- The Auto map new columns to tags at runtime check box must be selected (the default state) in the data source editor
- Right-click the warning message and click Add Data.
- The Automation failed window is displayed. Currently, no test data set types are implemented. Click Copy to Clipboard to copy the displayed data, then click OK.
- In the File Data Source window, next to the data source file name, click Open.
- The data source is opened. Paste the data from the clipboard into the data source, save the file, and rerun the test.

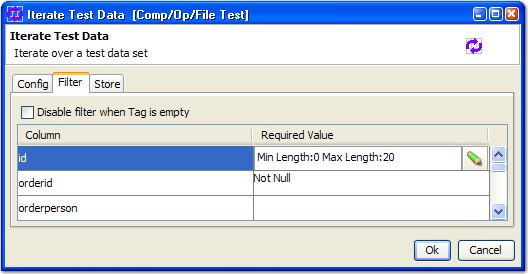
 icon, select the appropriate filter action, and enter the
matching criteria as needed.
icon, select the appropriate filter action, and enter the
matching criteria as needed.