Troubleshooting
Problem
If you are experiencing one of the symptoms listed below on an instances of WebSphere Application Server, this MustGather describes all possible ways of producing javacores and userdumps (core dumps) on Windows.
Symptom
Performance degradation, hang, no response, hung threads, CPU starvation, high CPU utilization, network delays, or deadlocks.
Resolving The Problem
Table of Contents
- Generating Javacores
- Wsadmin scripting
- Integrated Solutions Console (Admin Console)
- Manually generating javacores using Ctrl + Break
- Generating Core Dumps
- Additional Info - Configuring Full Core Dumps
| Generating Javacores |
- "generateHeapDump" to generate a heapdump (WebSphere Application Server 6.0.2 and later)
- "generateSystemDump" to generate a system core (WebSphere Application Server 7.0.0 and later)
Microsoft Windows does not allow direct signaling to other processes in the way UNIX and Linux does. There is no Windows-based equivalent to the UNIX "kill" command that can send a signal to a process which triggers a javacore. However, WebSphere Application Server and the operating system do have other ways to trigger dumps and javacores.
Any process dumps produced will need to be run against jextract.
"How to process an IBM SDK core dump with jextract"
http://www.IBM.com/support/docview.wss?uid=swg21577379
| Wsadmin scripting |
These steps also work on AIX and Linux in addition to Windows.
This method uses scripting commands invoked by the "wsadmin" utility. This has the advantage of being minimally invasive, and can be used without restarting the affected server.
1. Launch wsadmin from the bin directory of the application server profile (such as <WAS_HOME>\profiles\<PROFILE_NAME>\bin\wsadmin). Make sure you connect to the correct SOAP port for the application server or deployment manager.
2. Run the following commands:
JACL
set jvm [$AdminControl completeObjectName type=JVM,process=SERVER_NAME,*]
$AdminControl invoke $jvm dumpThreads
JYTHON
jvm = AdminControl.completeObjectName('type=JVM,process=SERVER_NAME,*')
AdminControl.invoke(jvm, 'dumpThreads')
SERVER_NAME is the name of the application server instance (like server1). Do not use the profile name.
Additionally, if you need to add more unique identifiers to locate the JVM, add "node=NODE_NAME," with the comma before the asterisk.
To produce additional javacores during the same session, execute the dumpThreads line again.
You can also produce heapdumps and system core dumps by replacing "dumpThreads" with:
JVM MBean (WebSphere Application Server 7.0 Information Center)
http://publib.boulder.ibm.com/infocenter/wasinfo/v7r0/index.jsp?topic=%2Fcom.ibm.websphere.javadoc.doc%2Fweb%2FmbeanDocs%2FJVM.html
Back to Top
| Integrated Solutions Console (Admin Console) |
This is good if you want to produce normal javacores during runtime, especially for hangs, performance, or high CPU issues.
Main article: Manually Generating Javacores, Heapdumps, and System Dumps through the Administrative Console
You can produce javacores (and heapdumps and coredumps) from the admin console by following the steps below, referenced in the Information Center article Collecting Java dumps and core files using the administrative console. This has the advantage of being minimally invasive.
1. Navigate to Troubleshooting > Java dumps and cores
2. Select the server(s) to collect dumps from
3. Click on Java Core, System Dump, or Heap Dump to produce the specified file.
Back to Top
| Manually generating javacores using Ctrl + Break |
This is the method recommended in situations where the server hangs shortly after startup. It is also recommended when other methods described above do not work, or when the system is under extremely heavy load.
This method uses an alternative method for starting an application server in a mode which accepts the Ctrl + Break keyboard combination to trigger a javacore. This method requires some preparation steps, and the affected server will need to be restarted. This method has the advantage that generating javacores does not require the additional overhead of using another tool (such as the administrative console or wsadmin tool).
1. Open the command prompt.
2. Navigate to "bin" subdirectory under the server's profile root (<WAS_HOME>\profiles\<PROFILE_NAME>\bin)
3. From the "bin" subdirectory, execute the one of the following commands. Choose the command from the list below based on the type of server that the javacore will be generated from.
Application Servers
startServer.bat SERVER_NAME -script
Nodeagents
startNode.bat -script
Deployment Managers (DMGR)
startManager.bat -script
This will generate a script named start_<SERVER_NAME>.bat in the current directory.
4. Stop the server that requires the javacore.
5. Using the new script, start the application server (or nodeagent or deployment manager).
start_server1.bat
6. While the server is running, from the same command prompt window, issue the keyboard combination Ctrl + Break. Output on the screen should immediately display that a javacore is being generated.
6a. Repeat step 6 as many times as required to collect javacores.
7. Note the location(s) of the javacores and collect them. They will usually be output to the current directory or the profile root.
The server can be stopped either by issuing a stopServer.bat command, or terminated immediately with a keyboard combination Ctrl + C.
Back to Top
| Generating System Cores |
The steps below require that full cores are enabled, either in Dr. Watson or the Windows registry (depending on your version of Windows). All raw dump files should be processed with jextract before sending to IBM Support.
To ensure full dumps are generated, see the Additional Info section.
| Task Manager |
NOTE: Since this procedure doesn't ensure that the JVM will stop all threads, there is a small possibility that the dumps will be missing data, such as thread stacks.
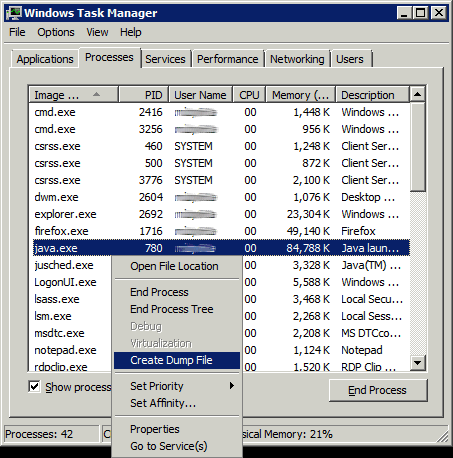 1. Open up the Windows Task Manager
2. Right-click on the process and select Create Dump File
3. Wait a moment while the dump is generated. A popup will be displayed with the location.
4. Rename this dump file with a unique identifier (timestamp, count number, etc) so if you take subsequent dumps, it will not be overwritten.
5. Process the core dump(s) with jextract.

Back to Top
| Userdump.exe |
This produces a core dump without stopping the process.
The Userdump.exe tool can be used to generate a user.dmp file of a process that stops responding (hangs). In most cases, this tool will not kill the Java™ Virtual Machine (JVM) and will allow for multiple user.dmp files to be taken during the time of the problem.
- Obtaining the Tool
Download the Userdump Tool.
Extract the files to a directory of your choosing. There is no requirement to install or run setup, the Userdump.exe tool can be used directly from the archive.
Alternatively, to install the Userdump tool, run the Setup.exe program that is included with the Userdump tool from the userdump folder. The executable can then be applied to your %PATH% variable.
Executing
Run this command from the command prompt. This assumes you have set up your %PATH% variable to point to the userdump.exe executable.
userdump.exe PID
Where PID is the process ID
This produces a file named java.dmp in the current directory. Rename java.dmp file with a unique name (like java1.dmp, java2.dmp, etc...) if you are instructed to gather multiple dumps.
Each dump needs to be processed by jextract.
Back to Top
| Process Explorer |
This produces a core dump without stopping the process.
Newer versions of Process Explorer, a tool from Microsoft, allows you to produce core dumps by simply right-clicking on any process.
1. Download Process Explorer and execute it.
2. Locate the java.exe process and right-click it.
3. Select Create Dump > Create Full Dump...
4. A file dialog box will appear. Give the dump a unique name (like java1.dmp, java2.dmp, etc.) and click on Save.
A dump will be generated in the location you chose.
Remember to process the dump file with jextract.
Back to Top
| Dr. Watson |
NOTE: This will terminate the process, use as a last resort.
Drwtsn32 can be used to force a user.dmp file. The location of the dump is controlled by the GUI panel in drwtsn32.exe. The default location is
C:\Documents and Settings\All Users\Application Data\Microsoft\Dr Watson
To produce the dump and kill the process, issue the following from a command prompt:
drwtsn32 -p PID
Where PID is the process ID of the executable java.exe.
Remember to process the dump file with jextract.
Back to Top
| Additional Info - Configuring Full Core Dumps |
Configure Full Core Dumps using the Windows Registry
(Windows Vista / Windows 2008 / Windows 7 / Windows 2008 R2 / Windows 8 / Windows Server 2012)
1. Backup the Windows registry by following the steps in How to back up and restore the registry in Windows.
2. Edit the Windows registry and create the following key:
HKEY_LOCAL_MACHINE\SOFTWARE\Microsoft\Windows\Windows Error Reporting\LocalDumps\java.exe
3. Create a new DWORD and name it DumpType.
Set the value to 2.
Alternatively, you can run the setdumptype.reg script on the server to do these steps automatically.
The dump file named as core.*.dmp should be generated in the profile_root folder or in the %LOCALAPPDATA%\CrashDumps folder.
For technical information concerning these registry settings, see this Microsoft Dev Center article.
Back to Top
Configure Dr Watson for Full Core Dumps
(Windows XP/2003)
- On the Start menu, click Run.
- Enter drwtsn32, and then click OK. This will display the Dr Watson window.
- Type the location to where you want the Dr Watson log to be stored in the field provided for Log File Path.
- Type the location and the file name where you want the user.dmp file to be stored in the field provided for Crash Dump.
- Make sure that the following options are checked in Dr Watson screen:
- Dump Symbol Table
- Dump All Thread Contexts
- Create Crash Dump file
- For Windows® 2003 /XP, Crash Dump Type option needs to be set to Windows NT® 4 compatible Full
- Click OK.
- Click Start > Run.
Enter drwtsn32 -i and click OK.
This will enable Dr. Watson to become the default debugger, and it will generate the Drwtson32.log and user.dmp files when an application crashes.
Back to Top
Follow instructions to send diagnostic information to IBM support.
For a listing of all technotes, downloads, and educational materials specific to a hang or performance degradation, search the WebSphere Application Server support site.
Related Information
[{"Product":{"code":"SSEQTP","label":"WebSphere Application Server"},"Business Unit":{"code":"BU053","label":"Cloud & Data Platform"},"Component":"Hangs\/Performance Degradation","Platform":[{"code":"PF033","label":"Windows"}],"Version":"9.0;8.5;8.0;7.0;6.1;6.0","Edition":"Base;Express;Network Deployment","Line of Business":{"code":"LOB36","label":"IBM Automation"}},{"Product":{"code":"SS7JFU","label":"WebSphere Application Server - Express"},"Business Unit":{"code":"BU053","label":"Cloud & Data Platform"},"Component":"Hangs\/performance degradation","Platform":[{"code":"PF033","label":"Windows"}],"Version":"7.0;6.1;6.0;5.1","Edition":"","Line of Business":{"code":"LOB45","label":"Automation"}},{"Product":{"code":"SSNVBF","label":"Runtimes for Java Technology"},"Business Unit":{"code":"BU059","label":"IBM Software w\/o TPS"},"Component":"Java SDK","Platform":[{"code":"","label":""}],"Version":"","Edition":"","Line of Business":{"code":"LOB36","label":"IBM Automation"}}]
Was this topic helpful?
Document Information
Modified date:
15 June 2018
UID
swg21138203