Troubleshooting
Problem
This document provides an example of how to use the mail merge function in Microsoft® Word with the IBM i ODBC driver to produce customized letters that use data from IBM i.
Resolving The Problem
This document is provided as an example by using Microsoft Word 2002 SP3. It is possible that this interface in Microsoft Word might change or look different in other versions of Word. The mail merge function in Word is a Microsoft Office feature; IBM has no control over this interface. This information is provided as a reference for IBM i users for informational purposes only.
The first step is to create an ODBC data source by using the IBM i Access Client Solutions ODBC driver. Open the ODBC Administrator using the icon in the IBM i Access Client Solutions program folder or the one in the Windows control panel. Create a system or user DSN by clicking one of those tabs, then clicking 'Add...' and selecting either the 'Client Access ODBC Driver (32-bit)', 'iSeries Access ODBC Driver', or 'IBM i Access ODBC Driver'. In the data source setup window a typical configuration would be:
The first step is to create an ODBC data source by using the IBM i Access Client Solutions ODBC driver. Open the ODBC Administrator using the icon in the IBM i Access Client Solutions program folder or the one in the Windows control panel. Create a system or user DSN by clicking one of those tabs, then clicking 'Add...' and selecting either the 'Client Access ODBC Driver (32-bit)', 'iSeries Access ODBC Driver', or 'IBM i Access ODBC Driver'. In the data source setup window a typical configuration would be:
- On the General tab, provide a data source name and select the system to which you will connect.
- On the Server tab, specify the library in which your data resides as the SQL default library. (Due to a functional limitation in the version of the mail merge feature I used, your table, view, or alias must reside in the SQL default library or you get errors.)
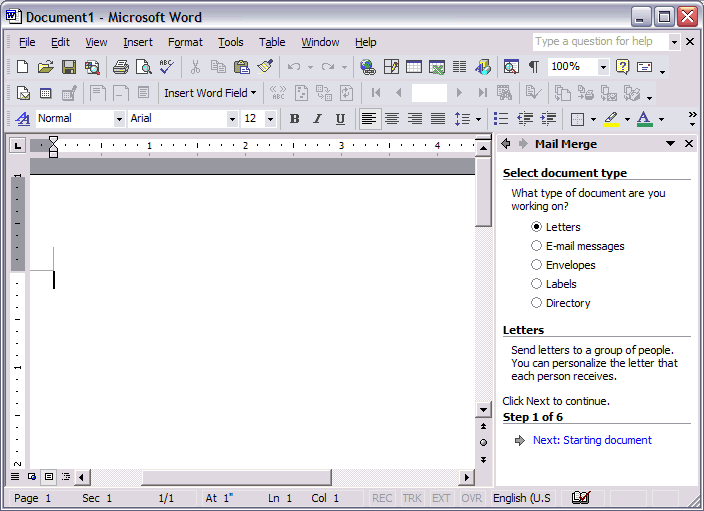
In Microsoft Word, create a document, specify a source for the mail merge data, and write the document and insert merge fields into the document as placeholders for the data that comes from the mail merge source. Finally, you can view the letter with the retrieved, or merged, data then print or save the document. Start by making sure that you have the Mail Merge toolbar visible. There are two ways to do this. You can right-click any blank space in any of Word's toolbars and click "Mail Merge" on the pop-up menu, or you can click the View menu, select "Toolbars" and "Mail Merge". If you do not already have a document open in Word, create a new document. Click the Tools menu and select "Letters and Mailings" and "Mail Merge Wizard..." This opens the Mail Merge wizard in the task pane (see Fig. 1):
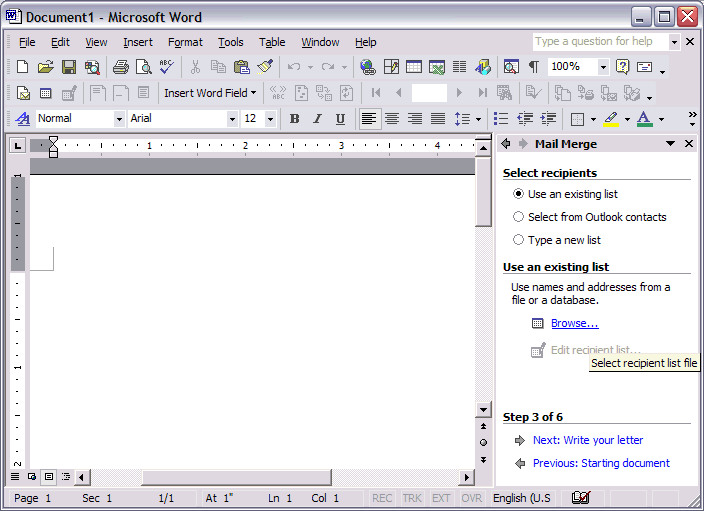
In the Mail Merge Wizard, select the document type and the starting document. The third step in the wizard has options to Select recipients, under the option "Use an existing list" select the "Browse..." link (Fig. 2):
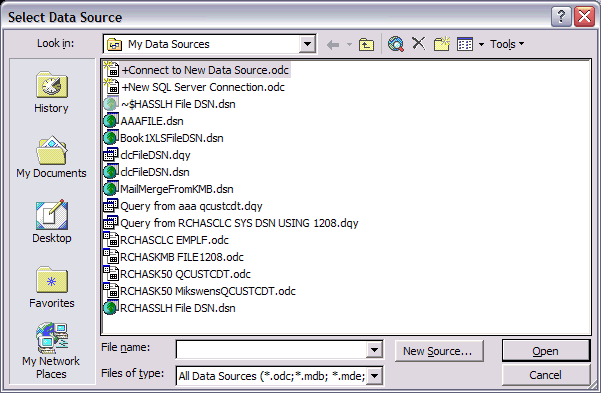
This opens a window that defaults to the location for the file data sources. Do not select one of these data sources; instead, click "New Source..." (Fig. 3):
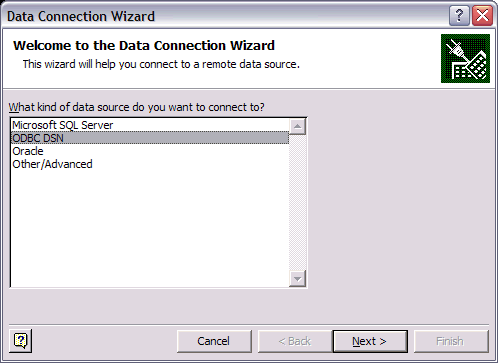
The Data Connection Wizard opens when you click "New Source..."; select ODBC DSN and click "Next >" (Fig. 4):
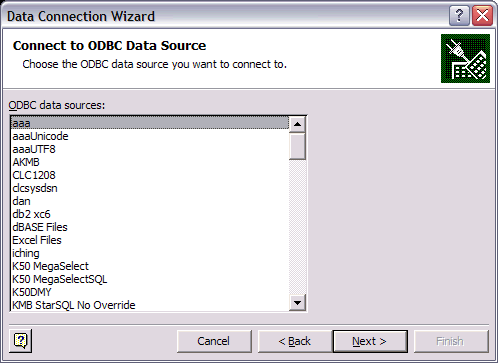
Select the data source you created for the mail merge and click "Next >" (Fig. 5):
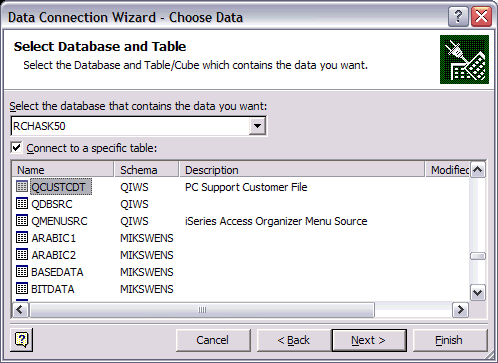
Next, the wizard presents you with a list of tables from your default library. It might include tables from other libraries depending on your user profile and data source settings. In the example shown in Fig. 6, you see that the list includes tables from the QIWS library and the MIKSWENS library. QIWS is the default library for this data source and I am limited by the functionality of the mail merge software to selecting only tables in that default library. If I select a table from another library, I get errors because Word ran a query without specifying the library so the table is not found. Scroll through the list until you find the table you want to pull your data from, select it, and click "Next >"(Fig. 6). Note you can select only one table; if you need to perform a join, you must create and then select a join view. Scroll through the list of tables and select one from your default library.
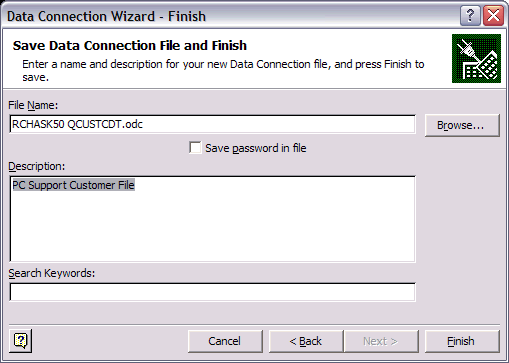
You are now at the last step of the Data Connection Wizard. It prompts you to select a file name for this data source; use the one it provides or modify it, then click "Finish" (Fig. 7):
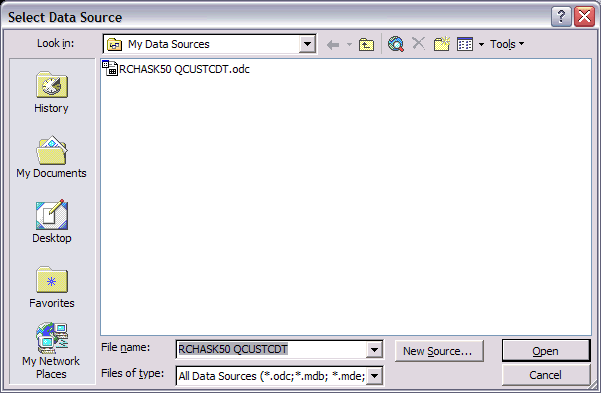
Next, the Mail Merge prompts you to select a data source. Select the file you just created and click "Open" (Fig. 8):
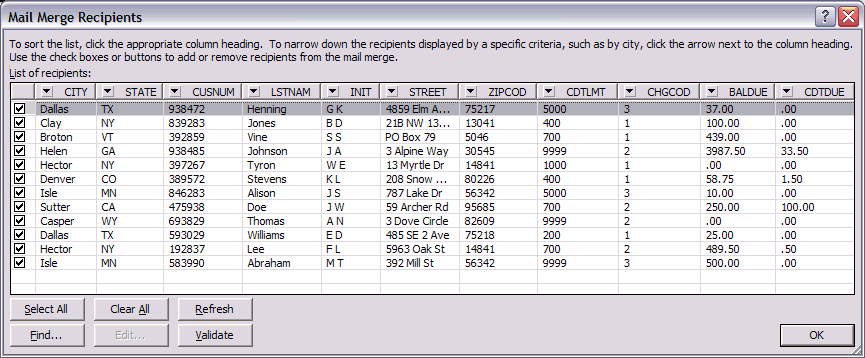
The Mail Merge Recipients window displays all of the columns and rows of your table. It offers limited ability to filter and sort the data (Fig. 9):
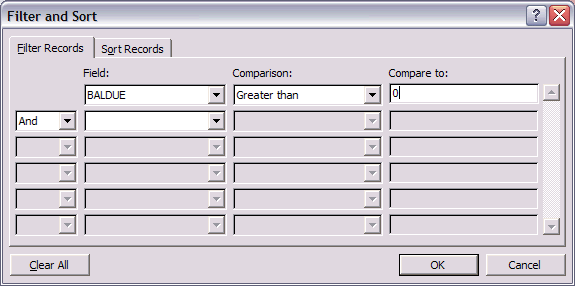
Open the "Filter and Sort" window by clicking the arrow in the column name and selecting "(Advanced)". The Filter and Sort window (Fig. 10) gives you a graphical way to provide selection criteria for your data. For example, I want to send letters only to people who have an outstanding account balance, so I add the filter criteria that BALDUE is greater than 0.
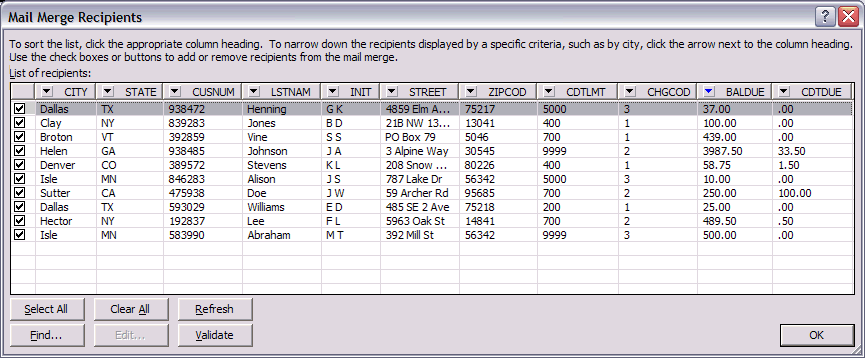
After clicking "OK" in the filter, the "Mail Merge Recipients" window is displayed with the updated records (Fig. 11). Note the difference between Fig. 9 and Fig. 11; the records in Fig. 9 with BALDUE of 0 are no longer in the list in Fig. 11.
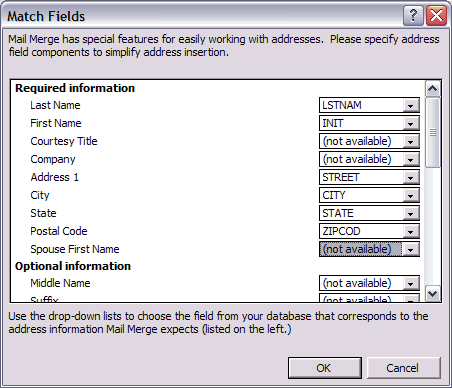
When you are done selecting the Filter and Sort criteria, click "OK" in the "Mail Merge Recipients" window, and it brings you back to your Word document where you can move to the next step; writing your document. While writing your document you can add fields from the "Mail Merge" toolbar. One of the options it offers is an address block that you can fill using data from table. I selected the address block and clicked "Match Fields' to match up the fields from my table with the appropriate part of the address block (Fig. 12):
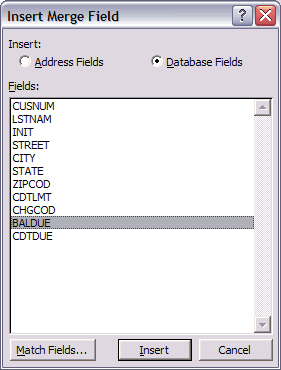
In the body of your document, you can insert merge fields at any time by clicking "Insert Merge Fields" on the "Mail Merge" toolbar. When you click that button, it opens a window (Fig. 13) for you to select one or more fields to insert at that spot in the document.
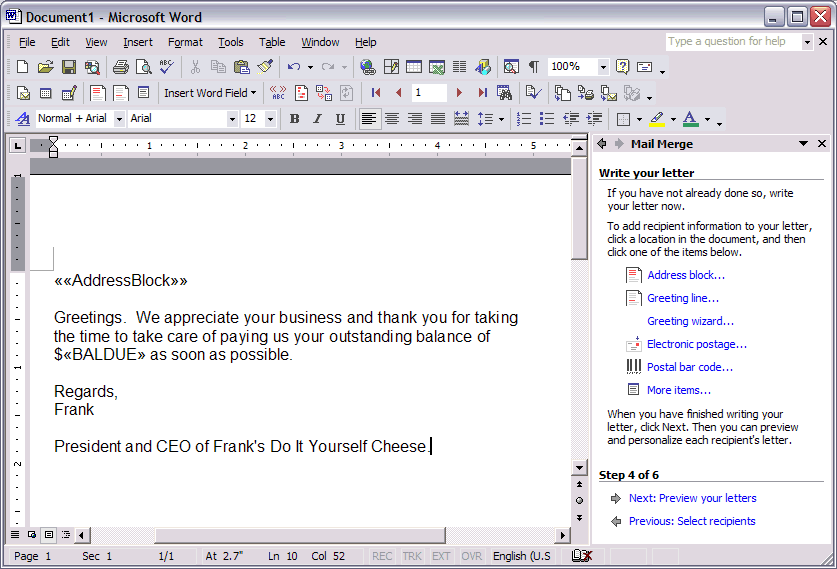
As you type your document, the merge fields are represented by placeholders like <<BALDUE>> in the example in Fig. 14:
You can select the next step in the wizard "Next: Preview your letters" and it replaces the placeholders and blocks with data from your table. There are buttons in the wizard and on the "Mail Merge" toolbar to select the first, previous, next, or last record in the table. In the example shown in Fig. 15, you see how it took the data from the first record (Fig. 11) and placed it into the document.

The last step of the mail merge is to complete the merge, which either prints the documents or allows you to edit each individual letter.
While this interface does not provide the user with the ability to create a custom SQL statement, that can be done on the server side. You can create a view over your files that modify or joins the data together as you need, then select that view in the mail merge function. As an example using the same file above, I might want to display zero balances in the format "$0.00" which is difficult given this interface; however, I can create a view that adds the dollar sign and, in the case of a zero balance, provides a leading zero (the default is $.00, which just does not look as good to me.) I create a view with the following SQL statement:
In the mail merge, I can select this view and use it to create reports that have the balance due printed as I would prefer to see it.

In the Mail Merge Wizard, select the document type and the starting document. The third step in the wizard has options to Select recipients, under the option "Use an existing list" select the "Browse..." link (Fig. 2):

This opens a window that defaults to the location for the file data sources. Do not select one of these data sources; instead, click "New Source..." (Fig. 3):

The Data Connection Wizard opens when you click "New Source..."; select ODBC DSN and click "Next >" (Fig. 4):

Select the data source you created for the mail merge and click "Next >" (Fig. 5):

Next, the wizard presents you with a list of tables from your default library. It might include tables from other libraries depending on your user profile and data source settings. In the example shown in Fig. 6, you see that the list includes tables from the QIWS library and the MIKSWENS library. QIWS is the default library for this data source and I am limited by the functionality of the mail merge software to selecting only tables in that default library. If I select a table from another library, I get errors because Word ran a query without specifying the library so the table is not found. Scroll through the list until you find the table you want to pull your data from, select it, and click "Next >"(Fig. 6). Note you can select only one table; if you need to perform a join, you must create and then select a join view. Scroll through the list of tables and select one from your default library.

You are now at the last step of the Data Connection Wizard. It prompts you to select a file name for this data source; use the one it provides or modify it, then click "Finish" (Fig. 7):

Next, the Mail Merge prompts you to select a data source. Select the file you just created and click "Open" (Fig. 8):

The Mail Merge Recipients window displays all of the columns and rows of your table. It offers limited ability to filter and sort the data (Fig. 9):

Open the "Filter and Sort" window by clicking the arrow in the column name and selecting "(Advanced)". The Filter and Sort window (Fig. 10) gives you a graphical way to provide selection criteria for your data. For example, I want to send letters only to people who have an outstanding account balance, so I add the filter criteria that BALDUE is greater than 0.

After clicking "OK" in the filter, the "Mail Merge Recipients" window is displayed with the updated records (Fig. 11). Note the difference between Fig. 9 and Fig. 11; the records in Fig. 9 with BALDUE of 0 are no longer in the list in Fig. 11.

When you are done selecting the Filter and Sort criteria, click "OK" in the "Mail Merge Recipients" window, and it brings you back to your Word document where you can move to the next step; writing your document. While writing your document you can add fields from the "Mail Merge" toolbar. One of the options it offers is an address block that you can fill using data from table. I selected the address block and clicked "Match Fields' to match up the fields from my table with the appropriate part of the address block (Fig. 12):

In the body of your document, you can insert merge fields at any time by clicking "Insert Merge Fields" on the "Mail Merge" toolbar. When you click that button, it opens a window (Fig. 13) for you to select one or more fields to insert at that spot in the document.

As you type your document, the merge fields are represented by placeholders like <<BALDUE>> in the example in Fig. 14:

You can select the next step in the wizard "Next: Preview your letters" and it replaces the placeholders and blocks with data from your table. There are buttons in the wizard and on the "Mail Merge" toolbar to select the first, previous, next, or last record in the table. In the example shown in Fig. 15, you see how it took the data from the first record (Fig. 11) and placed it into the document.

The last step of the mail merge is to complete the merge, which either prints the documents or allows you to edit each individual letter.
While this interface does not provide the user with the ability to create a custom SQL statement, that can be done on the server side. You can create a view over your files that modify or joins the data together as you need, then select that view in the mail merge function. As an example using the same file above, I might want to display zero balances in the format "$0.00" which is difficult given this interface; however, I can create a view that adds the dollar sign and, in the case of a zero balance, provides a leading zero (the default is $.00, which just does not look as good to me.) I create a view with the following SQL statement:
CREATE VIEW QIWS.CUSTVIEW2 AS
    SELECT LSTNAM, INIT, CITY, STREET, STATE, ZIPCOD,
      CASE WHEN BALDUE > 0 THEN '$' || BALDUE ELSE
      '$0.00' END AS BALDUE FROM QIWS.QCUSTCDT
In the mail merge, I can select this view and use it to create reports that have the balance due printed as I would prefer to see it.
[{"Business Unit":{"code":"BU070","label":"IBM Infrastructure"},"Product":{"code":"SWG60","label":"IBM i"},"Component":"Data Access","Platform":[{"code":"PF012","label":"IBM i"}],"Version":"All versions","Edition":"","Line of Business":{"code":"LOB68","label":"Power HW"}},{"Business Unit":{"code":"BU070","label":"IBM Infrastructure"},"Product":{"code":"SSRQKY","label":"IBM i Access Client Solutions"},"Component":"Windows Application Package","Platform":[],"Version":"All Versions","Edition":"","Line of Business":{"code":"LOB66","label":"Technology Lifecycle Services"}}]
Historical Number
486202449
Was this topic helpful?
Document Information
Modified date:
01 January 2020
UID
nas8N1013698